background image

10

DO986BFK

NL

13. 

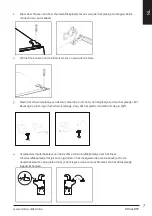
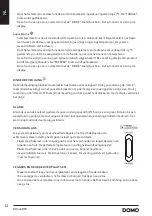
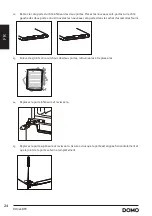
Verwijder de rubberen dichtingen van beide deuren, keer ze om, en plaats deze terug.

,QVWDOODWLRQ

13.Detach the Fridge and the Freezer door gaskets and then attach them after rotating.

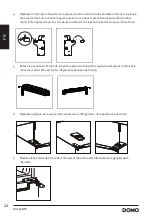
11.Refit the bracket fitting the bottom hinge pin. Replace both adjustable


feet.

12.Remove aid-closers from bottom of upper and lower doors, then take new aid-closers from 

accessary bag and install them to left side.

11

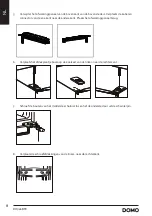
14.  Plaats de onderste deur terug en schroef deze weer vast.

,QVWDOODWLRQ

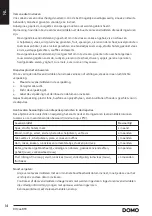
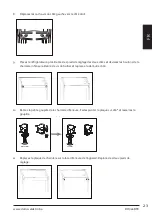
15.Replace upper door, please ensure the door align with the cabinet to make sure door gasket seal 

the cabinet tightly. Then connect door with cabinet by tightly fixed top hinge.

16.Connect harnesses from door and cabinet. Then replace top hinge cover. Before screw the cover, 

connect terminals of door switch.

14

12

15. 

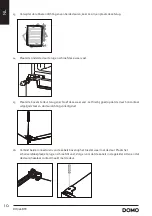
Plaats de bovenste deur terug en schroef deze weer vast. Let hierbij goed op dat de deur horizontaal 
uitgelijnd staat en de deurdichting volledig sluit.

,QVWDOODWLRQ

15.Replace upper door, please ensure the door align with the cabinet to make sure door gasket seal 

the cabinet tightly. Then connect door with cabinet by tightly fixed top hinge.

16.Connect harnesses from door and cabinet. Then replace top hinge cover. Before screw the cover, 

connect terminals of door switch.

14

12

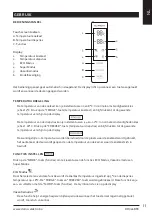
16.  Verbind beide connectoren van de kabels bovenop het toestel weer met de deur. Plaats het 

scharnierafdekplaatje terug en schroef dit vast. Zorg ervoor dat de kabels in de geleider zitten en dat 

de deurschakelaar contact maakt met de deur.

,QVWDOODWLRQ

15.Replace upper door, please ensure the door align with the cabinet to make sure door gasket seal 

the cabinet tightly. Then connect door with cabinet by tightly fixed top hinge.

16.Connect harnesses from door and cabinet. Then replace top hinge cover. Before screw the cover, 

connect terminals of door switch.

14

12

Summary of Contents for DOMO DO986BFK

Page 1: ...ateur avec congélateur Gebrauchsanleitung Kühlschrank und Gefrierschrank Instruction booklet Refrigerator and freezer Manual de instrucciones Frigo congelatore Istruzioni per l uso Frigorífico congelador Návod k použití Kombinovaná lednice Návod na použitie Kombinovaná chladnička ...

Page 2: ...manual for future reference Lea detenidamente todas las instrucciones Conserve este manual para futura referencia Leggere con attenzione le istruzioni conservarle per future consultazioni Před použitím si důkladně přečtěte tento manuál manuál si uschovejte i pro případ budoucího nahlédnutí Pred použitím si dôkladne prečítajte tento manuál manuál si uschovajte aj pre prípad budúceho nahliadnutie NL...

Page 3: ...in de winkel waar je het toestel hebt aangekocht De garantie op accessoires en onderdelen die onderhevig zijn aan slijtage bedraagt 6 maanden De garantie en verantwoordelijkheid aansprakelijkheid van de leverancier en fabrikant vervallen automatisch in de volgende gevallen Bij het niet naleven van de instructies in deze handleiding Bij verkeerde aansluiting vb te hoge elektrische spanning Bij verk...

Page 4: ...j de stekker zelf uit het stopcontact Trek nooit aan het snoer om de stekker uit het stopcontact te trekken Zet dit toestel nooit op of in de buurt van een gasvuur of elektrisch vuur of op een plaats waar het in contact zou kunnen komen met een warm toestel Gebruik het toestel niet buiten Gebruik het toestel enkel voor het doel waarvoor het bestemd is Gebruik het toestel altijd op een stevig droog...

Page 5: ...ls het apparaat gedurende lange tijd leeg blijft dien je het uit te schakelen te ontdooien en te reinigen Laat het drogen en laat de deur open om te voorkomen dat er schimmel in het apparaat ontstaat WAARSCHUWING Zet dit toestel nooit op of in de buurt van een gasvuur of elektrisch vuur of op een plaats waar het in contact zou kunnen komen met een warmtebron Aan de achterkant van het apparaat bevi...

Page 6: ...temperatuur tussen 16 C en 38 C In een ruimte met een lagere of hogere temperatuur zal het apparaat niet juist werken Het toestel mag alleen binnen gebruikt worden De diepvriezer maakt geluid wanneer de compressor het koelmiddel rondpompt Dit is normaal DRAAIRICHTING VAN DEUR WIJZIGEN Als je de scharnieren van de deur naar de andere kant wilt brengen is het aanbevolen om contact op te nemen met ee...

Page 7: ...laatje Zorg dat het plastic rondsel rond de pin blijft Left Aid Closer on Upper Door x 1 Left Aid Closer on Lower Door x 1 nscrew top hinge cover and disconnect connectors of door switch and harness 2 Unscrew top hinge 3 Remove the pin with a screwdriver and filp the hinge bracket Then refit the pin to hinge bracket unscrew screw 8 4 Verplaats de deurschakelaar van het rechtse scharnierafdekplaatj...

Page 8: ...elkast van de linker naar de rechterkant 5 Detach cover in top of upper door and move harness from right side to left side then replace the cover 6 Move top left cover to right side 7 9 7 Schroef de bouten van het middelste scharnier los en hef de onderste deur uit de scharnierpin 5 Detach cover in top of upper door and move harness from right side to left side then replace the cover 6 Move top le...

Page 9: ... terug op de onderkant van het toestel Plaats beide stelvoetjes terug QVWDOODWLRQ 13 Detach the Fridge and the Freezer door gaskets and then attach them after rotating 11 Refit the bracket fitting the bottom hinge pin Replace both adjustable feet 12 Remove aid closers from bottom of upper and lower doors then take new aid closers from accessary bag and install them to left side 12 Verwijder de deu...

Page 10: ...dichting volledig sluit QVWDOODWLRQ 15 Replace upper door please ensure the door align with the cabinet to make sure door gasket seal the cabinet tightly Then connect door with cabinet by tightly fixed top hinge 16 Connect harnesses from door and cabinet Then replace top hinge cover Before screw the cover connect terminals of door switch 14 16 Verbind beide connectoren van de kabels bovenop het to...

Page 11: ...de FREEZER toets temperatuur diepvries en blijf drukken tot de gewenste temperatuur verschijnt op de display 8VHU LQWHUIDFH BUTTON 3 4 5 6 De werkingstijd en temperatuur worden beïnvloed door de plaats waar de koelkast wordt gebruikt het aantal keer de deur wordt geopend en de temperatuur van de kamer waar de koelkast zich in bevindt FUNCTIES INSTELLEN DFH 3 4 5 6 Druk op de MODE toets functies om...

Page 12: ...aats de schakelaar in de chiller positie voor verse beperkt houdbare levensmiddelen zoals vis De temperatuur is koeler De voeding wordt vers gehouden maar niet bevroren LEGGERS EN DEURREK VERPLAATSEN Maak de koelkast leeg voor het verplaatsen van de leggers of de deurrekken Om een legger te verplaatsen hef je deze omhoog en trek deze naar je toe Om een deurrek te verplaatsen neem deze vast met 2 h...

Page 13: ...an een lek dat werd veroorzaakt door schade aan de koelelementen haal de koelkast weg van open vlammen of warmtebronnen en verlucht de kamer waar het apparaat zich in bevindt gedurende enkele minuten LEVENSMIDDELEN IN DE KOELKAST BEWAREN De koelkast zorgt voor een langere bewaartijd van verse beperkt houdbare levensmiddelen Bewaren van vers voedsel voor het beste resultaat Bewaar alleen zeer verse...

Page 14: ...de levensmiddelen in de verpakking 2 Verwijder alle lucht 3 Dicht de verpakking af 4 Label de verpakking met de inhoud en datum van invriezen Gepaste verpakking plastic folie buisfolie van polyethyleen aluminiumfolie of houders geschikt voor in de diepvries Aanbevolen bewaartijden van diepvriesproducten in de diepvries Deze tijden kunnen verschillen naargelang het soort voedsel De ingevroren leven...

Page 15: ...g steek de stekker in het stopcontact en stel de temperatuurregelaar op de gewenste positie in Plaats de levensmiddelen opnieuw in het apparaat PROBLEEM EN OPLOSSING Probleem Mogelijke oorzaak Oplossing Het toestel werkt niet De stekker steekt niet volledig in het stopcontact De zekering is gesprongen Het stopcontact is defect Steek de stekker in het stopcontact Controleer de zekeringen Contacteer...

Page 16: ...duct op de correcte manier wordt verwijderd voorkom je mogelijk voor mens en milieu negatieve gevolgen die zich zouden kunnen voordoen in geval van verkeerde afvalbehandeling Voor meer details in verband met het recycleren van dit product neem je best contact op met de gemeentelijke instanties het bedrijf of de dienst belast met de verwijdering van huishoudafval of de winkel waar je het product he...

Page 17: ...ffisant ou non conforme Réparation ou modification de l appareil par le consommateur ou un tiers non autorisé Utilisation d éléments ou d accessoires qui ne sont pas recommandés ou fournis par le fournisseur fabricant CONSIGNES DE SÉCURITÉ Les consignes de sécurité suivantes doivent être respectées lors de l utilisation de tout appareil électrique Lisez ces consignes très attentivement Conservez c...

Page 18: ...eur Utilisez l appareil uniquement dans le but auquel il est destiné Utilisez toujours l appareil sur une surface solide sèche et plane Cet appareil ne convient qu à un usage domestique Le fabricant décline toute responsabilité pour des accidents qui découleraient d un mauvais usage de l appareil ou du non respect des instructions fournies dans ce manuel Toutes les réparations en dehors de l entre...

Page 19: ...pareil Conservez la viande crue et le poisson dans des récipients séparés pour qu ils ne puissent ni entrer en contact avec d autres aliments ni goutter sur ceux ci Éteignez dégivrez et nettoyez l appareil en cas de période d inutilisation prolongée Laissez le sécher et laissez la porte ouverte pour éviter la formation de moisissure AVERTISSEMENT Ne placez jamais cet appareil sur ou à proximité d ...

Page 20: ... la terre Après installation laissez l appareil reposer pendant 8 heures avant de le mettre sous tension Le gaz réfrigérant pourra ainsi se stabiliser Laissez l appareil fonctionner à vide pendant 24 heures de sorte que les compartiments puissent refroidir à la température appropriée Cet appareil est conçu pour fonctionner sous une température ambiante entre 16 et 38 C Si la température est inféri...

Page 21: ... et retirez la plaque Débranchez les deux connecteurs des câbles QVWDOODWLRQ Left Aid Closer on Upper Door x 1 Left Aid Closer on Lower Door x 1 nscrew top hinge cover and disconnect connectors of door switch and harness 2 Unscrew top hinge 3 Remove the pin with a screwdriver and filp the hinge bracket Then refit the pin to hinge bracket screw screw 2 Dévissez les boulons des charnières et retirez...

Page 22: ...tie supérieure de la porte supérieure Déplacez le câble et le connecteur d un côté vers l autre Replacez le panneau de finition QVWDOODWLRQ 5 Detach cover in top of upper door and move harness from right side to left side then replace the cover 6 Move top left cover to right side 7 4 Move door switch from right hinge cover to left hinge cover in accessary bag 9 6 Déplacez la plaque de recouvrement...

Page 23: ...oth side 10 Unscrew and remove the bottom hinge pin turn the bracket over and replace it unscrew screw 10 10 Retirez la petite goupille de la charnière inférieure Faites pivoter la plaque sur 180 et resserrez la goupille QVWDOODWLRQ 8 9 Unscrew bottom hinge Then remove the adjustable feet from both side 10 Unscrew and remove the bottom hinge pin turn the bracket over and replace it unscrew screw 1...

Page 24: ...ers from accessary bag and install them to left side 11 14 Replacez la porte inférieure et revissez la QVWDOODWLRQ 15 Replace upper door please ensure the door align with the cabinet to make sure door gasket seal the cabinet tightly Then connect door with cabinet by tightly fixed top hinge 16 Connect harnesses from door and cabinet Then replace top hinge cover Before screw the cover connect termin...

Page 25: ...O 4 Mode Super 5 Mode vacances 6 Sécurité enfants Le panneau de commande passe automatiquement en mode veille L écran s éclaire à l ouverture des portes et lorsqu on touche un bouton RÉGLAGE DE LA TEMPÉRATURE Vous pouvez régler la température du réfrigérateur entre 2 et 8 C Dans des conditions normales nous vous conseillons de le régler sur 4 C Maintenez le bouton FRIDGE température réfrigérateur ...

Page 26: ...ctionnez cette fonction si la température standard ne refroidit pas assez vos aliments Par exemple en cas de température extérieure très élevée si les portes ont été ouvertes à plusieurs reprises en cas de température ambiante élevée si vous mettez dans l appareil une grande quantité d aliments non refroidis non congelés etc En sélectionnant cette fonction la température du congélateur baisse jusq...

Page 27: ...il est explosif Vous devez donc faire attention pendant le transport et l installation pour éviter que les éléments de réfrigération de l appareil ne soient endommagés En cas de fuite due à la détérioration des éléments de réfrigération éloignez votre réfrigérateur des flammes nues et des sources de chaleur et ventilez la pièce où il se trouve durant quelques minutes CONSERVATION DES ALIMENTS DANS...

Page 28: ...umes les fruits les herbes les oeufs sans coquilles les produits laitiers comme le fromage et le beurre les plats cuisinés et les restes tels que les soupes les ragoûts la viande cuite et le poisson les plats de pommes de terre les soufflés et les desserts Les aliments suivants ne sont pas adaptés à la congélation Les types de légumes qui sont généralement consommés crus comme la laitue ou les rad...

Page 29: ...rolongée vous devez prendre des mesures pour protéger la nourriture p ex en la couvrant de glace sèche Les aliments congelés ne seront pas affectés si la panne dure moins de 15 heures Ne recongelez pas les aliments une fois complètement dégelés Leur consommation serait alors potentiellement dangereuse NETTOYAGE ET ENTRETIEN NETTOYAGE N utilisez pas de produits nettoyants abrasifs ou des solvants 1...

Page 30: ...atéral est chaud Le canal de condensation se trouve de ce côté C est normal MISE AU REBUT Ce symbole sur le produit ou son emballage indique que ce produit ne peut être traité comme déchet ménager Il doit plutôt être remis au point de ramassage concerné se chargeant du recyclage du matériel électrique et électronique En vous assurant que ce produit est éliminé correctement vous favorisez la préven...

Page 31: ...6 Monate Die Garantie und dieVerantwortung Haftung des Lieferanten und Herstellers entfallen automatisch in den folgenden Fällen Bei Nichtbeachtung der Anweisungen in dieser Bedienungsanleitung Bei falschem Anschluss z B bei einer zu hohen Stromspannung Bei falscher grober oder abnormalerVerwendung Bei unzureichender oder falscherWartung Bei vomVerbraucher oder von nicht ermächtigten Dritten vorge...

Page 32: ...tecker direkt am Stecker selber und nicht an der Kabelschnur aus der Steckdose Lassen Sie das im Betrieb befindliche Gerät nicht unbeaufsichtigt Stellen Sie das Gerät nicht in der Nähe oder auf einer Gasflamme einer elektrischen Platte oder an einer Stelle ab auf der es in Kontakt mit einem Elektroofen oder einem anderen heißen Geräten kommen kann Benutzen Sie das Gerät nicht im Freien Benutzen Si...

Page 33: ...ie unten angegebenen Anweisungen ein um eine Kontamination von Lebensmitteln zu vermeiden Durch eine langfristige Öffnung derTür kann sich dieTemperatur in den Fächern des Geräts beträchtlich erhöhen Reinigen Sie die Oberflächen regelmäßig die in Kontakt mit Lebensmitteln kommen können Halten Sie den Kondensationskanal und das Ablaufloch an der Rückseite des Geräts sauber Bewahren Sie rohes Fleisc...

Page 34: ...rank Bevor Sie den Kühlschrank an das Stromnetz anschließen kontrollieren Sie ob die Spannung auf demTypenschild Ihres Geräts mit der Spannung in IhrerWohnung übereinstimmt Eine andere Spannung kann das Gerät beschädigen Sie können das Gerät nur über den Stecker vom Stromnetz trennen Sorgen Sie dafür dass er immer einfach zugänglich ist Um das Gerät vom Stromnetz zu trennen schalten Sie das Gerät ...

Page 35: ...licht das Absetzen des Kühlmittels Es wird empfohlen einen Flachschraubenzieher einen Kreuzschraubenzieher und einen Schraubenschlüssel nicht im Lieferumfang enthalten sowie die unten aufgeführten Bauteile zu verwenden Scharnier Abdeckplatte QVWDOODWLRQ Left Aid Closer on Upper Door x 1 Left Aid Closer on Lower Door x 1 nscrew top hinge cover and disconnect connectors of door switch and harness 2 ...

Page 36: ...u entfernen muss dessen Lasche auf der Rückseite der Abdeckung eingedrückt werden QVWDOODWLRQ 5 Detach cover in top of upper door and move harness from right side to left side then replace t 6 Move top left cover to right side 4 Move door switch from right hinge cover to left hinge cover in accessary bag pper door and move harness from right side to left side then replace the cover ght side ight h...

Page 37: ...die rechte Seite versetzen QVWDOODWLRQ 8 9 Unscrew bottom hinge Then remove the adjustable feet from both side 10 Unscrew and remove the bottom hinge pin turn the bracket over and replace it 9 Den Kühlschrank flach legen Die Stellfüße von beiden Seiten entfernen und die Bolzen des unteren Scharniers abschrauben Die Schraube aus dem Gehäuse entfernen und auf der anderen Seite wieder einsetzen QVWDO...

Page 38: ...erseite beiderTüren entfernen Die neuenTüranschläge auf der linken Seite beiderTüren anbringen Die neuenTüranschläge befinden sich im mitgelieferten Zubehörbeutel QVWDOODWLRQ 13 Detach the Fridge and the Freezer door gaskets and then attach them after rotating 11 Refit the bracket fitting the bottom hinge pin Replace both adjustable feet 12 Remove aid closers from bottom of upper and lower doors t...

Page 39: ... cabinet to make sure door gasket seal the cabinet tightly Then connect door with cabinet by tightly fixed top hinge 16 Connect harnesses from door and cabinet Then replace top hinge cover Before screw the cover connect terminals of door switch 14 12 16 Die beiden Stecker der Kabel auf der Oberseite des Geräts wieder an dieTür anschließen Die Abdeckplatte des Scharniers wieder einsetzen und festsc...

Page 40: ...alerweise wählen Sie am besten 18 C Drücken Sie die FREEZER Taste Temperatur Gefrierschrank und drücken Sie diese so lange bis die gewünschteTemperatur im Display angezeigt wird 8VHU LQWHUIDFH BUTTON 3 4 5 6 Die Betriebszeit und die temperatur werden durch den Ort an dem der Kühlschrank verwendet wird durch die Häufigkeit derTüröffnung und durch dieTemperatur des Raums beeinflusst in dem sich der ...

Page 41: ...tion Crisper um Obst und Gemüse länger frisch zu halten Die perfekteTemperatur und Luftfeuchtigkeit werden beibehalten Stellen Sie den Schalter in die Position Chiller für frische verderbliche Lebensmittel wie Fisch DieTemperatur ist kühler Die Lebensmittel werden frisch gehalten jedoch nicht eingefroren EINLEGEBÖDEN UND TÜRFÄCHER VERSETZEN Leeren Sie den Kühlschrank bevor Sie Einschübe oderTürfäc...

Page 42: ...hlelementen zu vermeiden Im Falle eines Lecks durch eine Beschädigung der Kühlelemente halten Sie den Kühlschrank von offenem Feuer oderWärmequellen fern und lüften Sie den Raum in dem sich das Gerät befindet für einige Minuten LEBENSMITTEL IM KÜHLSCHRANK AUFBEWAHREN Der Kühlschrank sorgt für eine längere Aufbewahrungszeit von frischen Lebensmitteln mit begrenzter Haltbarkeit Für eine Aufbewahrung...

Page 43: ...chmacksverlusts und von Austrocknung geben Sie die Lebensmittel in eine luftdichteVerpackung 1 Geben Sie die Lebensmittel in dieVerpackung 2 Entfernen Sie sämtliche Luft 3 Dichten Sie dieVerpackung ab 4 Etikettieren Sie dieVerpackung mit dem Datum des Einfrierens GeeigneteVerpackung Plastikfolie Schlauchfolie aus Polyethylen Aluminiumfolie oder Behälter fürTiefkühlware Empfohlene Aufbewahrungszeit...

Page 44: ... dieTürdichtung nur mit warmemWasser und reiben Sie diese anschließend gründlich ab 5 Stecken Sie den Stecker nach der Reinigung in die Steckdose und stellen Sie die gewünschte Temperatur ein 6 Legen Sie die Lebensmittel wieder in das Gerät PROBLEME UND DEREN LÖSUNG Problem Mögliche Ursache Lösung Das Gerät funktioniert nicht Der Stecker steckt nicht vollständig in der Steckdose Die Sicherung ist ...

Page 45: ...ndeln ist sondern an einem Sammelpunkt für das Recyling von elektrischen und elektronischen Geräten abgegeben werden muss Durch Ihren Beitrag zum korrekten Entsorgen dieses Produkts schützen Sie die Umwelt und die Gesundheit Ihrer Mitmenschen Umwelt und Gesundheit werden durch falsches Entsorgen gefährdet Weitere Informationen über das Recycling dieses Produkts erhalten Sie von Ihren Rathaus Ihrer...

Page 46: ...lity of the supplier and manufacturer lapse automatically in the following cases If the instructions in this manual have not been followed In case of incorrect connection e g electrical voltage that is too high In case of incorrect rough or abnormal use In case of insufficient or incorrect maintenance In case of repairs or alterations to the device by the consumer or non authorised third parties I...

Page 47: ...ance Do not use the appliance outdoors Only use the appliance for its intended use Always use the appliance on a steady dry and level surface Only use the appliance for domestic use The manufacturer can not be held responsible for accidents that result from improper use of the appliance or not following the instructions described in this manual All repairs should be carried out by the manufacturer...

Page 48: ...ome into contact with a heat source There are flammable materials located on the back of the appliance Pay attention to the symbol Fire risk flammable materials located on the back of the appliance PARTS 1 Shelves 2 Cover for vegetable container 3 Vegetable container 4 Crisper drawer 5 Door shelves 6 Freezer drawers 7 Levelling feet INSTALLATION Remove the exterior and interior packing wipe the ou...

Page 49: ...nplugged and empty After reversing the door leave the appliance alone for 8 hours before switching it on This allows the coolant to set We recommend using a slotted screwdriver a Phillips screwdriver and a wrench not included as well as the components supplied below Hinge cover plate QVWDOODWLRQ Left Aid Closer on Upper Door x 1 Left Aid Closer on Lower Door x 1 nscrew top hinge cover and disconne...

Page 50: ...s latch on the back of the cover plate QVWDOODWLRQ 5 Detach cover in top of upper door and move harness from right side to left side then replace t 6 Move top left cover to right side 4 Move door switch from right hinge cover to left hinge cover in accessary bag pper door and move harness from right side to left side then replace the cover ght side ight hinge cover to left hinge cover in accessary...

Page 51: ... to the right side QVWDOODWLRQ 8 9 Unscrew bottom hinge Then remove the adjustable feet from both side 10 Unscrew and remove the bottom hinge pin turn the bracket over and replace it 9 Lay the fridge down flat Remove the adjusting feet from both sides and unscrew the bolts of the bottom hinge Remove the screw from the housing and put it back on the other side QVWDOODWLRQ 8 9 Unscrew bottom hinge T...

Page 52: ... of both doors Place the new door stoppers on the left side of both doors The new door stoppers can be found in the included accessory pocket QVWDOODWLRQ 13 Detach the Fridge and the Freezer door gaskets and then attach them after rotating 11 Refit the bracket fitting the bottom hinge pin Replace both adjustable feet 12 Remove aid closers from bottom of upper and lower doors then take new aid clos...

Page 53: ...gn with the cabinet to make sure door gasket seal the cabinet tightly Then connect door with cabinet by tightly fixed top hinge 16 Connect harnesses from door and cabinet Then replace top hinge cover Before screw the cover connect terminals of door switch 14 12 16 Reconnect both connectors of the cables on top of the appliance to the door Replace the hinge cover plate and screw it into place Make ...

Page 54: ...ure is displayed 8VHU LQWHUIDFH BUTTON 3 4 5 6 The operating time and temperature is influenced by the location of the fridge the number of times the door is opened and the temperature of the room the fridge is in SETTING THE FUNCTIONS HUIDFH N 3 4 5 6 Press the MODE button s to toggle between ECO Mode Holiday Mode and Super Mode ECO Mode 3 4 5 6 By selecting this function the refrigerator tempera...

Page 55: ...for a long life For this reason these may not be replaced If there is a problem with the lighting contact a qualified service centre in your area MOVINGYOUR APPLIANCE If the appliance is turned off for any reason wait for 10 minutes before turning it back on This will allow the refrigeration system pressures to equalise before restarting Turn off the appliance and unplug it from the mains socket R...

Page 56: ... To freeze food Note Ensure that the freezer door has been closed properly Avoid opening the freezer drawers unnecessarily Purchasing frozen food Packaging must not be damaged Use by the use by best before best by date If possible transport deep frozen food in an insulated bag and place quickly in the freezer Freezing fresh food Freeze fresh and undamaged food only To retain the best possible nutr...

Page 57: ...t the food was not already frozen Indeed frozen food that has thawed completely must not be refrozen Once defrosted food should be consumed quickly POWER FAILURE Most power failures are corrected within an hour or two and will not affect your refrigerator temperatures However you should minimize the number of door openings while the power is off During power failures of longer duration take steps ...

Page 58: ...vice Buzzing or bubbling sound The compressor starts is operating The cooling gas circulates in the appliance This is normal The side panel is hot The condensation duct is on this side This is normal ENVIRONMENTAL GUIDELINES This symbol on the product or on its packaging indicates that this product may not be treated as household waste Instead it must be brought to the applicable collection point ...

Page 59: ...imer uso retire todos los materiales de embalaje y etiquetas promocionales Asegúrese de que los niños no puedan jugar con el material de embalaje Este aparato es adecuado para su uso en el ámbito doméstico y entornos similares como Zona de cocina para el personal de tiendas oficinas y otros entornos profesionales similares Granjas Habitaciones de hoteles y moteles y otros entornos de carácter resi...

Page 60: ...s ranuras de ventilación libres y asegúrese de que no están bloqueadas u obstruidas No utilice instrumentos mecánicos o de otro tipo para acelerar el proceso de descongelación No utilice ningún otro aparato eléctrico en el interior del frigorífico a menos que el mismo esté aprobado para este fin por el fabricante Nunca almacene materiales explosivos en el aparato como por ejemplo aerosoles con gas...

Page 61: ...o estrecho o en un lugar húmedo o que reciba la luz directa del sol Asegúrese de que pueda circular el aire alrededor del frigorífico La parte posterior del frigorífico debe estar separada de la pared al menos 10 cm Coloque el frigorífico sobre una superficie firme y nivelada Mediante las patas de ajuste se puede nivelar el aparato Ajústelas al girarlas hacia dentro o fuera del aparato Evite la lu...

Page 62: ...re trasladar las bisagras de la puerta hacia el otro lado le recomendamos que se ponga en contacto con un taller de reparación autorizado para llevar a cabo el trabajo Antes de cambiar la dirección de giro compruebe que el enchufe se ha desconectado de la toma de corriente y que el aparato está vacío Después de invertir la puerta no mueva el aparato durante 8 horas antes de encenderlo Esto permiti...

Page 63: ... Para retirar el interruptor de la puerta presione y mantenga la tapa en la parte posterior de la placa de cubierta QVWDOODWLRQ 5 Detach cover in top of upper door and move harness from right side to left side then replace t 6 Move top left cover to right side 4 Move door switch from right hinge cover to left hinge cover in accessary bag pper door and move harness from right side to left side then...

Page 64: ...rda a la derecha QVWDOODWLRQ 8 9 Unscrew bottom hinge Then remove the adjustable feet from both side 10 Unscrew and remove the bottom hinge pin turn the bracket over and replace it 9 Coloque el frigorífico en posición horizontal Retire las patas de ajuste de ambos lados y desatornille los pernos de la bisagra inferior Retire el tornillo de la carcasa y vuelva a colocarlo en el otro lado QVWDOODWLR...

Page 65: ...erior de ambas puertas Coloque los nuevos topes de puerta en el lado izquierdo de ambas puertas Puede encontrar los nuevos topes de puerta en la bolsa de accesorios suministrada QVWDOODWLRQ 13 Detach the Fridge and the Freezer door gaskets and then attach them after rotating 11 Refit the bracket fitting the bottom hinge pin Replace both adjustable feet 12 Remove aid closers from bottom of upper an...

Page 66: ...inet to make sure door gasket seal the cabinet tightly Then connect door with cabinet by tightly fixed top hinge 16 Connect harnesses from door and cabinet Then replace top hinge cover Before screw the cover connect terminals of door switch 14 12 16 Vuelva a conectar los dos conectores de los cables de la parte superior del aparato a la puerta Vuelva a colocar la placa de cubierta de la bisagra y ...

Page 67: ...entre 14 y 22 C En circunstancias normales debe escoger 18ºC Pulse la tecla FREEZER temperatura del congelador y manténgala presionada hasta que la temperatura deseada aparezca en la pantalla 8VHU LQWHUIDFH BUTTON 3 4 5 6 El tiempo de funcionamiento y la temperatura se ven afectados por la ubicación en la que se utiliza el refrigerador el número de veces que se abre la puerta y la temperatura de l...

Page 68: ...l compartimento de verduras Ponga el interruptor en la posición crisper para mantener la fruta y la verdura frescas y para conservarlas durante más tiempo Se mantienen la temperatura y la humedad perfectas Ponga el interruptor en la posición chiller para alimentos frescos y perecederos como el pescado La temperatura es más fría Los alimentos se mantienen frescos pero no se congelan COLOCAR LOS EST...

Page 69: ...a fuga por un daño en los elementos de refrigeración mantenga el frigorífico alejado de llamas o fuentes de calor y ventile la habitación donde se encuentra el aparato durante algunos minutos CONSERVAR ALIMENTOS EN EL FRIGORÍFICO El frigorífico asegura una vida útil más prolongada de los alimentos frescos y perecederos Conservación de alimentos frescos para obtener los mejores resultados Conserve ...

Page 70: ... 3 Cierre el envase 4 Añada al envase una etiqueta con su contenido y la fecha de congelación Envases adecuados película de plástico rollo de película de polietileno papel de aluminio o recipientes aptos para el congelador Tiempo de conservación en el congelador recomendado para los productos congelados Este tiempo puede variar según el tipo de alimento Los alimentos congelados se pueden conservar...

Page 71: ...nta de la puerta solo con agua limpia y a continuación frote a fondo 5 Después de la limpieza introduzca el enchufe en la toma de corriente y ajuste la temperatura deseada 6 Vuelva a colocar los alimentos en el aparato PROBLEMASY SUS SOLUCIONES Problema Posible causa Solución El aparato no funciona El enchufe no se encuentra completamente en la toma de corriente El fusible se ha fundido La toma de...

Page 72: ...ue se reciclan equipos eléctricos y electrónicos Si se asegura de que este producto se desecha correctamente usted ayudará a evitar posibles consecuencias negativas para las personas y el medio ambiente que serían causadospor un tratamiento de residuos inadecuado Para obtener información más detallada sobre el reciclaje de este producto póngase en contacto con su ayuntamiento o con la empresa o de...

Page 73: ...uali adesivi promozionali Assicurarsi che i bambini non giochino con gli imballaggi Questo apparecchio è destinato unicamente all uso domestico e in ambienti analoghi quali angoli cottura riservati al personale nei negozi negli uffici e in altri ambienti professionali Fattorie Camere di alberghi motel e altre strutture ricettive residenziali Camere per vacanze o ambienti analoghi L apparecchio può...

Page 74: ...mento o tecnica particolare per accelerare il processo di sbrinamento Non utilizzare nessuna apparecchiatura elettrica all interno del frigorifero a meno che tale dispositivo non sia approvato dal produttore Non conservare sostanze esplosive nell apparecchio come per esempio bombolette spray con gas infiammabile Assicurarsi che il circuito di raffreddamento non subisca danneggiamenti per esempio d...

Page 75: ...lare liberamente attorni al frigorifero Il lato posteriore del frigorifero deve essere ad almeno 10 cm di distanza dal muro Assicurare sufficiente spazio per aprire lo sportello Posizionare il frigorifero su una superficie stabile e piana L apparecchio può essere messo in posizione perfettamente orizzontale avvitando o svitando i piedini regolabili anteriori Evitare luce del sole diretta e calore ...

Page 76: ...chio In questo modo si garantisce il posizionamento del refrigerante Si consiglia di usare un cacciavite a punta piatta un cacciavite con punta a stella e una chiave non forniti oltre ai seguenti componenti forniti Piastrina di copertura per cerniera QVWDOODWLRQ Left Aid Closer on Upper Door x 1 Left Aid Closer on Lower Door x 1 nscrew top hinge cover and disconnect connectors of door switch and h...

Page 77: ...to Per rimuovere l interruttore di sportello tenerne premuto il tassello sul retro della piastrina di copertura QVWDOODWLRQ 5 Detach cover in top of upper door and move harness from right side to left side then replace t 6 Move top left cover to right side 4 Move door switch from right hinge cover to left hinge cover in accessary bag pper door and move harness from right side to left side then rep...

Page 78: ...al lato destro QVWDOODWLRQ 8 9 Unscrew bottom hinge Then remove the adjustable feet from both side 10 Unscrew and remove the bottom hinge pin turn the bracket over and replace it 9 Mettere il frigorifero in posizione orizzontale Rimuovere i piedini regolabili da entrambi i lati e svitare i bulloni della cerniera inferiore Rimuovere la vite dall alloggiamento e posizionarlo sull altro lato QVWDOODW...

Page 79: ...ato inferiore di entrambi gli sportelli Posizionare i nuovi stop sportello sul lato sinistro di entrambi gli sportelli I nuovi stop sportello si trovano nel sacchetto accessori fornito QVWDOODWLRQ 13 Detach the Fridge and the Freezer door gaskets and then attach them after rotating 11 Refit the bracket fitting the bottom hinge pin Replace both adjustable feet 12 Remove aid closers from bottom of u...

Page 80: ...et to make sure door gasket seal the cabinet tightly Then connect door with cabinet by tightly fixed top hinge 16 Connect harnesses from door and cabinet Then replace top hinge cover Before screw the cover connect terminals of door switch 14 12 16 Ricollegare allo sportello entrambi i connettori dei cavi sulla parte alta dell apparecchio Riposizionare la piastrina di copertura per cerniera e fissa...

Page 81: ...r e tenerlo premuto fino a quando il display non visualizza la temperatura desiderata 8VHU LQWHUIDFH BUTTON 3 4 5 6 Il tempo e la temperatura di funzionamento sono influenzati dal luogo in cui il frigorifero viene utilizzato dal numero di volte cui la porta viene aperta e dalla temperatura della stanza in cui l apparecchio si trova IMPOSTARE LE FUNZIONI HUIDFH N 3 4 5 6 Premere il tasto MODE funzi...

Page 82: ...me il pesce La temperatura è più bassa Il cibo viene mantenuto fresco ma non congelato SPOSTARE I RIPIANI DEL FRIGO E I BALCONCINI DELLA PORTA Svuotare il frigorifero prima di spostare i ripiani e i balconcini della porta Per spostare i ripiani è necessario sollevarli e tirarli verso di sé Per spostare i balconcini della porta afferrarli con 2 mani Sollevarli e tirarli verso di sé ILLUMINAZIONE L ...

Page 83: ...nservazione di alimenti freschi per il risultato migliore Conservare solo alimenti molto freschi e di buona qualità Assicurarsi che gli alimenti siano confezionati in modo corretto o siano coperti prima di essere messi in frigorifero Questo evita che si secchino e che perdano colore o sapore in questo modo si conserveranno più a lungo Inoltre si evita la proliferazioni di odore Assicurarsi che gli...

Page 84: ...ti latte 1 mese Pane gelato salsicce piselli frutti di mare cotti pesci grassi 2 mesi Pesci non grassi frutti di mare pizza scones e muffins 3 mesi Prosciutto dolci biscotti carne bovina e costolette di agnello pollame a pezzi 4 mesi Burro verdure sbollentate uova intere e tuorli gamberi di fiume cotti carne macinata cruda carne di maiale cruda 6 mesi Frutta secca o sciroppata albumi carne bovina ...

Page 85: ... sulla confezione indica che esso non deve essere trattato come rifiuto domestico Deve al contrario essere conferito al punto di raccolta predisposto per il riciclo delle apparecchiature elettriche ed elettroniche Facendo in modo che questo prodotto venga smaltito correttamente aiuterete a prevenire potenziali conseguenze negative per l ambiente e la salute dell uomo che potrebbero essere causate ...

Page 86: ...ba 24 měsíců Záruční doba počíná běžet od převzetí věci kupujícím Práva z vadného plnění uplatňuje kupující u prodávajícího na adrese jeho provozovny v níž je přijetí reklamace možné s ohledem na sortiment prodávaného zboží případně i v sídle nebo místě podnikání Za okamžik uplatnění reklamace se považuje okamžik kdy prodávající obdržel od kupujícího reklamované zboží Reklamaci lze také uplatnit v...

Page 87: ...kabel Nenechávejte přístroj běžet bez dozoru Nikdy neumisťujte přístroj v blízkosti plynového nebo elektrického sporáku či trouby nebo do blízkosti jiného přístroje produkujícího teplo Nepoužívejte přístroj venku Používejte přístroj pouze k účelům ke kterým je určený Přístroj vždy používejte pouze na stabilním suchém a rovném místě Přístroj je určený pouze pro použití v domácnostech Výrobce nemůže...

Page 88: ...edostaly do styku s jinými potravinami Pokud by byl spotřebič delší dobu prázdný tak ho doporučujeme vypnout odmrazit a vyčistit Po takovém vyčištění nechte vnitřek vyschnout a nezavírejte dvířka aby mohl prostor ventilovat a nemnožily se tam plísně VAROVÁNÍ Tento přístroj nikdy neumísťujte do blízkosti ohně ani na jiné místo kde by mohl přijít do styku s tepelným zdrojem V zadní straně přístroje ...

Page 89: ...ednice je zkonstruována a navrhnuta na používání v místech s průměrnou teplotou 16 38 C Pokud je tato teplota v okolí překročena nižší nebo vyšší tak nemusí lednice chladit správně Spotřebič může býr používán pouze v interiéru Ve chvíli kdy je kompresor sepnutý a čerpá chladící kapalinu v oběhu tak je přístroj mírně hlučný PŘEHOZENÍ PANTŮ DVEŘÍ Pokud potřebujete přehodit otevírání dveří na opačnou...

Page 90: ...otočte o 180 a znovu našroubujte středový kolík čep Na čepu by stále měl být gumový chránící potah nscrew top hinge cover and disconnect connectors of door switch and harness 2 Unscrew top hinge 3 Remove the pin with a screwdriver and filp the hinge bracket Then refit the pin to hinge bracket unscrew screw 8 4 V přiloženém příslušenství najdete opačný kryt na horní závěs dveří po přehození Z původ...

Page 91: ...h cover in top of upper door and move harness from right side to left side then replace the cover 6 Move top left cover to right side 7 9 7 Odšroubujte šroubky ze středního závěsu mezi dveřmi a spodní dveře nadzvedněte a sundejte 5 Detach cover in top of upper door and move harness from right side to left side then replace the cover 6 Move top left cover to right side 7 8 Na rozdělující příčce led...

Page 92: ...připevněte na opačnou spodní stranu lednice než bylo původně zašroubujte Následně našroubujte zpět obě nožičky QVWDOODWLRQ 13 Detach the Fridge and the Freezer door gaskets and then attach them after rotating 11 Refit the bracket fitting the bottom hinge pin Replace both adjustable feet 12 Remove aid closers from bottom of upper and lower doors then take new aid closers from accessary bag and inst...

Page 93: ...těte pantem závěsem a přišroubujte Zkontrolujte zda dveře těsní po celém svém obvodu QVWDOODWLRQ 15 Replace upper door please ensure the door align with the cabinet to make sure door gasket seal the cabinet tightly Then connect door with cabinet by tightly fixed top hinge 16 Connect harnesses from door and cabinet Then replace top hinge cover Before screw the cover connect terminals of door switch...

Page 94: ...ch je obecně doporučováno nastavit teplotu na 18 C Stiskněte tlačítko FREEZER teplota v mrazáku a každým dalším stiskem si upravujete nastavení Můžete mačkat do chvíle než se na displeji objeví požadovaná teplota 8VHU LQWHUIDFH BUTTON 3 4 5 6 Doba nachlazení a aktuální teplota je vždy závislá na více faktorech prostředí kde přístroj stojí jak často se otevírají dveře nebo teplota místnosti kde led...

Page 95: ...ky otevřené po dobu 90 sekund tak se ozve zvukový upozorňující signál Tento alarm je varováním abyste nenechali náhodou dveře otevřené a jídlo se nezkazilo Pokud dveře zavřete tak se zvuk vypne FRESH ZÁSUVKA NA ZELENINU Pomocí regulace na zadní straně zásuvky lze měnit podmínky uvnitř zásuvky Pro zaručení perfektní teploty a vlhkosti pro stále čerstvou zeleninu stačí přepnout regulaci do polohy cr...

Page 96: ...ednice prodlužuje trvanlivost jídla zejména jídla podléhající rychlé zkáze Pokud vložíte čerstvé potraviny tak ty vydrží v lednici nejdéle Neskladujte jídlo které již není čerstvé Před vložením do lednice jídlo zabalte nebo zakryjte jinak by jídlo vysychalo a měnilo barvu a samozřejmě ztrácelo na čerstvosti i chuti Potraviny se silným aroma důkladně zabalte aby se vůně zápach nepřenesla na ostatní...

Page 97: ...o se zeleninou mléko 1 měsíc Chleba zmrzlina párky koláče předvařené měkkýši tučné ryby 2 měsíce Málo tučné ryby hluboce zamražené měkkýši pizza muffiny 3 měsíce Šunka sušenky hovězí skopové kotlety naporcovaná drůběž 4 měsíce Máslo zelenina blanšírovaná vejce a žloutky vařený rak mleté masi syrové vepřové syrové 6 měsíce Ovoce sušené syrup vaječné bílky hovězí syrové celé kuře skopové syrové ovoc...

Page 98: ...zapojena do sítě Jsou vypnuty jističe nebo hlavní pojistka Závada ve vaší el síti Znovu a důkladně zástrčku zapojte Zkontrolujte jističe i pojistku Kontaktujte místního elektrikáře Podivný zápach Potraviny v chladničce jsou zkažené Vyčistěte vnitřek chladničky Dveře se úplně nezavřou Chladnička nebo mraznička jsou příliš plné Přístroj není vyrovnaný Ujistěte se že jídlo nebo nápoje nebrání v zavír...

Page 99: ...ístech určených ke sběru a likvidaci elektrických a elektronických zařízení Dodržením tohoto doporučení chráníte životní prostředí a zdraví spoluobčanů Více informací o možnostech likvidace nebezpečného odpadu obdržíte na obecních nebo městských úřadech sběrných dvorech nebo v prodejně kde jste přístroj zakoupili Obalové materiály jsou recyklovatelné nakládejte s nimi podle předpisů pro životní pr...

Page 100: ...4 mesiacov Záručná doba začína plynúť od prevzatia veci kupujúcim Práva z chybného plnenia uplatňuje kupujúci u predávajúceho na adrese jeho prevádzky v ktorej je prijatie reklamácie možné s ohľadom na sortiment predávaného tovaru prípadne aj v sídle alebo mieste podnikania Za okamih uplatnenia reklamácie sa považuje okamih kedy predávajúci dostal od kupujúceho reklamovaný tovar Reklamáciu možno t...

Page 101: ...y zástrčku nevyťahujte zo zásuvky ťahaním za kábel Nenechávajte prístroj bežať bez dozoru Nikdy neumiestňujte prístroj v blízkosti plynového alebo elektrického sporáka či rúry alebo do blízkosti iného prístroja produkujúceho teplo Nepoužívajte prístroj vonku Používajte prístroj iba na účely ku ktorým je určený Prístroj vždy používajte iba na stabilnom suchom a rovnom mieste Prístroj je určený len ...

Page 102: ...y skladujte vo vhodných nádobách tak aby sa nedostali do styku s inými potravinami Ak by bol spotrebič dlhšiu dobu prázdny tak ho odporúčame vypnúť odmraziť a vyčistiť Po takomto vyčistení nechajte vnútro vyschnúť a nezatvárajte dvierka aby mohol priestor ventilovať a nemnožili sa tam plesne VAROVANIE Tento prístroj nikdy neumiestňujte do blízkosti ohňa ani na iné miesto kde by mohol prísť do styk...

Page 103: ...vaná a navrhnutá na používanie v miestach s priemernou teplotou 16 38 C Ak je táto teplota v okolí prekročená nižšie alebo vyššie tak nemusí chladničky chladiť správne Spotrebič môžete badať používaný iba v interiéri Vo chvíli kedy je kompresor zopnutý a čerpá chladiacu kvapalinu v obehu tak je prístroj mierne hlučný PREHODENIE PÁNTOV DVERÍ Ak potrebujete prehodiť otváranie dverí na opačnú stranu ...

Page 104: ...čte o 180 a znovu naskrutkujte stredový kolík čap Na čapu by stále mala byť gumový chrániace poťah nscrew top hinge cover and disconnect connectors of door switch and harness 2 Unscrew top hinge 3 Remove the pin with a screwdriver and filp the hinge bracket Then refit the pin to hinge bracket unscrew screw 8 4 V priloženom príslušenstva nájdete opačný kryt na hornej záves dverí po prehodenie Z pôv...

Page 105: ...tach cover in top of upper door and move harness from right side to left side then replace the cover 6 Move top left cover to right side 7 9 7 Odstráňte skrutky zo stredového závesu medzi dverami a spodné dvere nadvihnite a zložte 5 Detach cover in top of upper door and move harness from right side to left side then replace the cover 6 Move top left cover to right side 7 8 Na rozdeľujúce priečke c...

Page 106: ... pripevnite na opačnú spodnú stranu chladničky než bolo pôvodne zaskrutkujte Následne naskrutkujte späť obe nožičky QVWDOODWLRQ 13 Detach the Fridge and the Freezer door gaskets and then attach them after rotating 11 Refit the bracket fitting the bottom hinge pin Replace both adjustable feet 12 Remove aid closers from bottom of upper and lower doors then take new aid closers from accessary bag and...

Page 107: ...stite pántom závesom a priskrutkujte Skontrolujte či dvere tesnia po celom svojom obvode QVWDOODWLRQ 15 Replace upper door please ensure the door align with the cabinet to make sure door gasket seal the cabinet tightly Then connect door with cabinet by tightly fixed top hinge 16 Connect harnesses from door and cabinet Then replace top hinge cover Before screw the cover connect terminals of door sw...

Page 108: ...všeobecne doporučované nastaviť teplotu na 18 C Stlačte tlačidlo FREEZER teplota v mrazničke a každým ďalším stlačením si upravujete nastavenia Môžete stláčať do chvíle než sa na displeji objaví požadovaná teplota 8VHU LQWHUIDFH BUTTON 3 4 5 6 Doba prechladnutie a aktuálna teplota je vždy závislá na viacerých faktoroch prostredie kde prístroj stojí ako často sa otvárajú dvere alebo teplota miestno...

Page 109: ...ekúnd tak sa ozve zvukový upozorňujúce signál Tento alarm je varovaním aby ste nenechali náhodou dvere otvorené a jedlo sa nepokazilo Ak dvere zatvoríte tak sa zvuk vypne FRESH ZÁSUVKA NA ZELENINU Pomocou regulácie na zadnej strane zásuvky možno meniť podmienky vo vnútri zásuvky Pre zaručenie perfektné teploty a vlhkosti pre stále čerstvú zeleninu stačí prepnúť reguláciu do polohy crisper Ak prepn...

Page 110: ...LADNIČKE Chladničky predlžuje trvanlivosť jedla najmä jedlá podliehajúce skaze Ak vložíte čerstvé potraviny tak tie vydržia v chladničke najdlhšie Neskladujte jedlo ktoré už nie je čerstvé Pred vložením do chladničky jedlo zabaľte alebo zakryte inak by jedlo vysýchalo a menilo farbu a samozrejme strácalo na čerstvosti i chuti Potraviny sa silnou arómou dôkladne zabaľte aby sa vôňa zápach neprenies...

Page 111: ...sené mäso so zeleninou mlieko 1 mesiac Chlieb zmrzlina párky koláče predvarené mäkkýše tučné ryby 2 mesiaca Málo tučné ryby hlboko zmrazené mäkkýše pizza muffiny 3 mesiaca Šunka sušienky hovädzie baranie kotlety naporciované hydinu 4 mesiaca Maslo zelenina blanšírovaná vajcia a žĺtky varený rak mleté mäso surové bravčové surové 6 mesiaca Ovocie sušené syrup vaječné bielky hovädzie surové celé kurč...

Page 112: ...točne zapojená do siete Sú vypnuté ističa alebo hlavné posjitka Závada vo vašej el sieti Znovu a dôkladne zástrčku zapojte Skontrolujte ističe aj poistku Kontaktujte miestneho elektrikára Podivný zápach Potraviny v chladničke sú pokazené Vyčistite vnútro chladničky Dvere sa úplne nezatvoria Chladnička alebo mraznička sú príliš plné Prístroj nie je vyrovnaný Uistite sa že jedlo alebo nápoje nebráni...

Page 113: ...ch určených na zber a likvidáciu elektrických a elektronických zariadení Dodržaním tohto odporúčania chránite životné prostredie a zdravie spoluobčanov Viac informácií o možnostiach likvidácie nebezpečného odpadu obdržíte na obecných alebo mestských úradoch zberných dvoroch alebo v predajni kde ste prístroj zakúpili Obalové materiály sú recyklovateľné nakladajte s nimi podľa predpisov pre životné ...

Page 114: ...114 DO986BFK ...

Page 115: ...115 DO986BFK www domo elektro be ...

Page 116: ...essoires en onderdelen online via of scan hier COMMANDEZ d authentiques accessoires et pièces Domo en ligne sur ou scannez ici BESTELLEN SIE die Domo Original Zubehör und Ersatzteile online über oder hier scannen ORDER the original Domo accessories and parts online at or scan here webshop domo elektro be Webshop ...

Reviews: