background image

25

DO987BFK

www.domo-elektro.be

FR

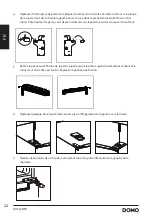
16.  Rebranchez les deux connecteurs des câbles au-dessus de l’appareil à la porte. Replacez la plaque de 

recouvrement de la charnière et vissez-la. Assurez-vous que les câbles se trouvent dans le guidage et 
que l’interrupteur de la porte est en contact avec la porte.

,QVWDOODWLRQ

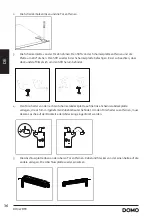
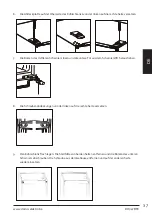
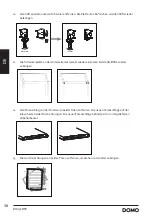
15.Replace upper door, please ensure the door align with the cabinet to make sure door gasket seal 

the cabinet tightly. Then connect door with cabinet by tightly fixed top hinge.

16.Connect harnesses from door and cabinet. Then replace top hinge cover. Before screw the cover, 

connect terminals of door switch.

14

. Install the lower door, adjust and fix the middle hinge onto the cabinet.

12

UTILISATION

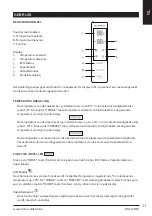
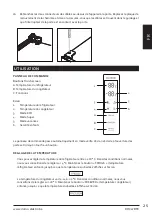
PANNEAU DE COMMANDE

Boutons Touch screen

A. Température du réfrigérateur
B. Température du congélateur
C. Fonctions

Écran

1. 

Température du réfrigérateur

2. 

Température du congélateur

3. 

Mode ECO

4. 

Mode Super

5. 

Mode vacances

6. 

Sécurité enfants

Le panneau de commande passe automatiquement en mode veille. L’écran s’éclaire à l’ouverture des 
portes et lorsqu’on touche un bouton.

RÉGLAGE DE LA TEMPÉRATURE

 · Vous pouvez régler la température du réfrigérateur entre 2 et 8 °C. Dans des conditions normales, 

nous vous conseillons de le régler sur 4 °C. Maintenez le bouton « FRIDGE. » (température 
réfrigérateur) enfoncé jusqu’à ce que la température souhaitée s’affiche sur l’écran.

8VHULQWHUIDFH

Using the Control Panel

A.Temperature Control of Fridge Compartment

B.Temperature Control of Freezer Compartment

C.Mode/ Locking / Unlocking

1.1 BUTTON OPERATION

2.1.1The panel will be lit up for 2 minutes once the door of fridge compartment is opened.

2.1 DISPLAY

1.Temperature of Fridge Comparment

2.Temperature of Freezer Comparment

3.ECO Mode

4.Holiday Mode

5.Super Mode

6.Locking / Unlocking

1.2 LED DISPLAY

a.The control panel is 100% lit up for 3 seconds, which operates exactly as per the setting

(mode and temperature) before the poweroff. The system will be automatically locked 25

seconds after the last button operation. After locking, the light of the panel would be out 30

seconds after the last button operation.

b.Both preset temperatures of fridge compartemnt and freezer compartment would be shown

on the display.

2.0 OPERATING CONDITION

1

2

A

B
C

3

4

5

6

14

 · La température du congélateur va de -14 à -22 °C. Dans des conditions normales, nous vous 

conseillons de le régler sur -18 °C. Maintenez le bouton « FREEZER » (température congélateur) 
enfoncé jusqu’à ce que la température souhaitée s’affiche sur l’écran.

8VHULQWHUIDFH

Using the Control Panel

A.Temperature Control of Fridge Compartment

B.Temperature Control of Freezer Compartment

C.Mode/ Locking / Unlocking

1.1 BUTTON OPERATION

2.1.1The panel will be lit up for 2 minutes once the door of fridge compartment is opened.

2.1 DISPLAY

1.Temperature of Fridge Comparment

2.Temperature of Freezer Comparment

3.ECO Mode

4.Holiday Mode

5.Super Mode

6.Locking / Unlocking

1.2 LED DISPLAY

a.The control panel is 100% lit up for 3 seconds, which operates exactly as per the setting

(mode and temperature) before the poweroff. The system will be automatically locked 25

seconds after the last button operation. After locking, the light of the panel would be out 30

seconds after the last button operation.

b.Both preset temperatures of fridge compartemnt and freezer compartment would be shown

on the display.

2.0 OPERATING CONDITION

1

2

A

B
C

3

4

5

6

14

A

4

3

1

B

C

2

5

6

Summary of Contents for DOMO DO987BFK

Page 1: ...rateur avec cong lateur Gebrauchsanleitung K hlschrank und Gefrierschrank Instruction booklet Refrigerator and freezer Manual de instrucciones Frigo congelatore Istruzioni per l uso Frigor fico congel...

Page 2: ...ea detenidamente todas las instrucciones Conserve este manual para futura referencia Leggere con attenzione le istruzioni conservarle per future consultazioni P ed pou it m si d kladn p e t te tento m...

Page 3: ...n de winkel waar je het toestel hebt aangekocht De garantie op accessoires en onderdelen die onderhevig zijn aan slijtage bedraagt 6 maanden De garantie en verantwoordelijkheid aansprakelijkheid van d...

Page 4: ...de stekker zelf uit het stopcontact Trek nooit aan het snoer om de stekker uit het stopcontact te trekken Zet dit toestel nooit op of in de buurt van een gasvuur of elektrisch vuur of op een plaats w...

Page 5: ...s het apparaat gedurende lange tijd leeg blijft dien je het uit te schakelen te ontdooien en te reinigen Laat het drogen en laat de deur open om te voorkomen dat er schimmel in het apparaat ontstaat W...

Page 6: ...In een ruimte met een lagere of hogere temperatuur zal het apparaat niet juist werken Het toestel mag alleen binnen gebruikt worden De diepvriezer maakt geluid wanneer de compressor het koelmiddel ro...

Page 7: ...rplaatje Zorg dat het plastic rondsel rond de pin blijft Left Aid Closer on Upper Door x 1 Left Aid Closer on Lower Door x 1 nscrew top hinge cover and disconnect connectors of door switch and harness...

Page 8: ...op of upper door and move harness from right side to left side then replace the cover 6 Move top left cover to right side 7 Take off the upper door take out the screw from the middle hinge by cross sc...

Page 9: ...terug op de onderkant van het toestel Plaats beide stelvoetjes terug QVWDOODWLRQ 13 Detach the Fridge and the Freezer door gaskets and then attach them after rotating 11 Refit the bracket fitting the...

Page 10: ...5 Replace upper door please ensure the door align with the cabinet to make sure door gasket seal the cabinet tightly Then connect door with cabinet by tightly fixed top hinge 16 Connect harnesses from...

Page 11: ...ar de koelkast wordt gebruikt het aantal keer de deur wordt geopend en de temperatuur van de kamer waar de koelkast zich in bevindt FUNCTIES INSTELLEN DFH Control Panel e Control of Fridge Compartment...

Page 12: ...et alarm stopt zodra de deur terug gesloten is VERSHOUDLADE Je kan de temperatuur van de vershoudlade bepalen met de schakelaar aan de achterwand Deze instelling heeft geen invloed op de groentelade P...

Page 13: ...n een lek dat werd veroorzaakt door schade aan de koelelementen haal de koelkast weg van open vlammen of warmtebronnen en verlucht de kamer waar het apparaat zich in bevindt gedurende enkele minuten L...

Page 14: ...e levensmiddelen in de verpakking 2 Verwijder alle lucht 3 Dicht de verpakking af 4 Label de verpakking met de inhoud en datum van invriezen Gepaste verpakking plastic folie buisfolie van polyethyleen...

Page 15: ...g steek de stekker in het stopcontact en stel de temperatuurregelaar op de gewenste positie in Plaats de levensmiddelen opnieuw in het apparaat PROBLEEM EN OPLOSSING Probleem Mogelijke oorzaak Oplossi...

Page 16: ...uct op de correcte manier wordt verwijderd voorkom je mogelijk voor mens en milieu negatieve gevolgen die zich zouden kunnen voordoen in geval van verkeerde afvalbehandeling Voor meer details in verba...

Page 17: ...sant ou non conforme R paration ou modification de l appareil par le consommateur ou un tiers non autoris Utilisation d l ments ou d accessoires qui ne sont pas recommand s ou fournis par le fournisse...

Page 18: ...ext rieur Utilisez l appareil uniquement dans le but auquel il est destin Utilisez toujours l appareil sur une surface solide s che et plane Cet appareil ne convient qu un usage domestique Le fabrica...

Page 19: ...appareil Conservez la viande crue et le poisson dans des r cipients s par s pour qu ils ne puissent ni entrer en contact avec d autres aliments ni goutter sur ceux ci teignez d givrez et nettoyez l a...

Page 20: ...Apr s installation laissez l appareil reposer pendant 8 heures avant de le mettre sous tension Le gaz r frig rant pourra ainsi se stabiliser Laissez l appareil fonctionner vide pendant 24 heures de so...

Page 21: ...re et retirez la plaque D branchez les deux connecteurs des c bles QVWDOODWLRQ Door Reversibility Left Aid Closer on Upper Door x 1 Left Aid Closer on Lower Door x 1 nscrew top hinge cover and disconn...

Page 22: ...vers l autre Replacez le panneau de finition QVWDOODWLRQ 5 Detach cover in top of upper door and move harness from right side to left side then replace the cover 6 Move top left cover to right side 7...

Page 23: ...h side 10 Unscrew and remove the bottom hinge pin turn the bracket over and replace it unscrew screw 10 10 Retirez la petite goupille de la charni re inf rieure Faites pivoter la plaque sur 180 et res...

Page 24: ...te inf rieure et revissez la QVWDOODWLRQ 15 Replace upper door please ensure the door align with the cabinet to make sure door gasket seal the cabinet tightly Then connect door with cabinet by tightly...

Page 25: ...temp rature r frig rateur enfonc jusqu ce que la temp rature souhait e s affiche sur l cran 8VHU LQWHUIDFH Using the Control Panel 1 2 A B C 3 4 5 6 La temp rature du cong lateur va de 14 22 C Dans d...

Page 26: ...re the poweroff The system will be automatically locked 25 button operation After locking the light of the panel would be out 30 DITION 1 2 A B C 3 4 5 6 Cette fonction permet d conomiser de l nergie...

Page 27: ...vez donc faire attention pendant le transport et l installation pour viter que les l ments de r frig ration de l appareil ne soient endommag s En cas de fuite due la d t rioration des l ments de r fri...

Page 28: ...mes les fruits les herbes les oeufs sans coquilles les produits laitiers comme le fromage et le beurre les plats cuisin s et les restes tels que les soupes les rago ts la viande cuite et le poisson le...

Page 29: ...olong e vous devez prendre des mesures pour prot ger la nourriture p ex en la couvrant de glace s che Les aliments congel s ne seront pas affect s si la panne dure moins de 15 heures Ne recongelez pas...

Page 30: ...neau lat ral est chaud Le canal de condensation se trouve de ce c t C est normal MISE AU REBUT Ce symbole sur le produit ou son emballage indique que ce produit ne peut tre trait comme d chet m nager...

Page 31: ...6 Monate Die Garantie und dieVerantwortung Haftung des Lieferanten und Herstellers entfallen automatisch in den folgenden F llen Bei Nichtbeachtung der Anweisungen in dieser Bedienungsanleitung Bei fa...

Page 32: ...ecker direkt am Stecker selber und nicht an der Kabelschnur aus der Steckdose Lassen Sie das im Betrieb befindliche Ger t nicht unbeaufsichtigt Stellen Sie das Ger t nicht in der N he oder auf einer G...

Page 33: ...e unten angegebenen Anweisungen ein um eine Kontamination von Lebensmitteln zu vermeiden Durch eine langfristige ffnung derT r kann sich dieTemperatur in den F chern des Ger ts betr chtlich erh hen Re...

Page 34: ...nk Bevor Sie den K hlschrank an das Stromnetz anschlie en kontrollieren Sie ob die Spannung auf demTypenschild Ihres Ger ts mit der Spannung in IhrerWohnung bereinstimmt Eine andere Spannung kann das...

Page 35: ...empfohlen einen Flachschraubenzieher einen Kreuzschraubenzieher und einen Schraubenschl ssel nicht im Lieferumfang enthalten sowie die unten aufgef hrten Bauteile zu verwenden Scharnier Abdeckplatte...

Page 36: ...zu entfernen muss dessen Lasche auf der R ckseite der Abdeckung eingedr ckt werden QVWDOODWLRQ 5 Detach cover in top of upper door and move harness from right side to left side then replace t 6 Move t...

Page 37: ...the middle hinge by cross screwdriver then take off the lower door 9 8 Die Schraubenabdeckungen von der linken auf die rechte Seite versetzen QVWDOODWLRQ 8 9 Unscrew bottom hinge Then remove the adjus...

Page 38: ...seite beiderT ren entfernen Die neuenT ranschl ge auf der linken Seite beiderT ren anbringen Die neuenT ranschl ge befinden sich im mitgelieferten Zubeh rbeutel QVWDOODWLRQ 13 Detach the Fridge and th...

Page 39: ...l the cabinet tightly Then connect door with cabinet by tightly fixed top hinge 16 Connect harnesses from door and cabinet Then replace top hinge cover Before screw the cover connect terminals of door...

Page 40: ...1 2 A B C 3 4 5 6 Die Betriebszeit und die temperatur werden durch den Ort an dem der K hlschrank verwendet wird durch die H ufigkeit derT r ffnung und durch dieTemperatur des Raums beeinflusst in de...

Page 41: ...dem Display erlischt ALARM Wenn die K hlschrankt r 90 Sekunden lang ge ffnet bleibt ert nt ein Signal Dieser Alarm ist eine Warnung damit dieT r nicht versehentlich ge ffnet bleibt und die Lebensmitt...

Page 42: ...hlelementen zu vermeiden Im Falle eines Lecks durch eine Besch digung der K hlelemente halten Sie den K hlschrank von offenem Feuer oderW rmequellen fern und l ften Sie den Raum in dem sich das Ger t...

Page 43: ...hmacksverlusts und von Austrocknung geben Sie die Lebensmittel in eine luftdichteVerpackung 1 Geben Sie die Lebensmittel in dieVerpackung 2 Entfernen Sie s mtliche Luft 3 Dichten Sie dieVerpackung ab...

Page 44: ...dieT rdichtung nur mit warmemWasser und reiben Sie diese anschlie end gr ndlich ab 5 Stecken Sie den Stecker nach der Reinigung in die Steckdose und stellen Sie die gew nschte Temperatur ein 6 Legen S...

Page 45: ...deln ist sondern an einem Sammelpunkt f r das Recyling von elektrischen und elektronischen Ger ten abgegeben werden muss Durch Ihren Beitrag zum korrekten Entsorgen dieses Produkts sch tzen Sie die Um...

Page 46: ...ity of the supplier and manufacturer lapse automatically in the following cases If the instructions in this manual have not been followed In case of incorrect connection e g electrical voltage that is...

Page 47: ...nce Do not use the appliance outdoors Only use the appliance for its intended use Always use the appliance on a steady dry and level surface Only use the appliance for domestic use The manufacturer ca...

Page 48: ...me into contact with a heat source There are flammable materials located on the back of the appliance Pay attention to the symbol Fire risk flammable materials located on the back of the appliance PAR...

Page 49: ...or leave the appliance alone for 8 hours before switching it on This allows the coolant to set We recommend using a slotted screwdriver a Phillips screwdriver and a wrench not included as well as the...

Page 50: ...s latch on the back of the cover plate QVWDOODWLRQ 5 Detach cover in top of upper door and move harness from right side to left side then replace t 6 Move top left cover to right side 4 Move door swi...

Page 51: ...rom the middle hinge by cross screwdriver then take off the lower door 9 8 Move the screw covers from the left side to the right side QVWDOODWLRQ 8 9 Unscrew bottom hinge Then remove the adjustable fe...

Page 52: ...of both doors Place the new door stoppers on the left side of both doors The new door stoppers can be found in the included accessory pocket QVWDOODWLRQ 13 Detach the Fridge and the Freezer door gaske...

Page 53: ...gasket seal the cabinet tightly Then connect door with cabinet by tightly fixed top hinge 16 Connect harnesses from door and cabinet Then replace top hinge cover Before screw the cover connect termin...

Page 54: ...e fridge is in SETTING THE FUNCTIONS HUIDFH e Control Panel ture Control of Fridge Compartment ture Control of Freezer Compartment ocking Unlocking N OPERATION ture of Fridge Comparment ture of Freeze...

Page 55: ...colder The food is kept fresh but not frozen MOVING THE SHELVES AND DOOR RACK Empty the fridge before moving the shelves or the door racks To move a shelf raise it and pull it towards you To move a do...

Page 56: ...To freeze food Note Ensure that the freezer door has been closed properly Avoid opening the freezer drawers unnecessarily Purchasing frozen food Packaging must not be damaged Use by the use by best be...

Page 57: ...the food was not already frozen Indeed frozen food that has thawed completely must not be refrozen Once defrosted food should be consumed quickly POWER FAILURE Most power failures are corrected withi...

Page 58: ...ice Buzzing or bubbling sound The compressor starts is operating The cooling gas circulates in the appliance This is normal The side panel is hot The condensation duct is on this side This is normal E...

Page 59: ...r uso retire todos los materiales de embalaje y etiquetas promocionales Aseg rese de que los ni os no puedan jugar con el material de embalaje Este aparato es adecuado para su uso en el mbito dom stic...

Page 60: ...s ranuras de ventilaci n libres y aseg rese de que no est n bloqueadas u obstruidas No utilice instrumentos mec nicos o de otro tipo para acelerar el proceso de descongelaci n No utilice ning n otro a...

Page 61: ...o estrecho o en un lugar h medo o que reciba la luz directa del sol Aseg rese de que pueda circular el aire alrededor del frigor fico La parte posterior del frigor fico debe estar separada de la pared...

Page 62: ...acia el otro lado le recomendamos que se ponga en contacto con un taller de reparaci n autorizado para llevar a cabo el trabajo Antes de cambiar la direcci n de giro compruebe que el enchufe se ha des...

Page 63: ...Para retirar el interruptor de la puerta presione y mantenga la tapa en la parte posterior de la placa de cubierta QVWDOODWLRQ 5 Detach cover in top of upper door and move harness from right side to...

Page 64: ...ge by cross screwdriver then take off the lower door 9 8 Desplace las cubiertas de los tornillos de la parte izquierda a la derecha QVWDOODWLRQ 8 9 Unscrew bottom hinge Then remove the adjustable feet...

Page 65: ...rior de ambas puertas Coloque los nuevos topes de puerta en el lado izquierdo de ambas puertas Puede encontrar los nuevos topes de puerta en la bolsa de accesorios suministrada QVWDOODWLRQ 13 Detach t...

Page 66: ...cabinet tightly Then connect door with cabinet by tightly fixed top hinge 16 Connect harnesses from door and cabinet Then replace top hinge cover Before screw the cover connect terminals of door swit...

Page 67: ...Mode 2 LED DISPLAY 1 2 A B C 3 4 5 6 El tiempo de funcionamiento y la temperatura se ven afectados por la ubicaci n en la que se utiliza el refrigerador el n mero de veces que se abre la puerta y la t...

Page 68: ...lla aparece un candado cerrado Presione 3 segundos la tecla UNLOCK bloqueo de seguridad para ni os para desbloquear el panel En la pantalla desaparece el icono del candado ALARMA Si la puerta del frig...

Page 69: ...a fuga por un da o en los elementos de refrigeraci n mantenga el frigor fico alejado de llamas o fuentes de calor y ventile la habitaci n donde se encuentra el aparato durante algunos minutos CONSERVA...

Page 70: ...3 Cierre el envase 4 A ada al envase una etiqueta con su contenido y la fecha de congelaci n Envases adecuados pel cula de pl stico rollo de pel cula de polietileno papel de aluminio o recipientes apt...

Page 71: ...unta de la puerta solo con agua limpia y a continuaci n frote a fondo 5 Despu s de la limpieza introduzca el enchufe en la toma de corriente y ajuste la temperatura deseada 6 Vuelva a colocar los alim...

Page 72: ...e se reciclan equipos el ctricos y electr nicos Si se asegura de que este producto se desecha correctamente usted ayudar a evitar posibles consecuencias negativas para las personas y el medio ambiente...

Page 73: ...uali adesivi promozionali Assicurarsi che i bambini non giochino con gli imballaggi Questo apparecchio destinato unicamente all uso domestico e in ambienti analoghi quali angoli cottura riservati al p...

Page 74: ...trumento o tecnica particolare per accelerare il processo di sbrinamento Non utilizzare nessuna apparecchiatura elettrica all interno del frigorifero a meno che tale dispositivo non sia approvato dal...

Page 75: ...olare liberamente attorni al frigorifero Il lato posteriore del frigorifero deve essere ad almeno 10 cm di distanza dal muro Assicurare sufficiente spazio per aprire lo sportello Posizionare il frigor...

Page 76: ...mento del refrigerante Si consiglia di usare un cacciavite a punta piatta un cacciavite con punta a stella e una chiave non forniti oltre ai seguenti componenti forniti Piastrina di copertura per cern...

Page 77: ...ito Per rimuovere l interruttore di sportello tenerne premuto il tassello sul retro della piastrina di copertura QVWDOODWLRQ 5 Detach cover in top of upper door and move harness from right side to lef...

Page 78: ...dle hinge by cross screwdriver then take off the lower door 9 8 Spostare le coperture delle viti dal lato sinistro al lato destro QVWDOODWLRQ 8 9 Unscrew bottom hinge Then remove the adjustable feet f...

Page 79: ...to inferiore di entrambi gli sportelli Posizionare i nuovi stop sportello sul lato sinistro di entrambi gli sportelli I nuovi stop sportello si trovano nel sacchetto accessori fornito QVWDOODWLRQ 13 D...

Page 80: ...cabinet tightly Then connect door with cabinet by tightly fixed top hinge 16 Connect harnesses from door and cabinet Then replace top hinge cover Before screw the cover connect terminals of door switc...

Page 81: ...cui il frigorifero viene utilizzato dal numero di volte cui la porta viene aperta e dalla temperatura della stanza in cui l apparecchio si trova IMPOSTARE LE FUNZIONI HUIDFH Control Panel ture Contro...

Page 82: ...to zona fresca mediante l interruttore sulla parete posteriore Questa impostazione non ha nessun effetto sul cassetto per verdure Posizionare l interruttore su crisper per mantenere fresche e pi a lun...

Page 83: ...rvazione di alimenti freschi per il risultato migliore Conservare solo alimenti molto freschi e di buona qualit Assicurarsi che gli alimenti siano confezionati in modo corretto o siano coperti prima d...

Page 84: ...ufati latte 1 mese Pane gelato salsicce piselli frutti di mare cotti pesci grassi 2 mesi Pesci non grassi frutti di mare pizza scones e muffins 3 mesi Prosciutto dolci biscotti carne bovina e costolet...

Page 85: ...o sulla confezione indica che esso non deve essere trattato come rifiuto domestico Deve al contrario essere conferito al punto di raccolta predisposto per il riciclo delle apparecchiature elettriche...

Page 86: ...s c Z ru n doba po n b et od p evzet v ci kupuj c m Pr va z vadn ho pln n uplat uje kupuj c u prod vaj c ho na adrese jeho provozovny v n je p ijet reklamace mo n s ohledem na sortiment prod van ho z...

Page 87: ...ta en m za kabel Nenech vejte p stroj b et bez dozoru Nikdy neumis ujte p stroj v bl zkosti plynov ho nebo elektrick ho spor ku i trouby nebo do bl zkosti jin ho p stroje produkuj c ho teplo Nepou vej...

Page 88: ...staly do styku s jin mi potravinami Pokud by byl spot ebi del dobu pr zdn tak ho doporu ujeme vypnout odmrazit a vy istit Po takov m vy i t n nechte vnit ek vyschnout a nezav rejte dv ka aby mohl pros...

Page 89: ...m stech s pr m rnou teplotou 16 38 C Pokud je tato teplota v okol p ekro ena ni nebo vy tak nemus lednice chladit spr vn Spot ebi m e b r pou v n pouze v interi ru Ve chv li kdy je kompresor sepnut a...

Page 90: ...v s oto te o 180 a znovu na roubujte st edov kol k ep Na epu by st le m l b t gumov chr n c potah nscrew top hinge cover and disconnect connectors of door switch and harness 2 Unscrew top hinge 3 Rem...

Page 91: ...to left side then replace the cover 6 Move top left cover to right side 7 Take off the upper door take out the screw from the middle hinge by cross screwdriver then take off the lower door 9 7 Od roub...

Page 92: ...p ipevn te na opa nou spodn stranu lednice ne bylo p vodn za roubujte N sledn na roubujte zp t ob no i ky QVWDOODWLRQ 13 Detach the Fridge and the Freezer door gaskets and then attach them after rota...

Page 93: ...ntrolujte zda dve e t sn po cel m sv m obvodu QVWDOODWLRQ 15 Replace upper door please ensure the door align with the cabinet to make sure door gasket seal the cabinet tightly Then connect door with c...

Page 94: ...B C 3 4 5 6 Doba nachlazen a aktu ln teplota je v dy z visl na v ce faktorech prost ed kde p stroj stoj jak asto se otev raj dve e nebo teplota m stnosti kde lednice stoj NASTAVEN ZVOLEN FUNKCE QWHUI...

Page 95: ...l of Fridge Compartment ature Control of Freezer Compartment ocking Unlocking N OPERATION ature of Fridge Comparment ature of Freezer Comparment de Mode ode Unlocking SPLAY 1 2 A B C 3 4 5 6 Slou pro...

Page 96: ...dnice prodlu uje trvanlivost j dla zejm na j dla podl haj c rychl zk ze Pokud vlo te erstv potraviny tak ty vydr v lednici nejd le Neskladujte j dlo kter ji nen erstv P ed vlo en m do lednice j dlo za...

Page 97: ...nina du en maso se zeleninou ml ko 1 m s c Chleba zmrzlina p rky kol e p edva en m kk i tu n ryby 2 m s ce M lo tu n ryby hluboce zamra en m kk i pizza muffiny 3 m s ce unka su enky hov z skopov kotle...

Page 98: ...jena do s t Jsou vypnuty jisti e nebo hlavn pojistka Z vada ve va el s ti Znovu a d kladn z str ku zapojte Zkontrolujte jisti e i pojistku Kontaktujte m stn ho elektrik e Podivn z pach Potraviny v chl...

Page 99: ...a m stech ur en ch ke sb ru a likvidaci elektrick ch a elektronick ch za zen Dodr en m tohoto doporu en chr n te ivotn prost ed a zdrav spoluob an V ce informac o mo nostech likvidace nebezpe n ho odp...

Page 100: ...mesiacov Z ru n doba za na plyn od prevzatia veci kupuj cim Pr va z chybn ho plnenia uplat uje kupuj ci u pred vaj ceho na adrese jeho prev dzky v ktorej je prijatie reklam cie mo n s oh adom na sorti...

Page 101: ...y z str ku nevy ahujte zo z suvky ahan m za k bel Nenech vajte pr stroj be a bez dozoru Nikdy neumiest ujte pr stroj v bl zkosti plynov ho alebo elektrick ho spor ka i r ry alebo do bl zkosti in ho pr...

Page 102: ...dujte vo vhodn ch n dob ch tak aby sa nedostali do styku s in mi potravinami Ak by bol spotrebi dlh iu dobu pr zdny tak ho odpor ame vypn odmrazi a vy isti Po takomto vy isten nechajte vn tro vyschn a...

Page 103: ...s priemernou teplotou 16 38 C Ak je t to teplota v okol prekro en ni ie alebo vy ie tak nemus chladni ky chladi spr vne Spotrebi m ete bada pou van iba v interi ri Vo chv li kedy je kompresor zopnut...

Page 104: ...oto te o 180 a znovu naskrutkujte stredov kol k ap Na apu by st le mala by gumov chr niace po ah nscrew top hinge cover and disconnect connectors of door switch and harness 2 Unscrew top hinge 3 Remo...

Page 105: ...side to left side then replace the cover 6 Move top left cover to right side 7 Take off the upper door take out the screw from the middle hinge by cross screwdriver then take off the lower door 9 7 O...

Page 106: ...ipevnite na opa n spodn stranu chladni ky ne bolo p vodne zaskrutkujte N sledne naskrutkujte sp obe no i ky QVWDOODWLRQ 13 Detach the Fridge and the Freezer door gaskets and then attach them after rot...

Page 107: ...ntrolujte i dvere tesnia po celom svojom obvode QVWDOODWLRQ 15 Replace upper door please ensure the door align with the cabinet to make sure door gasket seal the cabinet tightly Then connect door with...

Page 108: ...2 LED DISPLAY 1 2 A B C 3 4 5 6 Doba prechladnutie a aktu lna teplota je v dy z visl na viacer ch faktoroch prostredie kde pr stroj stoj ako asto sa otv raj dvere alebo teplota miestnosti kde chladni...

Page 109: ...Control of Freezer Compartment Locking Unlocking ON OPERATION ature of Fridge Comparment ature of Freezer Comparment ode Mode Mode Unlocking ISPLAY 1 2 A B C 3 4 5 6 Sl i pre zneakt vnen a zamknutie o...

Page 110: ...LO V CHLADNI KE Chladni ky predl uje trvanlivos jedla najm jedl podliehaj ce skaze Ak vlo te erstv potraviny tak tie vydr ia v chladni ke najdlh ie Neskladujte jedlo ktor u nie je erstv Pred vlo en m...

Page 111: ...a Slanina dusen m so so zeleninou mlieko 1 mesiac Chlieb zmrzlina p rky kol e predvaren m kk e tu n ryby 2 mesiaca M lo tu n ryby hlboko zmrazen m kk e pizza muffiny 3 mesiaca unka su ienky hov dzie b...

Page 112: ...zapojen do siete S vypnut isti a alebo hlavn posjitka Z vada vo va ej el sieti Znovu a d kladne z str ku zapojte Skontrolujte isti e aj poistku Kontaktujte miestneho elektrik ra Podivn z pach Potravin...

Page 113: ...ch ur en ch na zber a likvid ciu elektrick ch a elektronick ch zariaden Dodr an m tohto odpor ania chr nite ivotn prostredie a zdravie spoluob anov Viac inform ci o mo nostiach likvid cie nebezpe n ho...

Page 114: ...114 DO987BFK...

Page 115: ...115 DO987BFK www domo elektro be...

Page 116: ...essoires en onderdelen online via of scan hier COMMANDEZ d authentiques accessoires et pi ces Domo en ligne sur ou scannez ici BESTELLEN SIE die Domo Original Zubeh r und Ersatzteile online ber oder h...

Reviews: