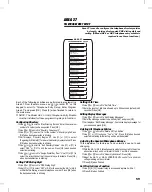
AREA 29
MEMORY MODULE UTILITIES
Area 29 is used for system service and maintenance. The
contents of the AM/II’s memory module can be copied to a
PC or to another AM/II using this area. The memory
contents can also be printed or initialized (erased) using this
area.
Each of the following activities are performed in programming
Area 29. From the main menu, use [
⇑
], [
⇓
] or enter “29” on the
keypad to scroll to “Memory Module Utilities, Enter Program
Area 29” and press [OK]. Press [
*
] when finished to return to
the main menu.
Sending Memory Module
Before sending the memory module contents, set the protocol to “XMODEM”
in the receiving computer’s communication program. Connect the computer
to the AM/II RS-232 port directly or use the Model AM-MOD modem for
remote telephone connection.
➊
Use [
⇑
] or [
⇓
] to scroll to “Send Memory Module”.
➋
Use [
⇐
] or [
⇒
] to select “Yes”. Press [OK].
➌
Unit displays: “Begin File Transfer”. You have one minute to begin
receiving the memory file. Instruct the receiving computer’s software to
receive (download) the binary file.
➍
When the transfer is finished, the AM/II will display: “File Transfer
Complete”.
Receiving Memory Module
Before receiving the memory module contents, set the protocol to
“XMODEM” in the sending computer’s communication program. Connect the
computer to the AM/II RS-232 port directly or use the Model AM-MOD
modem for remote telephone connection.
➊
Use [
⇑
] or [
⇓
] to scroll to “Receive Memory Module”.
➋
Use [
⇐
] or [
⇒
] to select “Yes”. Press [OK].
➌
Unit displays: “Begin File Transfer”. You have one minute to begin
sending the memory file. Instruct the sending computer’s software to
send (upload) the binary file.
➍
When the transfer is finished, the AM/II will display: “File Transfer
Complete”.
Copying Memory Module
Before copying the memory module contents to another AM/II, connect the
two units together using the Model A2A cable. Set both unit’s RS-232 port
device settings to “Off”.
➊
Use [
⇑
] or [
⇓
] to scroll to “Copy Memory Module” on both units.
➋
Use [
⇐
] or [
⇒
] to select “ReceiveMM” on the receiving unit. Press [OK].
➌
Use [
⇐
] or [
⇒
] to select “SendMM” on the sending unit. Press [OK].
➍
When the transfer is finished, the AM/II will display: “File Transfer
Complete”. Press [OK] to continue.
Printing Memory Module
➊
Use [
⇑
] or [
⇓
] to scroll to “Print Memory Module”.
➋
Use [
⇐
] or [
⇒
] to select “Yes”. Press [OK]. The contents of the memory
module will be sent to the AM/II’s RS-232 port.
Initializing Memory Module
✘
WARNING: Initializing the memory module will erase all
programmed data.
➊
Use [
⇑
] or [
⇓
] to scroll to “Initialize Memory Module”.
➋
Use [
⇐
] or [
⇒
] to select “Yes”. Press [OK]. The contents of the memory
module will be completely erased and the default values restored.
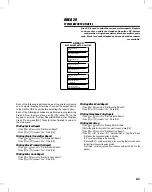
MEMORY MODULE UTILITIES
AREA 29
29.1
29.2
29.3
29.4
29.5
Send Memory Module
Yes No
Receive Memory Module
Yes No
Copy Memory Module
Off SendMM ReceiveMM
Print Memory Module
Yes No
Initialize Memory Module
Are You Sure? Yes No
60


