LTC3212
2
OPERATING PRINCIPLES
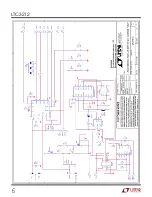
The DC1187 has a programmable IC on board that
communicates to the DC590 USB to I
2
C board
and drives the LTC3212 via a single wire interface.
The current in each LED output is set by adjusting
the resistance at the associated ISET pin. Each
ISET pin is connected to an 8.87K
Ω
resistor in se-
ries with a 50K
Ω
potentiometer. This allows the
user to adjust each ISET resistance between
8.87K
Ω
and 58.87K
Ω
to experiment with different
color variations and intensities. The current for
LEDG is set by the RSETG potentiometer, R4. The
currents for LEDR and/or LEDB are also set by the
RSETG potentiometer when in white mode and
when ISETR and/or ISETB are tied to VIN via JP2
and JP3 respectively. Otherwise, the LEDR and
LEDB output currents are set by the RSETR po-
tentiometer, R6, and RSETB potentiometer, R5,
respectively.
QUICK START PROCEDURE
Demonstration circuit 1187 is easy to set up to
evaluate the performance of the LTC3212. Refer to
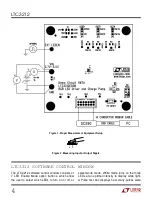
Figure 1 for proper measurement equipment setup
and follow the procedure below:
NOTE. When measuring the input or output voltage ripple, care
must be taken to avoid a long ground lead on the oscilloscope
probe. Measure the input or output voltage ripple by touching the
probe tip directly across the VIN or CPO and GND terminals. See
Figure 2 for proper scope probe technique.
1. Place jumpers in the following positions:
JP1 LEDEN: Up, DC590 position.
JP2 ISETR: Down, RSETR position.
JP3 ISETB: Down, RSETB position.
2. Make sure that the RSETG, RSETR, and
RSETB potentiometers are set approximately to
the center position (adjustment slot is
perpendicular to top of board).
3. Refer to the DC590 Quick Start Guide for
QuikEval
TM
setup and software installation
details.
4. If using the DC590B board, make sure the
VCCIO jumper, JP6, on the DC590B board is
set to the 5V position. The microcontroller on
the DC1187 board needs 5V to operate
properly.
5. Make sure the USB cable is connected between
the computer and the DC590 controller board.
6. Connect DC1187 to the DC590 USB Serial Con-
troller using the supplied 14-conductor ribbon
cable as shown in Figure 1.
7. With power off, connect the input power supply
to VIN
and GND with a series ammeter and a
voltmeter as shown in Figure 1.
8. Turn on the input power supply and set the VIN
voltage to 3.6V.
NOTE. Make sure that the input voltage does not exceed 6V.
9. Run the QuikEval program. The program de-
tects the DC1187 and displays the LTC3212
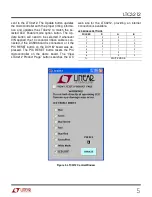
control window (shown in Figure 3).
10. Select the Green/Red option button on the
LTC3212 control window and observe that the
RGB LED illuminates light greenish.
11. Adjust RSETG fully counterclockwise and ob-
serve that the RGB LED changes to a yellowish
green color.
12. Adjust RSETR fully clockwise and observe that
the RGB LED color changes to light orange.
13. Move the ISETR jumper from the RSETR posi-
tion to the RSETG position and observe that the
RGB LED color changes to light green.
14. Select the Blue/Green option button on the
LTC3212 control window and observe that the
RGB LED illuminates light blue.
Summary of Contents for DC1187A
Page 7: ...LTC3212 6...
Page 8: ...LTC3212 7...


