6
7
Installing your unit – Quick Release Model
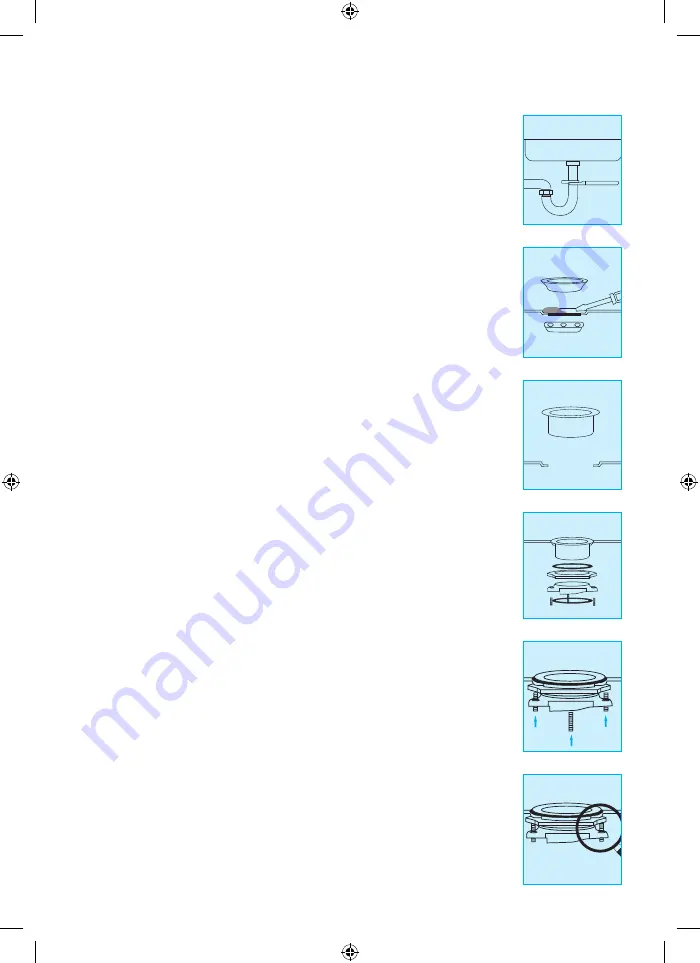
Make sure that the waste pipe system has no blockage
1.
before installation. Test that the waste pipe is running clear,
if not clean the pipe before continuing the installation.
(figure. 1)
Remove the original sink waste system and drain-pipe
2.
connection, making sure to remove any marks or stains
before continuing the installation. (figure. 2)
Remove the connector flange from the mounting ring by
3.
turning the sink flange in counter-clockwise direction until
the notches align in the mount ring and allow you to pull the
sink flange up and out of the remaining mounting assembly.
Unpack the 3 mount screws and screw them half way
through the sink flange. (figure. 3)
Take the stainless steel snap ring out of the groove at the
4.
end the sink flange and pull off the sink flange together
with the rubber gasket, fibre gasket, triangle ring, and
mount ring. Note the sequence of these parts as they are
stacked. (figure. 4)
Make sure that your sink is clean. Place the underside rim of
5.
the rubber gasket on the sink flange (If the sink is not made
of stainless steel, plumber’s putty should be used to ensure
a good seal). Then, position the sink flange on the sink
opening so it is centred as you look into your sink. Push the
sink flange firmly into the sink opening to make a good seal.
DO NOT move or rotate the sink flange once seated or the
seal may be damaged. (figure. 5)
From under the sink, replace the fibre gasket, triangle ring
6.
and mounting ring back to the sink flange in turn. Tighten
the 3 mounting screws evenly with a screwdriver. Then,
put the stainless steel snap ring back to its original place.
(figure. 6)
1
2
3
4
5
6
LINEAR MANUAL new.indd 7
29/4/10 14:48:34


