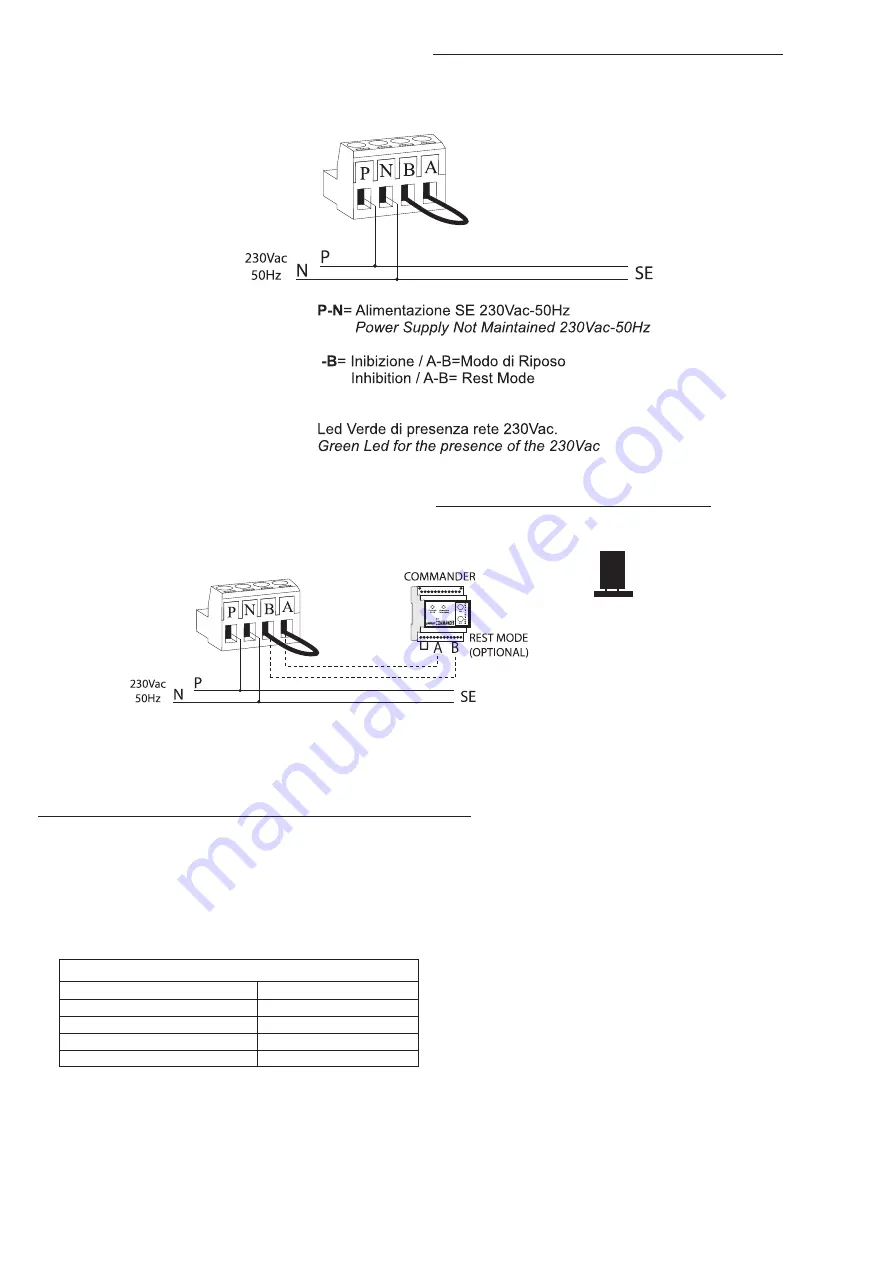
COLLEGAMENTI ELETTRICI MODELLI SOLO EMERGENZA
WIRING DIAGRAMS NOT MAINTAINED MODELS
J5
COLLEGAMENTI ELETTRICI MODELLI SEMPRE ACCESA
WIRING DIAGRAMS PERMANENT VERSION
N.B.
Il Jumper J5 inserito di
fabbrica consente l’accensione dei
LED in presenza di rete.
Rimuoverlo per rendere
l’apparecchio Solo Emergenza.
N.B.
The Jumper J5 supplied as
standard allows the LEDs in the
presence of mains supply. Remove
it to make the luminaire not
maintained.
A
Attenzione:
In caso di utilizzo dell’art. COMMANDER non collegare il ponte a filo su A-B, e una volta effettuato il collegamento come la linea tratteggiata
IN PRESENZA DI RETE,
tenere premuto per 10 s il tasto ON, affinché la lampada si configuri in “MODO DI RIPOSO”.
Da questa situazione è possibile ritornare alla configurazione di fabbrica spingendo il tasto OFF per 10 s.
NOTA:
Attention:
When using the COMMANDER do not connect the jumper wire on A-B and, once the connection is made as in figure 6-7 (broken line),
hold the ON button for 10 s so that the lamp gets configured in “REST MODE.
WITH THE MAINS SUPPLY ON
from this situation it is possible to return to the factory default configuration by pushing the OFF button for 10 s.
NOTE:
CONFIGURAZIONE - CONFIGURATION COMMANDER
Fig. 1
Fig. 2
MAINS SUPPLY ON, NO WARNING
TEST DISABLED, INHIBIT LUMINAIRE
BATTERY FAULT
WARNING LUMINAIRE
SEGNALETICA LED / LED SIGNALLING
VERDE ACCESO FISSO /
GREEN ON
PRESENZA RETE, NESSUNA ANOMALIA
TEST IN CORSO /
TEST IN PROGRESS
TEST DISABILITATI, LAMPADA INIBITA
GUASTO BATTERIA
ANOMALIA LAMPADA
VERDE LAMPEGGIANTE / GREEN FLASHING
ROSSO LAMPEGGIANTE LENTO / RED SLOW FLASHING
ROSSO LAMPEGGIANTE VELOCE / RED FAST FLASHING
ROSSO ACCESO FISSO / RED ON
FUNZIONI DI TEST
- La lampada esegue due tipi di test temporizzati: il test funzionale e il test di
autonomia. I test funzionale e di autonomia possono essere effettuati anche
manualmente con il Commander quando la batteria è in ricarica di
mantenimento.
Durante il tempo di attesa il led verde lampeggia per segnalare che la
lampada sta aspettando di potere compiere i test.
Test funzionale:
viene effettuato ogni 15 giorni e consiste nella accensione
della lampada fluorescente per una durata di 20 secondi. Per attivare il test
funzionale manuale premere una volta il Commander ON (effettuare una
pressione breve della durata non superiore a 2 secondi)
Test di autonomia:
viene effettuato ogni 90 giorni e consiste nella completa
scarica della batteria. P
e il test di autonomia premere una volta il
er far partir
Commander ON (effettuare una pressione lunga della durata non inferiore a
10 secondi).
Disabilitazione dei test:
tutti i test temporizzati possono essere inibiti tramite
la pressione di un tasto del Commander OFF, ad una seconda pressione del
tasto ON i test temporizzati verranno riabilitati.
TEST FUNCTIONS, ONLY FOR SELF TEST MODELS - ABRT:
-The lamp makes two types of deliberate time tests: the functional test and the duration
test. The functional test and the duration test can be made also in the manual way with
the use of the Commander in the normal charge mode.
In the time of waiting the green led flashes to indicate that the lamp is waiting for the
test.
The functional test:
is done every 15 days and consists in the lighting of the
fluorescent lamp for a duration of 10 seconds. To start the manual functional test push
one time the Commander ON (make a short push no more than 10 seconds)
The duration test:
is done every 90 days and consists in the complete discharge of the
battery. To start the duration test push one time the Commander ON (make a long push
no less than 5 seconds).
Disabilitation of the tests:
all deliberate time tests can be disabled with a pushing of
the button of Commander OFF, with a second pushing of the Commander ON
deliberate time tests will be enabled.


