background image

Operating Instruction

7. OPERATION CONTROLS AND FUNCTIONS

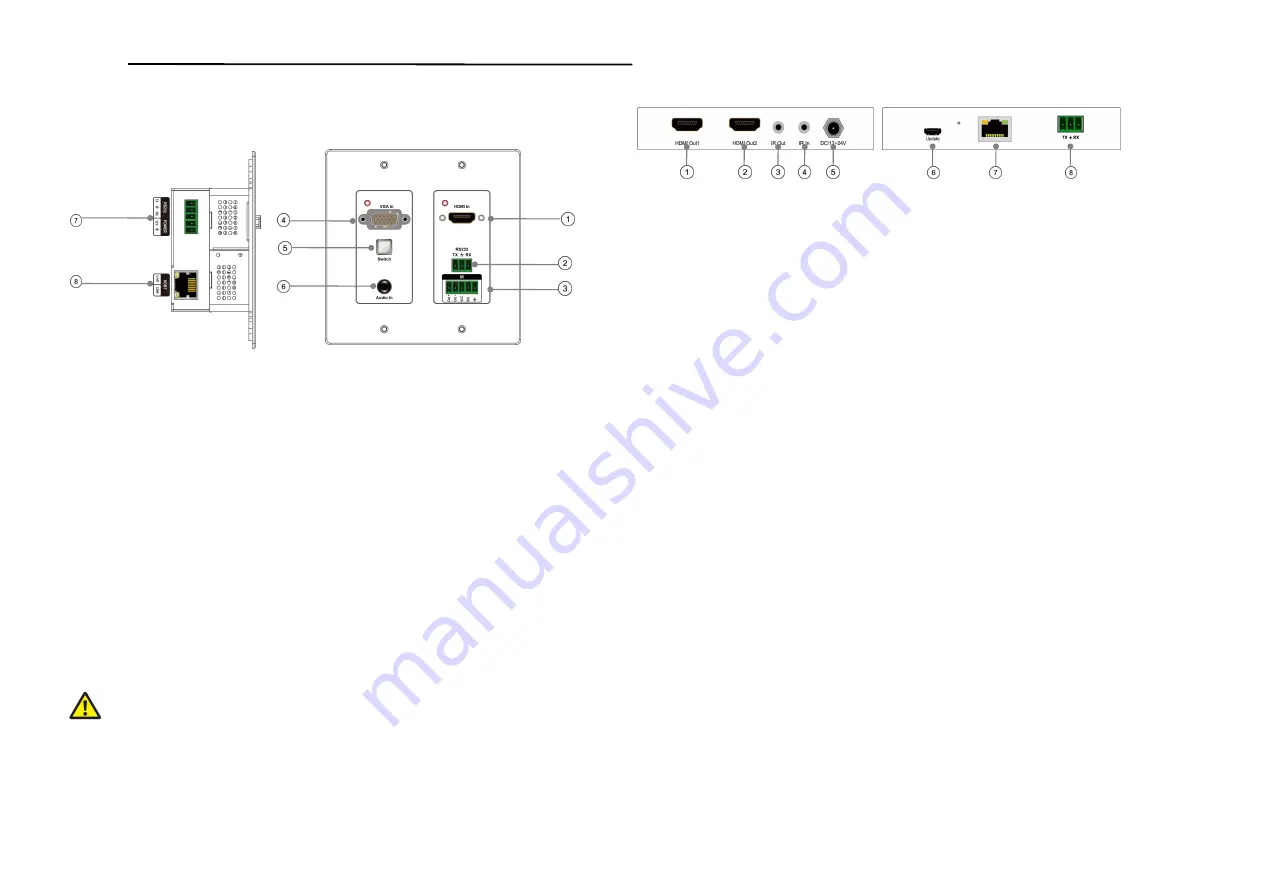
7.1 Transmitter Front and Rear

HDMI In

: Connect to HDMI source equipment such as DVD or Blu-ray player

RS232 port

: Connect the RS232 device via the RS232 cable via the Phoenix plug.

IR In/out

: Connect to the supplied IR blaster cable for IR signal transmission. Place the IR blaster

in direct line-of-sight of the equipment to be controlled.

VGA in

:Connect to VGA source equipment such as PC or other VGA device.

Switch Button

: Switch the VGA and HDMI source input.

Note:

(When select HDMI source input,double press switch button to enter audio embedded

mode,indicator light of HDMI on wallplate will be flickering.)

Mini 3.5 Jack

: Support analog 2.0 audio embedded.

Power and RS232 port:

It support powered at the back side connect with the Power Phoenix plug,

And the RS232 port is for the firmware upgrade.

CAT5e/6 Out:

Connect to the receiver unit with a single CAT5e/6 cable for transmission of all

data signals

Warning:

Please pay attention to the power and RS232 Interface.

We must make sure the power and RS232 connection is correct, If not, the unit will be
burned.

6

Operating Instruction

7.2 Receiver Front and Rear Panels

HDMI Out1

: Connect to a HDMI equipped TV/Monitor for display of the HDMI input source

signal

HDMI out2

: Connect to a HDMI equipped TV/Monitor for display of the HDMI input source

signal

IR Out

: Connect to the supplied IR blaster cable for IR signal transmission. Place the IR blaster in

direct line of sight of the equipment to be controlled

IR In

: Connect to the supplied IR blaster cable for IR signal transmission. Place the IR blaster in

direct line-of-sight of the equipment to be controlled.

DC/12-24V

: Plug the 24V DC power supply into the unit and connect the adaptor to an AC outlet

Update

: USB port to update the firmware

CAT5e/6 In

: Connect to the transmitter unit with a single CAT5e/6 cable for transmission of all

data signals

RS232 Out

: Connect to the device that is to be controlled via phoenix terminal by RS-232

command

7

Summary of Contents for LM-EW53

Page 1: ...LM EW53 HD Extender Wallplate TO BOX KIT Operating Instruction Thank you for purchasing this product For optimum performance and safety please ...

Page 2: ...ain moisture or install this product near water Never spill liquid of any kind on or into this product Never push an object of any kind into this product through any openings or empty slots in the unit as you may damage parts inside the unit Do not attach the power supply cabling to building surfaces Use only the supplied power supply unit PSU Do not use the PSU if it is damaged Do not allow anyth...

Page 3: ...If your product does not work properly because of a defect in materials or workmanship our Company referred to as the warrantor will for the length of the period indicated as below Parts 2 Year Labor 90 Days which starts with the date of original purchase Limited Warranty period at its option either a repair your product with new or refurbished parts or b replace it with a new of a refurbished pro...

Page 4: ... instructions 3 1xIR TX Cable 4 1xIR RX Cable 5 24V1A DC power supply 6 1x2 PIN Phoenix plugs for power 7 1x5 PIN Phoenix plugs for IR cable termination 8 2x3 PIN Phoenix plugs for RS232 cable termination 4 SYSTEM REQUIREMENTS Input HDMI or VGA source equipment such as DVD Blu ray player PC and HDMI equipped output display TV or monitor 4 Operating Instruction 9 Firmware Upgarde The unit support u...

Page 5: ...y Receiver HDCP2 2 HDCP1 4 Compliant Support 2 0 Analog Audio embedded 6 Specifications Operating Temperature Range 10 to 40 C 14 to 104 F Operating Humidity Range 5 to 90 RH no condensation Input Video Signal 0 5 1 0 volts p p Input DDC Signal 5 volts p p TTL Video Format Supported DTV HDTV 4K 1080P 1080i 720P 50HZ 576P 480P 576i 480i VGA resolution Output Video HDMI 2 0 HDCP1 4 2 2 Output Audio ...

Page 6: ...single CAT5e 6 cable for transmission of all data signals Warning Please pay attention to the power and RS232 Interface We must make sure the power and RS232 connection is correct If not the unit will be burned 6 Operating Instruction 7 2 Receiver Front and Rear Panels HDMI Out1 Connect to a HDMI equipped TV Monitor for display of the HDMI input source signal HDMI out2 Connect to a HDMI equipped T...

Reviews: