background image

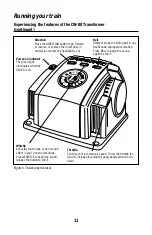
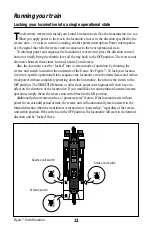
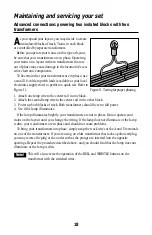
Refer to Figure 6 on page 11 for the location of the Transformer features listed in this section.

THROTTLE

Push the throttle forward to increase track power. The markings on the throttle approxi-

mate the percentage of full power. For more realism, push the throttle slowly to gradually
increase or decrease the speed of the locomotive. Slowing or stopping the locomotive with the
throttle instead of the DIRECTION button will allow you to continue in the same direction
when you increase the throttle again. To achieve this effect, reduce the throttle to the point
that the locomotive stops moving, but don’t completely turn off the throttle. That way, your
train won’t sequence into neutral.

DIRECTION

The DIRECTION control button interrupts track power to activate the reverse unit in your

locomotive. Your locomotive will not respond to this button when the reverse unit switch is in
the OFF position.

WHISTLE

The WHISTLE button will activate your locomotive’s whistle. The sound will continue until

the button is released. No external sound activation buttons are needed.

BELL

The BELL button will activate the bell sounds on locomotives equipped with this feature. Press

and hold the BELL button for two to three seconds to begin the sounds; press and hold the button
again to turn off the ringing. 

Your locomotive is not equipped with bell sounds.

Do not activate horns, whistles, or bells on RailSounds-equipped locomotives until
track power has been turned on for a few moments, or a continuous horn/whistle or
bell sound may occur. To correct this problem, simply turn off the CW-80
Transformer, then turn it back on.

POWER-ON INDICATOR

The green light will remain on during normal operation. The green light will begin to

flash if you exceed the power limit of the Transformer. The unit will allow you to momentarily
exceed the power limit, but power will be gradually reduced until the problem is corrected.
The benefit is that the Transformer will not instantly turn off. 

Running your train

10

Experiencing the features of the CW-80 Transformer

Note!

Note!

Summary of Contents for Cascade series

Page 1: ...ge Logging Train Ready to Run Set Owner s Manual CAUTION ELECTRICTOY NOT RECOMMENDED FOR CHILDREN UNDER EIGHTYEARS OFAGE ASWITH ALL ELECTRIC PRODUCTS PRECAUTIONS SHOULD BE OBSERVED DURING HANDLINGANDUSETOREDUCETHERISKOFELECTRICSHOCK TRANSFORMERRATINGS INPUT 120VAC 60HZONLY ACOUTPUT 18V 80VA ...

Page 2: ...years of reliable operation The transformer included with this set should be periodically examined for conditions that may result in the risk of fire electric shock or injury to persons such as damage to the output cord blades housing or other parts In the event that such conditions exist the transformer should not be used until properly repaired Parents Cascade Range Logging Train Set Features Br...

Page 3: ...ning your train Running your train set 8 Operating the Uncoupling Track section 8 Adding smoke fluid to your locomotive s smoke generator 9 Uncoupling your locomotive 9 Experiencing the features of the CW 80 Transformer 10 11 Locking your locomotive into a single operational state 12 CW 80 Transformer operation Powering your layout with the CW 80 Transformer 13 Setting the accessory output 14 Main...

Page 4: ... not use this device if water is present Serious or fatal injuries may result Use the CW 80 Transformer only for its intended purpose The CW 80 Transformer was meant to operate on 120 volt 60 Hertz power Do not connect this product to any other power supply Do not operate the CW 80 Transformer with a damaged cord plug or case To avoid the risk of electrical shock do not disassemble the unit There ...

Page 5: ...ding rails 3 Press the sections together until the interlocking roadbed snaps into place Figure 2 Joining the track sections Building your Lionel layout Your set comes with eight curved three straight and one terminal section of track Figure 1 provides some examples of layouts that you can build with these track sections By adding more FasTrack track sections you can create an endless number of ex...

Page 6: ...de connector Be sure that the blades are touching the metal post 4 If you need to power an accessory available separately at your authorized Lionel dealer connect the accessory to the ACCESSORY thumbscrew terminals Use the accessory wire included with the CW 80 Transformer 5 Plug the CW 80 Transformer into your wall outlet 120 volts As your layout expands you may also make power connections with t...

Page 7: ...Creating your layout 7 Wiring your CW 80 Transformer continued U 120 60z 0 18VAC A B U 0 18VAC TRACK ACCESSORY Figure 3 Controller connections FasTrack terminal section Notch Spade shaped connector ...

Page 8: ...iefly bring the throttle all the way back to the OFF position and then forward Each press of the DIRECTION button or interruption in track power causes the locomotive to advance to the next operational state Adjust track voltage until your locomotive moves at your desired speed 1 1 Note Operating the Uncoupling Track section Without making any additional con nections your Uncoupling Track is power...

Page 9: ...to Figure 7 on page 12 for the location of the switch The smoke generator requires the periodic addition of Lionel smoke fluid in order to function A small bottle of smoke fluid is included with this set Press down and unscrew the cap Pierce the end of the nozzle with a pin then add about four drops of fluid directly into the locomotive s stack Smoke production commences momentarily It will start ...

Page 10: ...on will activate your locomotive s whistle The sound will continue until the button is released No external sound activation buttons are needed BELL The BELL button will activate the bell sounds on locomotives equipped with this feature Press and hold the BELL button for two to three seconds to begin the sounds press and hold the button again to turn off the ringing Your locomotive is not equipped...

Page 11: ...y RailSounds equipped locomotive Press BELL to begin the sound again to stop it Direction Press the DIRECTION button to go forward or reverse or to place the locomotive in neutral no movement headlight is on Throttle Controls your locomotive s speed Throw the throttle for ward to increase locomotive speed backward to slow it down Power on indicator The green light illuminates when the CW 80 is on ...

Page 12: ...nderside of the frame See Figure 7 To lock your locomo tive into a specific operational state sequence the locomotive into the desired state and reduce track power without completely powering down the locomotive then throw the switch to the OFF position The DIRECTION button or other track power interruptions will then have no affect on the direction of the locomotive If you would like to resume fo...

Page 13: ...ssory voltage are 0 18 volts AC each This Transformer is capable of operating trains up to and including dual motored AC locomotives To operate at this level of track power it may be necessary to disconnect any accessories You may also attempt to lower the accessory voltage settings Refer to the Setting the accessory output section on page 14 You may momentarily approach or exceed the five amp lim...

Page 14: ...nsformer as discussed on page 6 2 Bring the throttle all the way back to the OFF position 3 Press and hold down the DIRECTION WHISTLE and BELL buttons on the Transformer Refer to Figure 5 on page 11 for the location of these buttons The green light on the Transformer will flash and track power will turn off 4 With all three buttons held down raise the throttle slowly until you reach your desired a...

Page 15: ...lubricate a small amount will do and avoid getting grease or oil on the locomotive s wheels or your track You ll know your locomotive requires lubrication when visual inspection reveals dryness on the parts indicated in Figure 8 Remove accumulated dirt and dust before lubricating and always lubricate any locomotive emerging from prolonged storage Figure 8 Underside details and lubrication points S...

Page 16: ...ve If you are uncomfortable with this operation you may choose to have the traction tires replaced by your authorized Lionel Service Center Figure 9 Plunger and cradle locations Cradle Loading the log cars Prepare the car for its load by pressing down the cradle on top of the car until it locks in the horizontal position Place the logs in the cradle and your car is ready for action Refer to Figure...

Page 17: ... hinged at the platform to swing outward away from the body 3 Remove the window shell To remove the window shell carefully bend the sides of the caboose outward while pulling up on the window shell until the tabs are released from the windows 4 Pull the lamp straight up and out of the socket Replace it with Lionel lamp no 600 8352 311 available at your authorized Lionel Service Center or Lionel Se...

Page 18: ... lamp wire to the center rail in the other block 3 Power up both blocks of track Both transformers should be set to full power 4 See if the lamp illuminates If the lamp illuminates brightly your transformers are not in phase Do not operate your trains on the layout until you change the wiring If the lamp does not illuminate or the lamp is dim your transformers are in phase and should not cause pro...

Page 19: ...for the accessory refer to page 14 and reset the voltage to a higher level Locomotive runs slowly or lights dim at the far end of the track On larger layouts additional track resistance may cause reduced track voltage as the trains move away from the power terminal section Install additional FasTrack terminal sections around your layout and connect them to your Transformer to distribute power Gree...

Page 20: ...ith your dated sales receipt and completed warranty information to the nearest Authorized Lionel Service Center Your nearest Lionel Service Center can be found by calling 1 800 4 Lionel or by accessing our Website at www lionel com If you prefer to send your product back to Lionel L L C for repair in Michigan you must first call 586 949 4100 or FAX 586 949 5429 or write to Customer Service P O Box...

Reviews:

Related manuals for Cascade series