background image

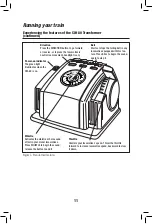
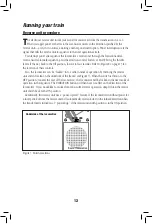
Refer to Figure 6 on page 11 for the location of the Transformer features listed in this section.

THROTTLE

Push the throttle forward to increase track power. The markings on the throttle approxi-

mate the percentage of full power. For more realism, push the throttle slowly to gradually 
increase or decrease the speed of the locomotive. Slowing or stopping the locomotive with the 
throttle instead of the DIRECTION button will allow you to continue in the same direction 
when you increase the throttle again. To achieve this effect, reduce the throttle to the point 
that the locomotive stops moving, but don’t completely turn off the throttle. That way, your 
train won’t sequence into neutral.

DIRECTION

The DIRECTION control button interrupts track power to activate the reverse unit in your 

locomotive. Your locomotive will not respond to this button when the reverse unit switch is in 
the OFF position.

WHISTLE

The WHISTLE button will activate your locomotive’s horn or whistle sounds. The sound 

will continue until the button is released. No external sound activation buttons are needed.

BELL

The BELL button will activate the bell sounds on locomotives equipped with this feature. Press 

and hold the BELL button for two to three seconds to begin the sounds; press and hold the button 
again to turn off the ringing. 

Do not activate horns, whistles, or bells on RailSounds RTR-equipped locomotives 
until track power has been turned on for a few moments, or a continuous horn/
whistle or bell sound may occur. To correct this problem, simply turn off the CW-80 
Transformer, then turn it back on.

POWER-ON INDICATOR

The green light will remain on during normal operation. The green light will begin to 

flash if you exceed the power limit of the Transformer. The unit will allow you to momentarily 
exceed the power limit, but power will be gradually reduced until the problem is corrected. 
The benefit is that the Transformer will not instantly turn off. 

Running your train

10

Experiencing the features of the CW-80 Transformer

Note!

Summary of Contents for Grand Central Express

Page 1: ... AS WITH ALL ELECTRIC PRODUCTS PRECAUTIONS SHOULD BE OBSERVED DURINGHANDLINGANDUSETOPREVENTELECTRICSHOCK TRANSFORMERRATINGS INPUT 120VAC 60HZONLY ACOUTPUT 18V 80VA Lionel Grand Central Express Ready to Run Train Set Owner s Manual Lionel Grand Central Express Ready to Run Train Set Owner s Manual ...

Page 2: ...et up operate and maintain your train set for years of reliable operation The transformer included with this set should be periodically examined for conditions that may result in the risk of fire electric shock or injury to persons such as damage to the output cord blades housing or other parts In the event that such conditions exist the transformer should not be used until properly repaired Paren...

Page 3: ...nsformer 10 11 Reverse unit procedure 12 13 Operating the RailSounds RTR sound system 14 Adjusting the volume 15 CW 80 Transformer operation Powering your layout with the CW 80 Transformer 16 Setting the accessory output 17 Maintaining and servicing your set Lubricating your locomotive 18 Replacing your locomotive s traction tire 19 Replacing your locomotive s lamp 20 Replacing the lamps in your p...

Page 4: ...Do not use this device if water is present Serious or fatal injuries may result Use the CW 80 Transformer only for its intended purpose The CW 80 Transformer was meant to operate on 120 volt 60 Hertz power Do not connect this product to any other power supply Do not operate the CW 80 Transformer with a damaged cord plug or case To avoid the risk of electrical shock do not disassemble the unit Ther...

Page 5: ...dreams can quickly become a reality Creating your layout Figure 1 Track layout ideas 5 FasTrack Add on Track Packs make it easy to expand your railroad Each Track Pack includes all the track sections you need to create a more advanced layout using the sections included with this set Refer to Figure 2 to explore the possibilities Figure 2 Add on Track Pack layouts Inner Passing Loop Add on Track Pa...

Page 6: ...k fits together securely so you always get good electrical contact Take a look at Figure 3 to see how to join the track sections 1 Line up your two sections of track 2 Insert the rail tabs into the openings at the ends of the corresponding rails 3 Press the sections together until the interlocking roadbed snaps into place Figure 3 Joining the track sections Rail tab ...

Page 7: ...pade connector Be sure that the blades are touching the metal post 4 If you need to power an accessory available separately at your authorized Lionel dealer connect the accessory to the ACCESSORY thumbscrew terminals Use the accessory wire included with the CW 80 Transformer 5 Plug the CW 80 Transformer into your wall outlet 120 volts As your layout expands you may also make power connections with...

Page 8: ...Creating your layout 8 Connecting your CW 80 Transformer continued U 120 60z 0 18VAC A B U 0 18VAC TRACK ACCESSORY Figure 4 Controller connections FasTrack terminal section Notch Spade shaped connector ...

Page 9: ...d to operate on 7 15 volts alternating cur rent Virtually all Lionel and Lionel compatible alternating current transformers are suitable Do not power your locomotive with direct current DC transformers The locomotive was designed for use with alternating current AC transformers only Move em out Get your locomotive moving Your locomotive goes through a repeating pattern of operations forward neutra...

Page 10: ... The WHISTLE button will activate your locomotive s horn or whistle sounds The sound will continue until the button is released No external sound activation buttons are needed BELL The BELL button will activate the bell sounds on locomotives equipped with this feature Press and hold the BELL button for two to three seconds to begin the sounds press and hold the button again to turn off the ringing...

Page 11: ...ocomotive equipped with this fea ture Press BELL to begin the sound again to stop it Direction Press the DIRECTION button to go forward or reverse or to place the locomotive in neutral no movement headlight is on Throttle Controls your locomotive s speed Throw the throttle forward to increase locomotive speed backward to slow it down Power on indicator The green light illuminates when the CW 80 is...

Page 12: ...ontrols Also the locomotive can be locked into a certain mode of operation by throwing the reverse unit switch located on the underside of the frame see Figure 7 When the switch is thrown to the OFF position towards the rear of the locomotive the locomotive will be locked in the next mode of operation in the sequence The DIRECTION button will then have no affect on the direction of the locomotive ...

Page 13: ...Running your train 13 Reverse unit procedure continued Figure 8 Direction control button location Direction control button Whistle control button Bell control button Throttle ...

Page 14: ...e sound Crew dialog Press the WHISTLE HORN button on your transformer briefly for less than a second to trig ger the train dialog The dialog varies with the state of the locomotive Power must be applied to the track for the dialog to play If the locomotive set has been stopped for longer than 15 seconds a short horn blast trig gers a cleared outbound dialog If the locomotive set has started moving...

Page 15: ...r train 15 Adjusting the volume Use the volume control knob on the underside of the locomotive to adjust the volume Refer to Figure 9 Figure 9 Volume control knob and switch locations RUN LOCK Volume control knob ...

Page 16: ...sory voltage are 0 18 volts AC each This Transformer is capable of operating trains up to and including dual motored AC locomotives To operate at this level of track power it may be necessary to disconnect any accessories You may also attempt to lower the accessory voltage settings Refer to the Setting the accessory output section on page 17 You may momentarily approach or exceed the five amp limi...

Page 17: ...nsformer as discussed on page 7 2 Bring the throttle all the way back to the OFF position 3 Press and hold down the DIRECTION WHISTLE and BELL buttons on the transformer Refer to Figure 6 on page 11 for the location of these buttons The green light on the Transformer will flash and track power will turn off 4 With all three buttons held down raise the throttle slowly until you reach your desired a...

Page 18: ...r oil on the locomotive s wheels contact rollers or your track You ll know your locomotive requires lubrication when visual inspection reveals dryness on the parts indicated in Figure 10 Remove accumulated dirt and dust before lubricating and always lubricate any locomotive emerging from prolonged storage Lubricate with Lionel oil sparingly Lubricate with Lionel oil sparingly Turn truck to remove ...

Page 19: ... rubber tires increase the tractive effort of your locomotive allowing it to pull more cars at once During the course of normal operations the traction tires may become worn out Because you must remove the trucks and the side frames to access the wheels we recommend that you have the traction tires replaced by your Factory Trained Authorized Lionel Service Center ...

Page 20: ...g your locomotive s lamp Your locomotive is illuminated by four lamps During the course of normal operations you may find that the lamps require replacement Lamp replacement should be performed by a Factory Trained Authorized Lionel Service Center ...

Page 21: ...hey may require replacement To replace the lamp inside the car remove the two screws under the car See Figure 11 below Once this screw is removed you can lift the roof off remove the expired lamp and install the replacement Replacing the lamp in your passenger cars Part No 6308352311 Remove large screw on both ends Figure 11 Lamp replacement ...

Page 22: ...from the power terminal section Install additional FasTrack terminal sections around your layout and connect them to your Transformer to distribute power Note that loco motives may decrease speed slightly around curves Green light begins to flash Be sure that all the wheels are properly on the track Ensure that no metal objects are in con tact with the track to cause a short Also be sure that the ...

Page 23: ...ot installed and used in accordance with the instructions may cause harmful interference to radio communications However there is no guarantee that interference will not occur in a particular installation If this equipment does cause harmful interference to radio or television reception which can be determined by turning the equipment off and on the user is encouraged to try to correct the interfe...

Page 24: ...s warranty gives you specific legal rights and you may have other rights which vary from state to state Instructions for Obtaining Service If service for this Lionel LLC product is required bring the item along with your DATED sales receipt and completed warranty information at the bottom of this page to the nearest Lionel Authorized Service Station Your nearest Lionel Service Station can be found...

Reviews:

Related manuals for Grand Central Express