background image

18

L

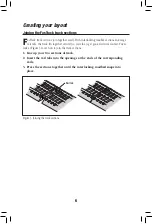
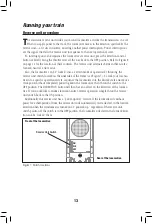
ionel offers accessories of all shapes and sizes — from crossing signals to coal and lumber 
loaders — available at your authorized Lionel dealer. When you are ready to operate your new 

accessory, the CW-80 Transformer allows you to choose how much power your accessory receives 
with programmable accessory output. The ability to control the voltage allows you to set the speed of 
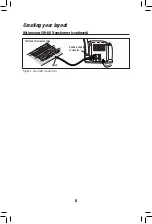
your accessory motors and the intensity of your lights. Accessories connected to the accessory output 
terminals receive constant voltage whenever the transformer is plugged in, regardless of the throttle 
position. Follow these steps to set the voltage.

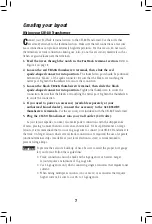
The accessory output voltage was set to 12 volts at the factory.

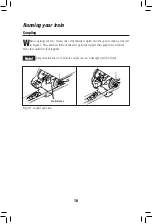
1.  Connect your accessory to the CW-80 Transformer as discussed on pages 7-8.
2.  Bring the throttle all the way back to the OFF position.
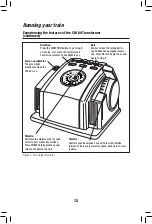
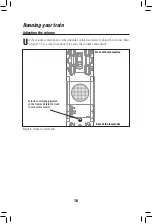
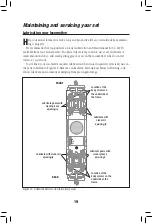
3.  Press and hold down the DIRECTION, WHISTLE, and BELL buttons on the 

Transformer. Refer to Figure 6 on page 12 for the location of these buttons.

  The green light on the Transformer will flash, and track power will turn off.

4.  With all three buttons held down, raise the throttle slowly until you reach your 

desired accessory voltage. 

5.  Release the buttons once you have reached your desired voltage.

  The accessory turns off, and the solid green light indicates that you have set the accessory voltage.

6.  Bring the throttle all the way back to turn off the power.

  The voltage will momentarily increase, briefly causing the lights to shine brighter or the motors 

to operate faster, before returning to the set level. At this point, increasing the throttle again will 
control track power only.

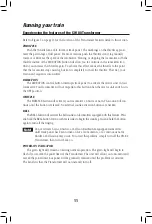
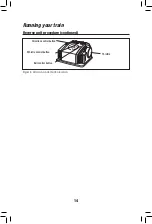
Setting the accessory output

Note!

CW-80 Transformer operation

Summary of Contents for NJ Transit

Page 1: ...RICTOY NOT RECOMMENDED FOR CHILDREN UNDER FOURTEEN YEARS OF AGE AS WITHALLELECTRICPRODUCTS PRECAUTIONSSHOULDBEOBSERVEDDURING HANDLINGANDUSETOPREVENTELECTRICSHOCK TRANSFORMERRATINGS INPUT 120VAC 60HZON...

Page 2: ...n how to set up operate and maintain your train set for years of reliable operation The transformer included with this set should be periodically examined for conditions that may result in the risk of...

Page 3: ...ormer 11 12 Reverse unit procedure 13 14 Operating the RailSounds RTR sound system 15 Adjusting the volume 16 CW 80 Transformer operation Powering your layout with the CW 80 Transformer 17 Setting the...

Page 4: ...o not use this device if water is present Serious or fatal injuries may result Use the CW 80 Transformer only for its intended purpose The CW 80 Transformer was meant to operate on 120 volt 60 Hertz p...

Page 5: ...reams can quickly become a reality Creating your layout Figure 1 Track layout ideas 5 FasTrack Add on Track Packs make it easy to expand your railroad Each Track Pack includes all the track sections y...

Page 6: ...fits together securely so you always get good electrical contact Take a look at Figure 3 to see how to join the track sections 1 Line up your two sections of track 2 Insert the rail tabs into the ope...

Page 7: ...ghten the thumbscrew to secure the connection 4 If you need to power an accessory available separately at your authorized Lionel dealer connect the accessory to the ACCESSORY thumbscrew terminals Use...

Page 8: ...8 Creating your layout Wiring your CW 80 Transformer continued U 120 60z 0 18VAC A B U 0 18VAC TRACK ACCESSORY Figure 4 Controller connections FasTrack terminal section Notch Spade shaped connector...

Page 9: ...ect current DC transformers The locomotive was designed for use with alternating current AC transformers only Move em out Get your locomotive moving Your locomotive goes through a repeating pattern of...

Page 10: ...plers must be open as shown at the left in Figure 5 Press down on the lock release to open the coupler then push the cars toward each other until they lock together Keep in mind that it s easier to co...

Page 11: ...WHISTLE The WHISTLE button will activate your locomotive s whistle or horn The sound will con tinue until the button is released No external sound activation buttons are needed BELL The BELL button wi...

Page 12: ...RailSounds equipped locomo tive Press BELL to begin the sound again to stop it Direction Press the DIRECTION button to go forward or reverse or to place the locomotive in neutral no movement headligh...

Page 13: ...switch located on the underside of the frame see Figure 7 To lock your locomo tive into a specific operational state sequence the locomotive into the desired state and reduce track power without comp...

Page 14: ...Running your train 14 Reverse unit procedure continued Figure 8 Direction control button location Direction control button Whistle control button Bell control button Throttle...

Page 15: ...sound Crew dialog Press the WHISTLE HORN button on your transformer briefly for less than a second to trig ger the train dialog The dialog varies with the state of the locomotive Power must be applie...

Page 16: ...he locomotive to adjust the volume Refer to Figure 9 Use a small screwdriver to access the volume control knob ON OFF ON OFF SMOKE DIR Figure 8 Volume control knob Front of the locomotive Rear of the...

Page 17: ...sory voltage are 0 18 volts AC each This Transformer is capable of operating trains up to and including dual motored AC locomotives To operate at this level of track power it may be necessary to disco...

Page 18: ...ansformer as discussed on pages 7 8 2 Bring the throttle all the way back to the OFF position 3 Press and hold down the DIRECTION WHISTLE and BELL buttons on the Transformer Refer to Figure 6 on page...

Page 19: ...rollers or your track You ll know your locomotive requires lubrication when visual inspection reveals dryness on the parts indicated in Figure 10 Remove accumulated dirt and dust before lubricating an...

Page 20: ...gently pull the expired lamp from its socket Replace the expired lamp with Lionel part no 630 8352 311 available from your authorized Lionel Service Center or Lionel Service For more information see p...

Page 21: ...the wires that attach the body to the frame 4 Carefully pull the expired lamp straight up and out of the socket then install the replacement bulb Refer to Figure 14 If you accidentally pull the entir...

Page 22: ...rom the power terminal section Install additional FasTrack terminal sections around your layout and connect them to your Transformer to distribute power Note that loco motives may decrease speed sligh...

Page 23: ...used in accordance with the instructions may cause harmful interference to radio communications However there is no guarantee that interference will not occur in a particular installation If this equ...

Page 24: ...warranty gives you specific legal rights and you may have other rights which vary from state to state Instructions for Obtaining Service If service for this Lionel LLC product is required bring the i...

Reviews: