background image

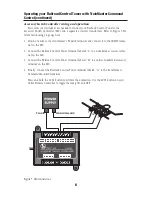
Figure 4. SC-2 connections

ACC2

ACC2

ACC1

ACC1

5

Operating your Railroad Control Tower with  

TrainMaster Command Control

Y

ou may choose to wire your Railroad Control Tower with an SC-2 Switch and Accessory 
Controller (available separately, 6-22980) or the Accessory Switch Controller (available 

separately, 6-14182) for operation in the TrainMaster Command Control environment. Refer 
to these manuals for additional information.

SC-2 wiring and operation

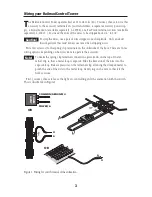
Four wires (not included) are needed to connect your Railroad Control Tower to the SC-2 

and a separate accessory transformer. Refer to Figure 4. We recommend using 22-gauge wire.

1.   Attach one wire to the transformer’s Common/Ground/U terminal and connect it to the 

accessory COMM (common) position on the SC-2. 

2.   Connect one of the Railroad Control Tower terminal labeled “L” to the accessory ON/OFF 

toggle position on the SC-2. 

3.  Connect the Railroad Control Tower terminal labeled “M” to the momentary position on 

the SC-2

4.   Finally, connect the Railroad Control Tower terminal labeled “G” to the transformer’s 

Power/A terminal. 

  Press and hold the AUX1 button to activate the animation. Use the AUX2 button on your 

CAB-1 Remote Controller to toggle the lamp ON and OFF.

Power/A

Common/Ground/U

Operating the Railroad Control Tower

I

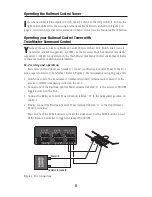
f you have connected the separate switch, slide the switch to the ON position to turn on the 
light and/or animation. If are using an Insulated Track Section as shown in Figure 3 on 

page 4, your train will activate the animation when it rolls across the Insulated Track Section.

Summary of Contents for Railroad Control Tower

Page 1: ...72 4153 250 09 09 Lionel Railroad Control Tower Owner s Manual Lionel Railroad Control Tower Owner s Manual ...

Page 2: ...trol 5 6 Replacing the lamps in your Railroad Control Tower 7 Limited Warranty Lionel Service 8 The following Lionel marks may be used throughout this instruction manual and are protected under law All rights reserved Lionel TrainMaster Odyssey RailSounds CrewTalk TowerCom DynaChuff StationSounds Pullmor ElectroCoupler Magne Traction CAB 1 Remote Controller PowerMaster Lionel ZW ZW PowerHouse TMCC...

Page 3: ...o the spring clip terminals on the underside of the base There are three wiring options depending on how you want to operate the accessory To make the spring clip terminal connections press down on the top of the ter minal clip so that a metal loop is exposed Slide the bare end of the wire into the exposed loop Release pressure on the terminal clip allowing the crimped metal to pinch the end of th...

Page 4: ...he light on and activate the animation with an Insulted Track Section available separately This is illustrated in Figure 3 POWER SUPPLY COMMON GROUND U POWER SUPPLY POWER A OR OR POWER SUPPLY A U 2 1 U A A U Figure 2 Wiring for switch control of the animation and lighting A U POWER SUPPLY COMMON GROUND U POWER SUPPLY POWER A OR OR POWER SUPPLY 2 1 U A A U Figure 3 Wiring for Insultated Track contr...

Page 5: ...round U terminal and connect it to the accessory COMM common position on the SC 2 2 Connect one of the Railroad Control Tower terminal labeled L to the accessory ON OFF toggle position on the SC 2 3 Connect the Railroad Control Tower terminal labeled M to the momentary position on the SC 2 4 Finally connect the Railroad Control Tower terminal labeled G to the transformer s Power A terminal Press a...

Page 6: ...Power A terminal and connect it to the COMM termi nal on the ASC 2 Connect the Railroad Control Tower terminal labeled L to a numbered accessory termi nal on the ASC 3 Connect the Railroad Control Tower terminal labelel M to another numbered accessory terminal on the ASC 4 Finally connect the Railroad Control Tower terminal labeled G to the transformer s Common Ground U terminal Press and hold the...

Page 7: ...ad Control Tower may require replacement To access the lamp remove the anemometer and the weather vane then lift off the roof Unscrew the expired bulb and replace it with Lionel part no 600 0363 300 Replace the roof to complete the lamp replacement Refer to Figure 6 Figure 6 Lamp replacement Anemometer Weather vane ...

Page 8: ...ages Some states do not allow the exclusion or limitation of incidental or consequential damages so the above exclusion may not apply to you This warranty gives you specific legal rights and you may have other rights which vary from state to state Instructions for Obtaining Service If service for this Lionel LLC product is required bring the item along with your DATED sales receipt and completed w...

Reviews: