‑ 6 ‑
EN
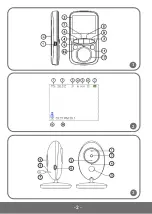
6.
Volume key – (volume down) / „left” button / automatic unit switch
7.
Music ON/OFF
8.
Talk key/MENU navigation key
9.
Volume key + (volume up / „right” button / manual unit switch
10.
OK / Menu key
11.
Power/return key
12.
Speaker
13.
Battery
PARENT UNIT SCREEN ICONS fig .2
DESCRIPTION OF BABY UNITS (located near child) fig. 3
USE
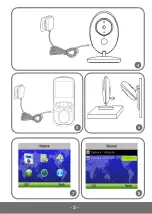
How to provide power supply and switch the unit on (fig. 4
)
1.
Connect a feeder plug to a baby unit and the other end to the socket.
NOTE:
Use the feeder cable supplied only.
2.
The baby unit will activate automatically after you have provided power
supply.
3.
Blue LED suggests that the baby unit is active.
How to provide power supply and switch the unit on (fig. 5)
It is advisable to charge the parent unit fully before you use it. By doing so,
the device can work on battery in case of a power failure.
1.
Connect the feeder plug to the parent unit and the other end to the socket.
NOTE:
Use the feeder cable supplied only.
1.
Signal strength indicator and unit
number (1 or 2)
2.
Unit temperature
3.
Lullaby play
4.
Automatic switch activated
5.
VOX mode activated
6.
Alarm activated
7.
Battery charging indicator
8.
Talk function activated
9.
Date and time
1.
Light sensor
2.
Camera
3.
Power LED
4.
Microphone
5.
Infrared light
6.
Feeder connector
7.
Temperature sensor
8.
Steam key
9.
Speaker
Summary of Contents for Babyline 5.1
Page 2: ...2 1 2 13 3...
Page 3: ...3 4 7 5 6 8...
Page 4: ...4 9 10 11...
Page 21: ...21 RU 1 2 3 4 1 5 6 7 1 1 2 LCD 3 4 5 6 7 ON OFF 8 9 10 11 12 13...
Page 22: ...22 RU 2 3 4 1 2 3 5 1 2 3 1 1 2 2 3 4 5 VOX 6 7 8 9 1 2 3 4 5 6 7 8 9 10...
Page 23: ...23 RU 4 6 1 VOX VOX VOX 1 2...
Page 24: ...24 RU 5 7 6 8 1 9 1 2 3 4 VOX 5 6...
Page 25: ...25 RU 10 2 50 60 11 LCD LCD VOX 2 VOX VOX...
Page 72: ...www lionelo com...

