


Rev: 11.23.22
Page 5
CCD-0004307
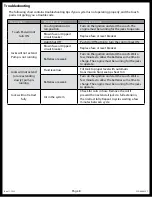
Manual Operation
Leveling Coach
There are certain conditions where manually leveling your coach may be desirable. Conditions where large
amounts of side to side leveling are necessary or when one or more tires are off the ground at the end of the
auto-level sequence, it may work better using the manual leveling procedures that follow:
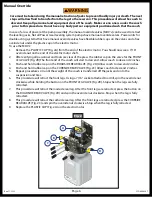
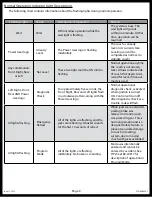
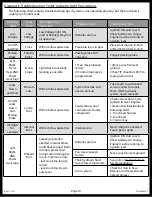
1.
Turn on the ignition and start the coach.
2.
Push the ON/OFF (Fig.1A) button to turn on the system.
3.
Push and hold the MAN (Fig.1D) button for 5-7 seconds in order for the system to switch to the manual
mode. It will signal that it is in the manual mode when the light under the MAN (Fig.1D) button is
illuminated.
4.
Push FRONT (Fig.1F) button until the front of the coach rises at least 3”. This is important and necessary
to allow the coach to pivot when leveling side to side. If there is insufficient jack stroke to lift the front
of the coach at least 3 inches, the coach will have to be moved to an area with less front to back slope,
or a weight distribution block will have to be placed under the jack.
5.
Push the REAR (Fig.1I) button until jacks contact the ground.
6.
Level the coach from front to rear by pushing the REAR (Fig.1I) button if the light under the REAR
(Fig.1I) button is illuminated. If the light is illuminated above the FRONT JACKS button, push the FRONT
(Fig.1F) button. In either case, keep button depressed until the green center LEVEL (Fig.1E) light is
illuminated, or both front and rear lights are dark.
Note:
The right and left rear jacks are used to level the coach side to side. Pushing the LEFT (Fig.1) button
on the control panel will extend the left rear jack. Pushing the RIGHT (Fig.1) button on the control
will extend the right rear jack.
7.
Level the coach from side to side by pushing the RIGHT (Fig.1) button if the light beside the RIGHT
(Fig.1) button is illuminated. If the light beside the LEFT (Fig.1) button is illuminated, push the LEFT
(Fig.1) button until the LEVEL (Fig.1) light is illuminated.
8.
Repeat steps 6 and 7 if needed.
9.
Turn power off to leveling system by pushing ON/OFF (Fig.1A) button.
Note:
If the Wait (Fig.1G) LED is ever flashing by itself, it means the control is busy and you cannot operate
the jacks. After a short period of time (from 5 to 30 seconds), the WAIT (Fig.1G) LED will go off again,
and you can resume operation as normal.
10. Visually inspect jack to ensure all pads are touching ground. Should one of the rear jacks not be
touching the ground, press the corresponding left or right rear jack buttons to lower the appropriate
jack to the ground. Never lift the wheels off the ground to level the coach. This can lead to an unsafe
condition and damage to the leveling system or coach.
11. If a level condition cannot be reached or one or more tires are off the ground at the completion of
leveling, retract the leveling jacks and move the coach to a different location or change its orientation
to achieve a more level starting position and repeat steps 1 through 10.
12. If a level condition cannot be obtained with the previous steps, level the coach as much as possible
while maintaining tire contact with the ground.


