Rev: 10.04.18
Page 4
CCD-0002274
TI-284
KWIKEE
®
DOOR SWITCH STEP ACTIVATION
INSTALLATION GUIDE (1421330)
STEPS
Note:
Under no circumstances should the door switch be forced into its mounting position.
Note:
Before installing screws in the door switch to securely attach to the unit, perform a quick test to
make sure step is functioning properly.
1.
Installing the new switch on the door frame.
A.
Check for ample clearance in the door frame for the body of the door switch.
B.
Remove backing from the double-sided adhesive tape on the back of the switch.
C.
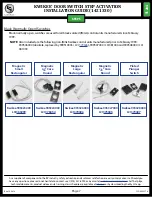
Using the double-sided tape, attach the switch to the door frame. The switch can be placed in
the same location as the old switch if the bottom placement of the new switch will be at least six
inches from the bottom of the door frame (Fig. 1).
2.
Installing the new magnet on the screen door.
A.
Using double-sided tape attached to the magnet, install the magnet on the screen door, opposite
the switch.
B.
Make sure to align the magnet with the switch attached to door frame (Fig. 1).
Moving parts can pinch, crush or cut. Keep fingers, arms, and legs clear of the step mechanism while
performing this check. Failure to do so may result in personal injury. Keep clear and use caution.
3.
Check switch function to make sure the steps are working properly.
A.
Open screen door.
B.
Step assembly should extend.
C.
Close screen door.
D.
Step assembly should retract.
Securing Connections
1.
Once the locations of the switch and magnet are correctly set, and steps are working properly, finish
securing the door switch.
A.
Line up the holes in the switch and magnet with the holes in the screen door and door frame.
B.
Secure using self-tapping screws with a screwdriver or a cordless or electric drill with appropriate
drill bit.
C.
If possible, use the same screws previously removed from the old door switch.
2.
Under the unit, at the 4-way connector to the control box, use a heat gun to shrink the heat shrink butt
connector attaching the switch to the control box. This will help keep out moisture.
3.
In addition, black electrical tape can also be wrapped around the butt connector to keep out dust, dirt,
debris and moisture.
4.
Place silicone rubber sealant under the vehicle at the hole where the wires feed to the switch. This will
help seal against moisture or water leaks.


