background image

Rev: 08.30.22

Page 22

CCD-0006500

1. 

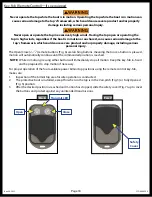
Touch and hold the controller's 

RAISE

 button (Fig. 10A) to fully extend the bimini top.

NOTE:  

Do 

NOT

 fully open the power bimini without the canvas top installed or failure of the system 

will result.

A.  The controller's operation indicator light will turn on green (Fig. 10B).

B.  The light will turn off after the system has completed its travel.

2. 

Touch and hold the controller's 

LOWER

 button (Fig. 11A) to fully retract the bimini top.

C.  The controller's operation indicator light will turn on blue (Fig. 11B).

D.  The light will turn off after the system has completed its travel.

3. 

Alternately operate the controller's 

RAISE 

and

 LOWER 

buttons to place the bimini top in various 

positions to ensure proper touch controller installation.

Operation 

Indicator Light

A

Fig. 9 

B

A

B

A

Fig. 10 

Fig. 11 

Using the Bluetooth® Compatible App

The SureShade app operates in the same fashion as the physical controller. There is no operation indicator 

light on the control button screen.
If using an iOS (Apple) smart device, do as follows:

1. 

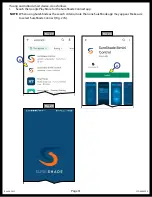
Search the App Store for the SureShade Bimini Control app.

NOTE:  

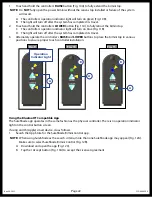
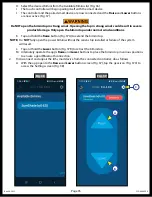
When using SureShade as the search criteria, more than one SureShade app may appear (Fig. 12A). 

Make sure to select SureShade Bimini Control (Fig. 12B).

A.  Download and open the app (Fig. 12C).

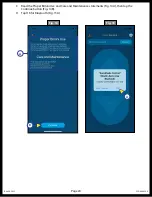
B.  Tap the I Accept button (Fig. 13A) to accept the License Agreement.

Summary of Contents for Power Bimini Master

Page 1: ...Power Bimini Master OWNER S MANUAL...

Page 2: ...ional 20 Touch Controller or App if so equipped 21 High Speed Mesh Top if so equipped 36 Front Shade Extension if so equipped 37 Courtesy Light if so equipped 39 Speakers if so equipped 39 Adjustable...

Page 3: ...ustable front support straps Front support arms Complete quick connect QC bimini system This manual covers the operation of the various available power bimini features To learn about the operation of...

Page 4: ...sult in severe product damage Only fully open the bimini frame with the canvas top installed The 6 Amp auto reset circuit breaker used on any Power Bimini System that does NOT use the touch sensitive...

Page 5: ...on purposes only Boat fencing and railings are NOT included in the Power Bimini system Securing straps are provided to prevent undue billowing of the bimini top and for the attachment of accessories T...

Page 6: ...vigation Light Front shade extension stanchions and tie down straps are folded rolled up inside the shade fabric and tucked into the bimini s front pocket for storage Two adjustable front support stra...

Page 7: ...Rev 08 30 22 Page 7 CCD 0006500 Front Frame Rear Frame Middle Frame Courtesy Light Standoff Fence Railing Fence Railing Adjustable Front Support Straps...

Page 8: ...Rev 08 30 22 Page 8 CCD 0006500 Front Securing Straps Optional Accessory Loops...

Page 9: ...Rev 08 30 22 Page 9 CCD 0006500 Stanchions Quick Release Hinge Boat Railing Saddle Strap Front Shade Extension Tie down Straps...

Page 10: ...v 08 30 22 Page 10 CCD 0006500 Complete Quick Connect Bimini System if so equipped Front Shade Extension Mesh Top Speakers Controller Power Bimini Actuators and Frame Front Support Arm Front Support A...

Page 11: ...on Install protective boot Do NOT trailer or tow the boat without the protective boot properly installed on the top and without the top in its full down position Trailering or towing the boat without...

Page 12: ...the top in high winds regardless if the boat is in motion or anchored can cause serious damage to the top s framework which could cause severe product and or property damage including serious personal...

Page 13: ...peration The Power Bimini top can be operated in four different positions Fully Closed for lifts bridges and storage Vari pitch for shade during low setting sun conditions Radar for aft entry exit Ful...

Page 14: ...ctive boot is properly installed when the top is not in use Fully Closed Down Towing Position Do NOT trailer or tow the boat without the protective boot properly installed on the top and without the t...

Page 15: ...high winds Having the top open or operating the top in high winds regardless if the boat is in motion or anchored can cause serious damage to the top s framework which could cause severe product and...

Page 16: ...en release button NOTE Maximum speed limit is 50 MPH NOT for trailering or towing NOTE Do NOT operate top when boat is in motion or in excessively high winds Radar For Water Use Only Never operate the...

Page 17: ...t is in motion Operating the top while the boat is in motion can cause serious damage to the top s framework which could cause severe product and or property damage including serious personal injury F...

Page 18: ...Fob Remote Control if so equipped The Open Close remote buttons Fig 6 are latching buttons meaning that once a button is pressed motion will automatically continue until the commanded position is rea...

Page 19: ...utton Fig 6 until motion begins then release When desired position is reached Fig 4 press either button to stop motion 3 Slide safety cover up Fig 7 NOTE Maximum speed limit is 50 MPH NOT for traileri...

Page 20: ...remote Fig 6 Verify that the RF receiver Status Light blinks 4 Repeat steps 1 and 2 for each additional remote 5 Verify that each remote has been successfully programmed NOTE To delete all key fob rem...

Page 21: ...llation NOTE Do NOT fully open the power bimini without the canvas top installed or failure of the system will result Using the Touch Controller The power bimini system is designed to shut itself off...

Page 22: ...as completed its travel 3 Alternately operate the controller s RAISE and LOWER buttons to place the bimini top in various positions to ensure proper touch controller installation Operation Indicator L...

Page 23: ...Rev 08 30 22 Page 23 CCD 0006500 App Store is a trademark of Apple Inc AndroidTM and Google PlayTM are trademarks of Google LLC A Fig 12 Fig 13 C B A...

Page 24: ...Rev 08 30 22 Page 24 CCD 0006500 C Read the Proper Bimini Use and Care and Maintenance statements Fig 14A then tap the Continue button Fig 14B D Tap OK for Bluetooth Fig 15A B A A Fig 14 Fig 15...

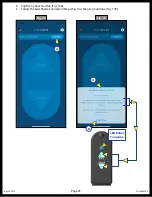
Page 25: ...Rev 08 30 22 Page 25 CCD 0006500 E Tap the Connect button Fig 16A F Follow the SureShade Connection Steps Fig 9A then tap Continue Fig 17B A LED Blinks Turquoise A B Fig 16 Fig 17...

Page 26: ...Rev 08 30 22 Page 26 CCD 0006500 G Select the desired bimini from the Available Biminis list Fig 18 H The Touch Controller will begin pairing itself with the smart device Fig 19 Fig 18 Fig 19...

Page 27: ...CD 0006500 I Tap the Pair button Fig 20A to complete the connection J The controller and the paired smart device are now connected and the Raise and Lower buttons are now active Fig 21 A Buttons are A...

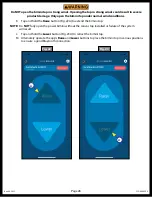
Page 28: ...l result L Tap and hold the Lower button Fig 23A to retract the bimini top M Alternately operate the app s Raise and Lower buttons to place the bimini top in various positions to ensure a good Bluetoo...

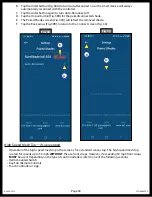
Page 29: ...button screen Fig 21 tap the gear icon Fig 21A to access the Settings screen Fig 24 B Tap the slider button Fig 24A to turn Auto Reconnect on so the smart device will always automatically reconnect w...

Page 30: ...Rev 08 30 22 Page 30 CCD 0006500 E The Paired Shades screen Fig 26 will reflect the removed shade F Tap the Back arrow Fig 26A to return to the Connect screen Fig 17 A Fig 26...

Page 31: ...id smart device do as follows 1 Search the Google Play Store for the SureShade Connect app NOTE When using SureShade as the search criteria more than one SureShade app may appear Make sure to select S...

Page 32: ...stall button Fig 28A and open the app Fig 29 B Tap the I Accept button Fig 30A to accept the License Agreement C Read the Proper Bimini Use and Care and Maintenance statements Fig 31A then tap the Con...

Page 33: ...0006500 D Tap OK Fig 32A in the Permissions Request window E Tap the desired option Fig 33A to grant the app access to the device s location NOTE Lippert recommends selecting the While using the app...

Page 34: ...Rev 08 30 22 Page 34 CCD 0006500 F Tap the Connect button Fig 34A G Follow the SureShade Connection Steps Fig 35A then tap Continue Fig 35B Fig 34 Fig 35 A B LED Blinks Turquoise A...

Page 35: ...nstalled or failure of the system will result L Tap and hold the Lower button Fig 37B to retract the bimini top M Alternately operate the app s Raise and Lower buttons to place the bimini top in vario...

Page 36: ...will reflect the removed shade F Tap the Back arrow Fig 39B to return to the Connect screen Fig 34 Fig 38 Fig 39 A B B A High Speed Mesh Top if so equipped Operation of the high speed mesh top is the...

Page 37: ...top s front zippered storage pocket before deploying the front shade extension If so desired reconnect the front support straps after the front shade extension has been disconnected and stowed The fro...

Page 38: ...is placed underneath the bimini top and secured to the rear rails with locking plates for the stanchions and saddles for the tie down straps With the bimini top fully opened and the front shade exten...

Page 39: ...ere are no directional or brightness level adjustments for the courtesy light Speakers if so equipped NOTE The power bimini s speakers located on the port and starboard mid frame struts are not affect...

Page 40: ...completely disconnected from their saddles and then stored in the top s front zippered storage pocket Fig 46D 4 Whenever the front shade extension is disconnected and stowed the front support straps...

Page 41: ...il the auto reset breaker trips J Pull the front support arm Fig 47A out of its EZ Clip Fig 47B K Position the swivel barrel over the hinge assembly L Slide and hold the locking button down Fig 48A th...

Page 42: ...t the front support arms A Slide and hold the hinge assembly s locking button Fig 49A down then pull the swivel barrel out of the locking plate Fig 49B B Release the locking button C Push the front su...

Page 43: ...Remove foreign material from gear handle Inspect gear handle and actuator for damage Perform manual override if necessary Bimini top does not fully open or close Low power Make sure battery is fully c...

Page 44: ...pocket Zip all frame pockets closed Unconnected snap s Connect all snaps Mesh top not fully opened Fully open mesh top Front shade extension stanchions do not reach the locking plates Front shade ext...

Page 45: ...m locking plate Debris lodged inside the locking plate Remove debris from locking plate Damaged or worn slide button spring Replace hinge assembly Front support arm does not stay secured Damaged or wo...

Page 46: ...ore them in the top s front zippered storage pocket 3 Unzip the front pocket of the bimini canvas A If available have a second person push forward on the rear frame to relieve some pressure off of the...

Page 47: ...Rev 08 30 22 Page 47 CCD 0006500 Fig 51 A B Fig 52 A B QC Controller A B Fig 53...

Page 48: ...pocket over the loose front frame to help hold the frame in place 10 Install the protective boot over the collapsed rear frame fabric and front frame Fig 55 to secure the bimini system in place 11 Sec...

Page 49: ...w the solution time to soak completely into the fabric I Hose off the bimini top and boot fabric with fresh clean water Repeat as necessary 3 Allow bimini top and boot to dry before closing the top an...

Page 50: ...ors Harness Connectors Circuit Protection per ABYC Codes OEM Supplied The 6 Amp auto reset circuit breaker used on any Power Bimini System that does NOT use the touch sensitive controller MUST be prot...

Page 51: ...GLE SWITCH PHILMORE 30 125 BATTERY POSITIVE 1 4 SPADE TERMINAL FULLY INSULATED 3 REQUIRED 10 INSULATED RING TERMINAL 2 REQUIRED 6 AMP SHORT STOP BREAKER BUSSMAN 121A06 A2M HD NOTE ALL WIRES TO BE 16 A...

Page 52: ...Harness Blu Wht Port Harness Blu Wht Port Speaker Starboard Speaker Harness Blk Wht Sound System Speaker Harness Connectors Speaker Harnesses Power Source Circuit Protection per ABYC Codes OEM Supplie...

Page 53: ...Starboard Actuator Port Actuator Port Harness Blu Wht Frame Harness Blu Wht Starboard Harness Blu Wht Helm Harness Harness Connectors Harness Connectors Harness Connectors Harness Connectors Circuit...

Page 54: ...r to Right Speaker output Harness Connectors Starboard Speaker Port Speaker Harness Blk Red Port Speaker Speaker Harnesses Speaker Harness Connectors Starboard Speaker Harness Blk Wht Sound System Fra...

Page 55: ...Rev 08 30 22 Page 55 CCD 0006500 Notes...

Page 56: ...e has been provided Any unauthorized use shall void any applicable warranty The information contained in this manual is subject to change without notice and at the sole discretion of Lippert Revised e...

Reviews: