background image

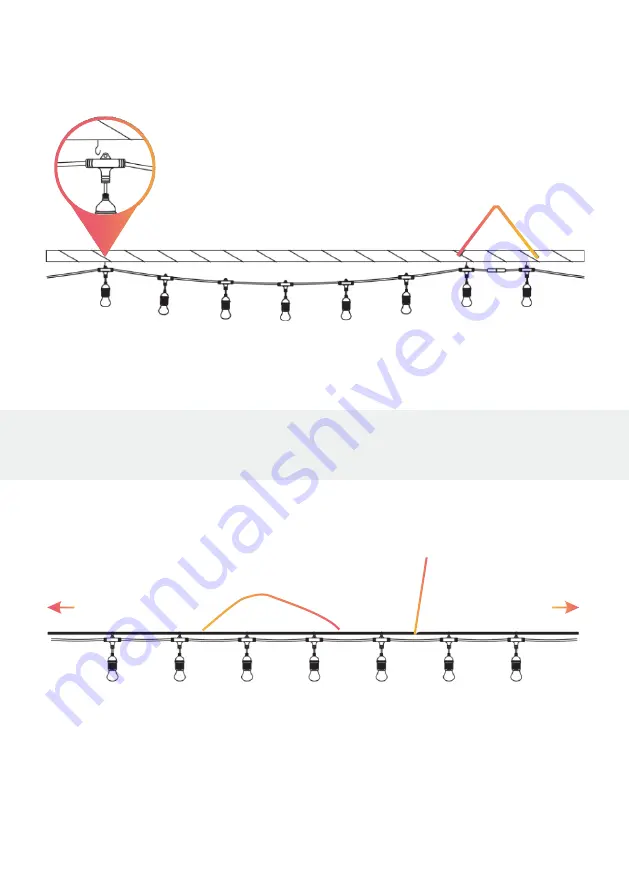
Installing By Guide Wire

Step 2: Installing

1.

 Attach to structure to the

sixth or seventh holder

in middle of each

String Light.

2.

 Attach to structure on first

and last holder.

3. 

Installing by Structure Connect securely to structure at the

beginning,middle and end of each string light.

Attach ring at the back of every bulb holder to the guide wire using
an S-hook or cable tie (not included)

Attach Using
hooks or cable ties

Guide Wire

Wire to 

Structure

Wire to 
Structure

NOTE: Attachment hardware, such as hooks or nylon cables 
ties is not included.

Summary of Contents for Smart Colour String Lights

Page 1: ...Smart Colour String Lights User Manual Download Free App Tuya help liquidleds com au Email...

Page 2: ...alled out of reach of children SAA recommends testing power plug and outlets monthly to ensure proper operation Regularly check the smart string lights for physical damage or other damage caused by ou...

Page 3: ...ed to provide reasonable protection against harmful interference in a residential installation The LiquidLEDs Smart String Lights are perfect for any occasion Control your String lights using Alexa Go...

Page 4: ...all lights work properly Overall Length 15 meter Number of Sockets 15 Bulbs Included 15 Input Volts 110 250 V AC Output Volts 12 V DC Rated Wattage 7 5 W Max Wattage 24 W Bulb Wattage each 0 5 W Cord...

Page 5: ...r 3 Installing by Structure Connect securely to structure at the beginning middle and end of each string light Attach ring at the back of every bulb holder to the guide wire using an S hook or cable t...

Page 6: ...6 Step 3 Plug In Plug LiquidLeds Smart String Lights into any standard outlet...

Page 7: ...7 Tuya Tuya Step 4 Download App Download the Tuya App from the App Store or Google Play...

Page 8: ...8 Step 5 Register 1 Enter your mobile phone number or email address...

Page 9: ...9 2 Enter the veri cation code and create a passwoord 3 Log into the APP...

Page 10: ...nter your mobile phone number or email address Please select Allow While Using APP positioning function when connecting products with APP 1 Select Add Device or click at the top right corner of the ho...

Page 11: ...11 3 Hold the power button for about 5 seconds until the bulb on the string lights ashes rapidly and then press Continue light blinks rapidly on the APP page Confirm light blinks rapidly...

Page 12: ...12 Enter your 2 4GHz Wi Fi network and password The Tuya smart App will connect your device Step 7 Plaese make sure you are in close proximity of router OK...

Page 13: ...ontrol your string lights Select Colour Broad spectrum of colours to create the perfect ambiance Con rm how many bulbs in the string light Brightness Increase or decrease bulb brightness Tunable Light...

Page 14: ...Tuya APP has a scene selection function Press the scene button to enter the scene selection interface You can choose your favorite scenes as you like Select light scene Select a scene Customise based...

Page 15: ...d and set the working time of the LiquidLEDs Smart Light String which can be turned on and off freely according to the set time Hold Schedule for 2 seconds Start entering the setup interface Select th...

Page 16: ...16 Schedule Steps to set the time Select the time to repeat the setting within a week De ne whether the set time is the beginning or the end of the work...

Page 17: ...t app then repeat the setup process Smart String Lights are not responding to Tuya App 1 Check if Smart String Lights are turned off If yes turn them on and waituntil Smart Bulb reconnects with the Wi...

Reviews: