25
GAMMA SERIES ENGINES OpERATORS' hANdbOOk
4. Open the tap or remove the drain plug at the bottom of the radiator in order to
drain the radiator. If the radiator does not have a tap or a plug, disconnect the
hose at the bottom of the radiator.
5. If necessary, flush the system with clean water.
6. Fit the drain plugs and the filler cap. Close the radiator tap or connect the
radiator hose.
5.3 ChECkING ThE dRIvE bElTS
Always renew a belt if it is worn or damaged.
If twin belts are fitted, they must be renewed together.
To ensure maximum belt life, it is recommended that a belt tensioner gauge is used
to check the belt tension. Fit the gauge
(Figure 5.3)
at the centre of the longest free
length and check the tension. If a Burroughs gauge is used, the correct tension
is 355N (80 Ibf or 36 kgf). If the tension is below 220N (50 Ibf or 22 kgf) adj st to
355N as indicated below.
21
GAMMA SERIES ENGINES OPERATORS' HANDBOOK
5.3 CHECKING THE DRIVE
BELTS
Always renew a belt if it is worn or
damaged.
If twin belts are fitted, they must be
renewed together.
To ensure maximum belt life, it is
recommended that a belt tensioner
gauge is used to check the belt
tension. Fit the gauge (
Figure 5.3
) at
the centre of the longest free length
and check the tension. If a Burroughs
gauge is used, the correct tension is
355N (80 Ibf or 36 kgf). If the tension
is below 220N (50 Ibf or 22 kgf) adj st
to 355N as indicated below.
5.3 Using the belt tensioner gauge
If a gauge is not available, press down
the belt with a thumb at the centre of
the longest free length and check the
deflection (
Figure 5.3
). With moderate
thumb pressure, 45N (10 Ibf or 4.5 kgf),
the correct deflection is 10mm 3/8in).
If twin belts are fitted, check and if
necessary adjust the tension on the
tighter belt.
5.3.1 Adjusting the Belt Tension
Refer to
Figure 5.3.1
below.
1.Loosen the pivot fasteners of the
alternator (1) and also the adjustment
link fasteners (2).
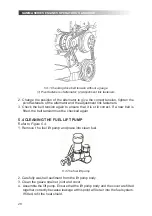
5.3.1 Checking drive belt tension without
a gauge. (1) Pivot fasteners of alternator;
(2) Adjustment link fasteners.
2.Change the position of the alternator
to give the correct tension, tighten the
pivot fasteners of the alternator and the
adjustment link fasteners.
3.Check the belt tension again to
ensure that it is st ill correct. If a new
belt is fitted, the belt tension must be
checked again.
5.4 CLEANING THE FUEL LIFT
PUMP
Refer to
Figure 5.4.
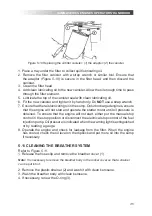
1.Remove t he fuel lift pump and place
into clean fuel.
5.4 The fuel lift pump
5.3 Using the belt tensioner gauge
If a gauge is not available, press down the belt with a thumb at the centre of the
longest free length and check the deflection
(Figure 5.3)
. With moderate thumb
pressure, 45N (10 Ibf or 4.5 kgf), the correct deflection is 10 mm 3/8 in).
If twin belts are fitted, check and if necessary adjust the tension on the tighter belt.
5.3.1 Adjusting the belt Tension
Refer to
Figure 5.3.1
below.
1. Loosen the pivot fasteners of the alternator (1) and also the adjustment link
fasteners (2).
Summary of Contents for GW3
Page 59: ...59 ...


