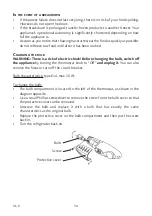
UNPACKING
•
Remove the shipping box.
•
Check that the appliance has not been damaged during transport. Do not plug
in a damaged appliance under any circumstances! If the appliance is damaged,
please contact your retailer.
•
Remove all tape and packaging materials on the inside and outside of the
appliance. Take out any accessories (ice cube tray, egg holder, etc.) that may have
been supplied with the appliance.
b
efore
first
use
•
Clean the inside of the appliance and any accessories provided with lukewarm
water with a little white wine vinegar added to it. Do not use soap or detergent
as the odour may linger. After cleaning, completely dry the appliance.
•
You can use white spirit to remove any remaining adhesive from the outside of
the appliance.
To clean the appliance, always turn it off and unplug it, or remove the fuses or
turn off the circuit breaker.
SET-UP
i
nstAllAtion
loCAtion
•
The appliance’s energy consumption and efficient operation are affected
by the ambient temperature. For this reason, it is important to follow the
following recommendations:
•
Place your refrigerator-freezer on a stable, level surface. Your appliance will be
heavy when loaded with food: it must, therefore, be placed on a strong, solid
floor.
•
The appliance must be installed in a dry, well-ventilated room at room temperature
(
16°C
minimum and
38°C
maximum). Make sure you leave a space of at least 10
cm around the appliance.
•
Never place an appliance that emits heat (microwaves, toasters, etc.) on the
refrigerator.
•
The appliance must not be exposed to direct sunlight.
•
This appliance must not be exposed to moisture or rain.
•
The appliance must not be installed next to a radiator, a stove or any other heat
source.
•
The installation of the appliance must not obstruct the outlet.
•
After installation, make sure that it is not resting on its power cord.
•
Leave the appliance in its final location for two hours before plugging it in.
This will allow the refrigerant circuit to stabilise.
V.1.0
20
Summary of Contents for RDL 130-50b4
Page 2: ...1 2 3 4 5 6 7 8 9 V 1 0 2...
Page 85: ......

