background image


4

 / 

12


ELECTRICAL REQUIREMENTS 

Volts: 120 V.A.C.                      Hertz: 60 Hz                      Power Rate: 650 W 
The wattage rating for your Stand Mixer is printed on a tag under the mixer base. If the 
power cord is too short, have a qualified electrician or serviceman install an outlet near the 
appliance. 


PARTS AND FEATURES 


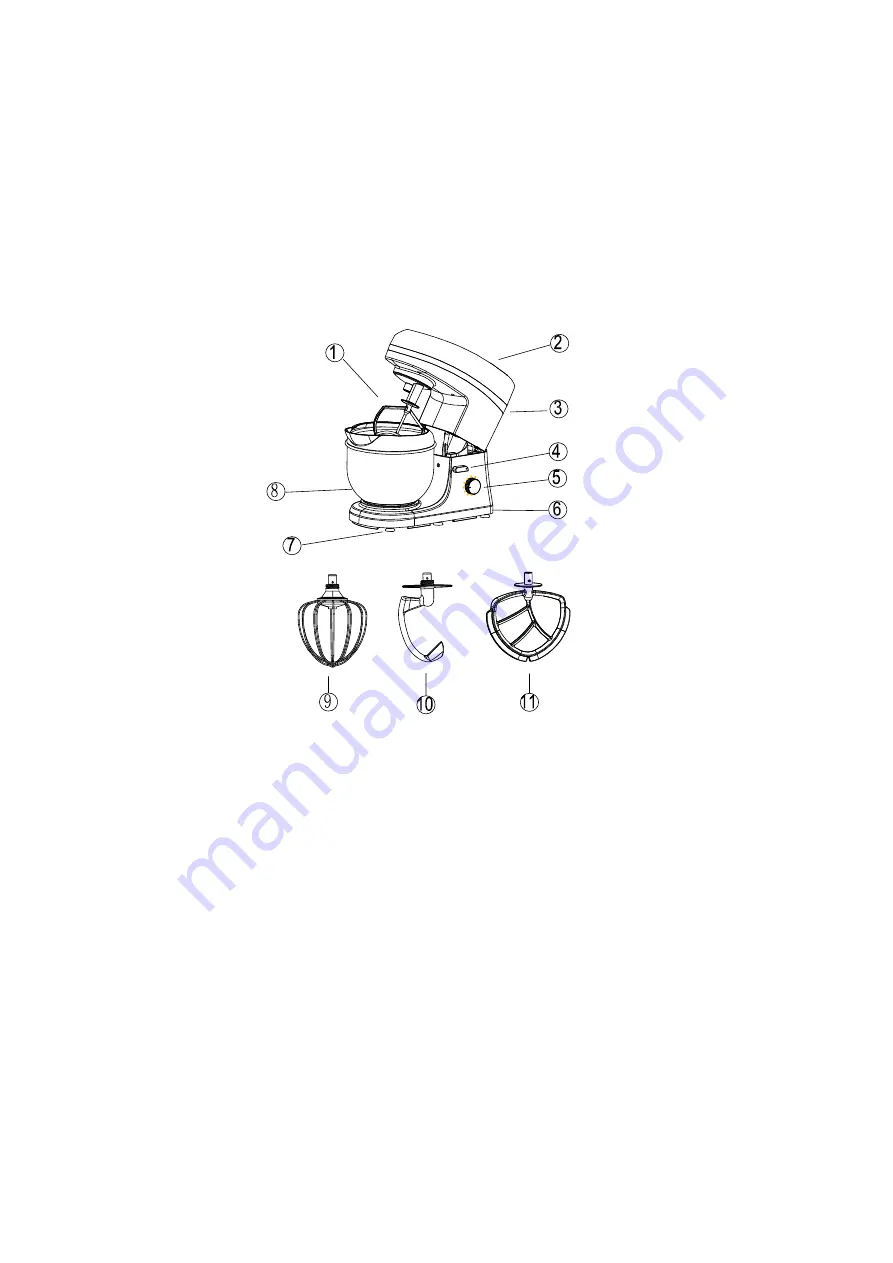
STAND MIXER PARTS: 
 

 Mixing Blade 

⑤ Speed Dial


⑨ Wire Whisk


② Large Cover


⑥ Lower Housing Cover


⑩ Dough Hook


③ Upper Housing Cover


⑦ Suction Cups


 Flat Beater 

④ 

Tilt Knob 

⑧ Mixing Bowl


ASSEMBLING YOUR TILT-HEAD STAND MIXER 


To Attach Flat Beater, Wire Whisk, Dough Hook or Mixing Blade 

1. Turn speed dial to speed 0. 
2. Unplug Stand Mixer or disconnect power. 
3. Tilt motor head back by turning the tilt knob. 
4. Insert beater into the beater connector and press upward and turn it to right to lock. 
5. Plug into an outlet. 

Summary of Contents for SM983

Page 1: ...chi Stand Mixer Instructions SM983 Register your product and get support at www litchilive com service litchilive com 8427 S Old Bingham Hwy West Jordan UT United States 84088 Made in China Call 844 2...

Page 2: ...To Remove Pouring Shield 5 To Raise Motor Head 6 To Put Down Motor Head 6 To Operate Speed Dial 6 USING LITCHI ACCESSORIES Using Dough Hook 6 Using Mixing Blade 6 Using Wire Whisk 6 Using Flat Beater...

Page 3: ...earest Authorized Service Center for examination repair or electrical or mechanical adjustment Call the Litchi Customer Satisfaction Center at 1 844 246 8462 for more information 7 The use of attachme...

Page 4: ...AND MIXER PARTS Mixing Blade Speed Dial Wire Whisk Large Cover Lower Housing Cover Dough Hook Upper Housing Cover Suction Cups Flat Beater Tilt Knob Mixing Bowl ASSEMBLING YOUR TILT HEAD STAND MIXER T...

Page 5: ...nnect power 3 Attach Flat Beater Dough Hook Mixing Blade or Wire Whisk and bowl 4 From the front of the mixer slide the Pouring Shield over the bowl until the shield is centered The bottom rim of the...

Page 6: ...OUR LITCHI ACCESSORIES C Dough Hook mixes and kneads yeast dough with ease saving you both the time and effort of hand kneading Mixing Blade is perfect for quickly and thoroughly mashing potatoes mixi...

Page 7: ...aping Scraping the bowl once or twice during mixing is usually sufficient Turn the Stand Mixer off before scraping The Stand Mixer may warm up during use Under heavy load with extended mixing time you...

Page 8: ...lways be sure to unplug the Stand Mixer before cleaning Wipe the Stand Mixer with a soft damp cloth Do not use household or commercial cleaners Do not immerse in water Wipe off the beater connector fr...

Page 9: ...nless Steel Bowl for the model from us 5 Why the splash guard can t be removed Answer If you are turning it clockwise try with more pressure If the problem cannot be fixed with the steps provided in t...

Page 10: ...o 325 F Line a large baking paper Step 2 Place sugar salt and one egg in a large bowl Beat with flat beaters by speed 3 Step 3 Fold in sifted flour baking powder cocoa powder and almond slides to wet...

Page 11: ...a Step 3 Attach bowl and flat beater to stand mixer Step 4 Turn to Speed 5 and beat about 2 minutes Step 5 Stop and scrape bowl Turn to Speed 2 and add eggs one at a time mixing about 20 seconds after...

Page 12: ...ll be slightly sticky to the touch Step 4 Place dough in greased bowl turning to grease top Cover Let rise in warm place free from draft about 1 1 2 hour or unt il doubled in bulk Step 5 Punch dough d...

Reviews: