background image

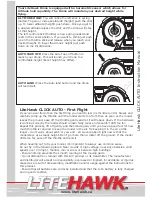
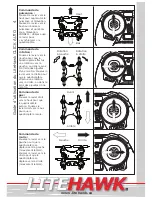
Power Switch

LiteHawk CLICK AUTO - Controller Functions

*Familiarize yourself with the Remote and the Quadrocopter - everything should be 

turned off.* 

Welcome to the World of LiteHawk!

   Welcome aboard, this is your new LiteHawk CLICK AUTO! Before we get ready for your 

first aerial adventure, let’s cover the basics together!

   Attempting to fly your LiteHawk CLICK AUTO without completely reading the manual 

may cause injury to yourself and people in the vicinity, as well as damage to the RC 

model.  Please read the Instruction Manual thoroughly before taking your first flight.

LiteHawk CLICK AUTO - Transmitter Set Up

Battery Installation:

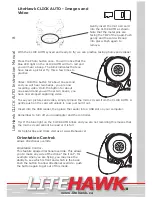
1. Open the Battery Cover. 

2. If used batteries are present, remove these batteries from 

the unit by pulling up on one end of each battery. 

3. Install new batteries as shown in the battery compartment 

(+/-). 

4. Replace battery door securely.

5. Check your local laws and regulations for correct recycling 

and/or battery disposal.

6. Never expose the transmitter or batteries to moisture.

LiteHawk CLICK AUTO - 2.4 Ghz

  Your LiteHawk comes with a 2.4 Ghz radio system, which 

allows you to play without the fear of ever losing control! Race 

or play with countless other pilots. The range of your model is 

approximately 100ft which, due to its small size, is in excess 

of normal vision. The farther the model goes away from you the smaller it will become 

and the harder it will be to determine the model’s direction. We suggest you stay at a 

distance between 5ft-25ft, this keeps your CLICK AUTO within a safe operational 

distance.

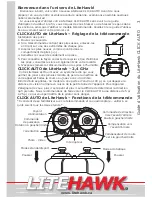
Directional Control Stick 

Forward/Backward

Left/Right Roll

Photo - Video

Forward/Backward

 Trim

Throttle

Left/Right Rotation

Power Indicator

Left/Right 

Roll Trim

Flip Mode

Push

Standard/Sport Modes

Push

Orientation

LiteHa

wk CLICK A

UT

O Instruction Manual 


3

www.litehawk.ca

R

Summary of Contents for Click Auto

Page 1: ...Each blade has an A or B stamped on it Make sure replacement blades go to the proper motor or your model will not fly properly PLEASE DO NOT RETURN THIS PRODUCT TO ANY RETAIL STORE For any questions...

Page 2: ...lways remove batteries from the controller when it is not being used for a long period of time Keep the toy away from direct heat or extreme cold Do not expose the toy s interior to water or moisture...

Page 3: ...e battery compartment 4 Replace battery door securely 5 Check your local laws and regulations for correct recycling and or battery disposal 6 Never expose the transmitter or batteries to moisture Lite...

Page 4: ...lockwise Moving the stick to the right will rotate the quadrocopter right or clockwise Left Rotation Right Rotation Pitch Control Moving the right stick up will make the quadrocopter go forward Moving...

Page 5: ...tes are at 75 In Sport Mode 2 controls are much more responsive Press again and you will hear three beeps you are now in Sport Mode 3 response rates are at 100 This is an advanced setting and should o...

Page 6: ...other end of the cable into your Litehawk CLICK AUTO battery port located at the side of the model Do not force the plug it only goes in one way The model must have the power switch in the OFF positio...

Page 7: ...or tamper with this R C product or its transmitter The manufacturer and distributor will accept no responsibility expressed or implied for accidents or injuries caused as a result of dis assembly modi...

Page 8: ...e CLICK AUTO synced and ready to fly we can practice taking photos and videos Video Hold the button for about one second and you will hear two beeps you are now recording video Hold the button for abo...

Page 9: ...All LiteHawk products have been tested and designed to perform as claimed out of the box If you have an issue with a product or part of a product please contact us directly We cover claims towards man...

Page 10: ...nt Markham Ontario L3R 8T4 Petit conseil Pales et DEL blanches l avant pales et DEL rouges l arri re Cela vous aidera distinguer la partie avant de la partie arri re Petit conseil les directions des p...

Page 11: ...la chaleur directe et le froid extr me Ne pas exposer l int rieur du jouet l eau ou l humidit car celles ci peuvent ab mer les dispositifs lectroniques Avant de charger le LiteHawk CLICK AUTO veuille...

Page 12: ...AUTO de LiteHawk R glage de la t l commande Installation des piles 1 Ouvrez le couvercle 2 Si la t l commande contient des piles us es enlevez les en tirant sur une des extr mit s de chaque pile 3 In...

Page 13: ...aiguilles d une montre Poussez le levier vers la droite pour que le quadricopt re effectue une rotation vers la droite ou dans le sens des aiguilles d une montre Commande de pas Poussez le levier dro...

Page 14: ...Avec le mode sport 2 les commandes sont beaucoup plus sensibles Enfoncez de nouveau le bouton et vous entendrez trois bips qui signalent le mode sport 3 taux de r ponse de 100 N utilisez ce r glage s...

Page 15: ...ous devez veiller l entretien correct de la batterie LiPo La batterie LiPo ne devrait jamais tre trop d charg e Une trop forte baisse de tension l endommagera et elle ne rechargera plus Lorsque l appa...

Page 16: ...d monter ou trafiquer ce mod le t l command ou sa t l commande Le fabricant et le distributeur rejettent toute responsabilit explicite ou implicite en cas d accident ou de blessure r sultant du d mont...

Page 17: ...o Maintenez le bouton enfonc pendant environ une seconde Vous entendrez deux bips vous tes en train de r aliser un enregistrement vid o Maintenez nouveau le bouton enfonc pendant environ une seconde V...

Page 18: ...offrir les performances publi es d s la sortie de l emballage Si vous avez un probl me avec un produit ou une pi ce d un produit veuillez communiquer directement avec nous Nous couv rons les r clamati...

Reviews: