background image


10 
 

9. Mount the walls with Velcro fasteners to the tent roof sheathing and then to the 
legs of the tent frame, wrapping the Velcro around the legs of the tent. Then 
connect the tent wall with the adjacent walls on the corners of the tent (solid walls, 
with windows or doors fasten according to your own configuration). 


10.  Anchoring method: 


Standard 

EN 13782:2007 

applies to the 3 x 3 m Neotent Plus tent. 


In order to ensure tent resistance to wind gusts with a speed of 28m/s (100km/h) 
according to the standard 

EN 13782:2007

all 4 side walls of the sheathing must be 

fitted or none of the side walls must be fitted. The tent fixings described below 
should also be used. 


A) To use the tent in a hard terrain (concrete) under conditions 


described in the standard, each leg should be loaded with a minimum weight of 


25kg or screwed to the ground with HILTI, HSA M6 L=50mm anchors. The anchoring 
of lashings must be carried out using the HILTI, HLC EC M8 L=40mm anchor 


B) In order to use a tent in grassland (compact soil) under the conditions described 
in the standard, each leg must be loaded with a minimum weight of 
25kg or screwed to the ground using 8mm diameter anchors anchored in the 
ground to a depth of 32cm. The anchoring of lashings should be made at an angle 
of 45 degrees to the tent, using a steel anchor with the diameter of 
24mm and 90cm long, anchored in the ground to a depth of 80cm at a right 
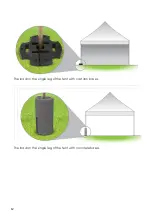
angle. Details of the anchoring are shown in the drawings below. 


ATTENTION: HILTI anchors are not standard equipment for the tent. 


Foundation


Anchoring of the tent's leg base


Anchoring of the 

lashing 


at an angle of 45


Concrete


HILTI anchor, HSA M6 L=50mm 


or a ballast of 25 kg. (e.g. concrete 

block)


HILTI, HLC EC M8 Anchor 


L=40mm


Ground


Steel anchor Ø 8 mm anchored to a 

depth of 32 cm or ballast 25 kg 

(e.g. concrete 

block)


Steel anchor Ø 24 mm


anchored in the ground 80 

cm


Summary of Contents for neotent PLUS

Page 1: ...1 OPERATION MANUAL Date of publication 31 03 2019 All rights reserved Litex Promo Sp ka z o o...

Page 2: ...Litex Promo tents are famous for their high quality because they undergo detailed inspection and meet requirements for safety and durability In order to ensure that this product is simple and pleasan...

Page 3: ...ble of contents 1 INTRODUCTION 2 SAFETY INFORMATION 3 DELIVERY CONTENT 4 TENT CONSTRUCTION 5 SETTING UP THE TENT 6 TAKING OFF AND PUTTING ON THE SHEATH 7 CARE 8 STORAGE 9 MAINTENANCE 10 SERVICE 11 ADD...

Page 4: ...on Maintenance The manufacturer is not liable for damage resulting from non observance of these instructions such damage is also not subject to warranty Therefore Litex Promo informs that before using...

Page 5: ...e light fluffy snow should be immediately and continuously removed from the tent s structure and if it gets stuck on the roof of the tent s sheathing the tent should be absolutely folded e The tent do...

Page 6: ...er the tent Do not hang any objects e g clothes on the shoulder of the frame of the tent The quick pitch tent is not a toy Make sure that the children do not use the fast pitch tent as a play field or...

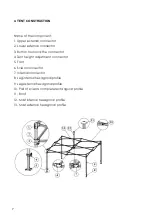
Page 7: ...ton to unlock the connector 4 Tent height adjustment connector 5 Foot 6 Scissor connector 7 Internal connector 8 Leg internal hexagonal profile 9 Leg external hexagonal profile 10 Pair of scissors com...

Page 8: ...ulated in this area can cause difficulty in moving and damage the surface 3 The tent should be set up with the help of another person 4 Remove the cover 5 Unfold the tent frame by gripping the scissor...

Page 9: ...nnector and check the fastening of the roof sheathing in the upper external connectors see drawings below 7 In the Neotent Plus line pull out legs by unlocking the block When the desired length is rea...

Page 10: ...ound with HILTI HSA M6 L 50mm anchors The anchoring of lashings must be carried out using the HILTI HLC EC M8 L 40mm anchor B In order to use a tent in grassland compact soil under the conditions desc...

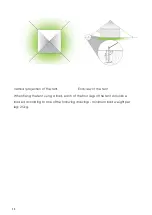
Page 11: ...al projection of the tent End view of the tent When fixing the tent using a load each of the four legs of the tent should be loaded according to one of the following drawings minimum load weight per l...

Page 12: ...12 The load on the single leg of the tent with cast iron bases The load on the single leg of the tent with concrete bases...

Page 13: ...er external connectors 6 Uncouple the sheathing from the frame roof 7 Remove the sheathing from the tent roof Mounting of the roof sheathing is carried out in reverse order 7 CARE Do not use sharp too...

Page 14: ...ry out a thorough inspection of the tent using the following list after the first assembly or before storing the tent Do not clean the fabric chemically Hand wash laundry lightly squash Surface washin...

Page 15: ...15 10 SERVICE If you have any questions concerning the installation or ordering spare parts please contact our Sales Advisor www litex pl...

Page 16: ...counter for wall 3 m 4 m 4 5 m Radiator 500 w Universal connector Grip System Tent frame connector Cable clamp Flag adapter maximum permissible mast diameter 20 mm Concrete base roller single 16 kg Ca...

Page 17: ...sists of aluminium and plastic elements These materials can be disposed of in accordance with the applicable environmental regulations 13 WARRANTY Compliance with delivery terms please refer to terms...

Reviews: