4
7
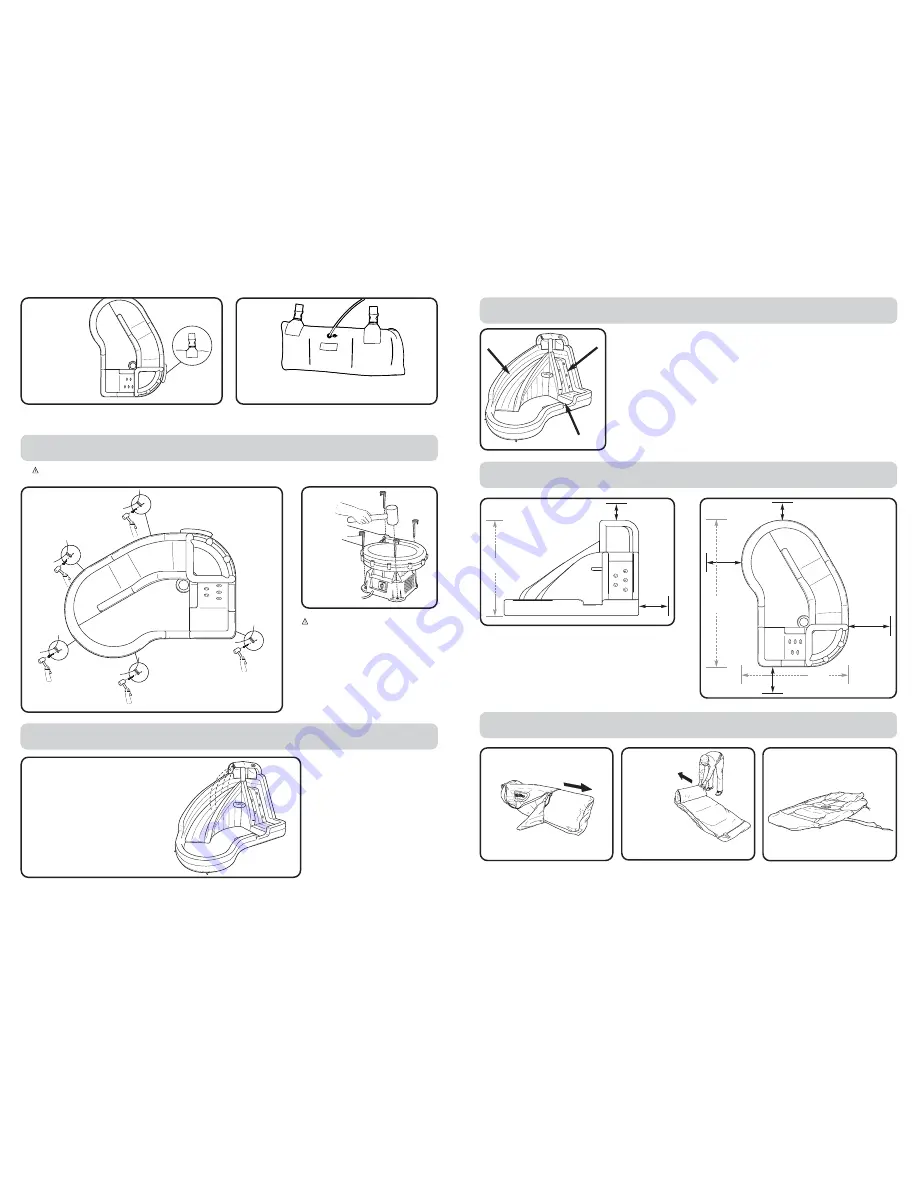
Water Park Placement
Designate a flat, level surface that allows for 6.6 feet (2m) of minimum clearance around the
Water Park.
NOTE: DO NOT place the Water Park on a hard surface like asphalt, concrete or packed earth as
both serious bodily injury and damage to the Water Park could result.
ASSEMBLY AREAS
• Make sure the assembly area is flat and level and is free of rocks, sharp objects or other
obstructions.
• Do not set up the Water Park on a slope or inline.
• Do not set up the Water Park on hard-packed earth, asphalt, decking or any hard surface as
doing so may result in physical injury and/or damage to the Water Park.
• Once the Water Park is inflated or filled with water, do not attempt to drag it to another location.
• Check your local county or city regulations for requirements on securing the pool.
• Secure the pool from unauthorized use.
Minimum Clearance Zones
MINIMUM CLEARANCE ZONES
Make sure that there is a 6.6 ft. (2m) obstacle-free zone around the
product, including the slide and overhead.
INFLATABLE SIZE:
12.9W x 9.8D x 7.9H feet (3.9 x 2.9 x 2.4 m)
1
2
Unfolding the Water Park
3
Remove contents from the
carrying bag.
Unroll and unfold
the Water Park in
the center of the
designated area.
CAUTIONS:
The Water Park and all its anchorage points should be checked before and during use.
Reinflate or re-secure as appropriate. DO NOT let children play on the water park until it is fully inflated!
!
2
Staking the Water Park
WATER PARK CAUTIONS:
• Drive ground stakes completely into the
ground to avoid tripping hazard.
• Do not use the Water slide until an Adult
has assembled, staked down, and fully
inflated.
• Do not set up or inflate the Water Park in
windy and/or rainy conditions as wind gusts
may cause the park to become unstable and
possibly be lifted from the ground.
!
1
1
Secure the Water Park to the ground with
the provided stakes. To prevent tripping,
pull the stake loops all the way out, then
drive stakes completely into the ground.
Secure
the
Blower to the
ground with
the provided
stakes.
Entrance/Exit
Slide
Climbing
Wall
7.9 ft.
(2.4 m)
9.8 ft.
(2.9 m)
6.6 ft. (2 m)
6.6 ft.
(2 m)
6.6 ft. (2 m)
6.6 ft. (2 m)
6.6 ft.
(2 m)
6.6 ft.
(2 m)
12.9 ft.
(3.9 m)
Turn on the garden hose and adjust the
pressure as desired. Make sure that a
steady spray of water comes out of the
sprayer and keep the slides wet.
3
2
Once Water Park is
inflated, attach the
Water Anchor Bag to
the plastic connectors
at the base of the
Water Park.
Once attached, fill the Anchor Bag with water until it is
completely full.
NOTE:
The Water Anchor Bag needs to be attached to the Water Park whether or not the Water Sprayer is used. The Water
Anchor Bag prevents the Water Park from toppling over when people climb on it.
Water Park Spray Assembly, Part 2
Meijer.com


