8 GB
Q
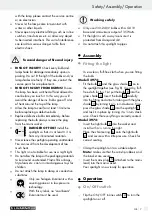
Directing the spotlight
Only change the direction of the spotlight
1
after the light has been switched off.
Allow the lamp to cool down completely.
Turn the spotlight
1
in the desired direction. The
spotlight
1
can be turned to face any direction.
Q
Changing the bulbs
CAuTIOn! DAngeR Of eLeCTRIC
SHOCk!
First pull the plug
5
attached to the
mains lead out of the mains socket.
Allow the lamp to cool down completely.
Only change the bulb
2
when it has completely
cooled down. Use a clean, lint-free cloth when
changing light bulbs.
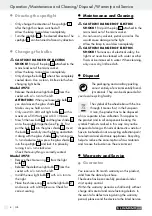
Model 2973:
Release the defective light bulb
2
from the
socket with a ¼ turn to the left.
ATTenTIOn:
When you loosen the bulb
2
you also loosen the glass shade
3
.
Make sure you hold on to it.
Only use 230–240 volt light bulbs
2
with a
maximum of 35 Watts and a GU 10 base.
Now fit the new bulb
2
and the glass shade
3
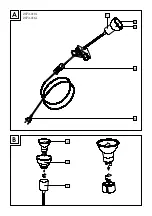
on to the spotlight together (see Fig. B). First
put the bulb
2
into the glass shade
3
. Insert
the bulb
2
carefully into the fitting and attach
it along with the glass shade
3
by turning it a
¼ turn clockwise. Now press the glass shade
3
into the spotlight
1
and lock it in place by
turning it a ¼ turn clockwise.
Check that everything is correctly seated.
Model 2972:
Remove the chrome ring
6
from the light
bulb
2
.
Release the defective light bulb
2
from the
socket with a ¼ turn to the left.
Install the new light bulb
2
with a ¼ turn to
the right.
Place the chrome ring
6
onto the light bulb
2
and secure with a little pressure. Check for
correct seating.
Q
Maintenance and Cleaning
CAuTIOn! DAngeR Of eLeCTRIC
SHOCk!
First pull the plug
5
attached to the
mains lead out of the mains socket.
Do not use any solvents, petrol or similar. This
would cause damage to the light.
Allow the lamp to cool down completely.
CAuTIOn! DAngeR Of eLeCTRIC
SHOCk!
For reasons of electrical safety, the
light must never be cleaned with water or other
fluids or be immersed in water. When cleaning,
only use a dry, lint-free cloth.
Q
Disposal
The packaging and ancillary packing
consist entirely of environmentally-friend-
ly materials. They can be disposed of at
your local recycling facility.
The symbol of the wheelie bin with the line
through it means that, in the European
Union, the product has to be disposed
of in a separate refuse collection. This applies to
the product and to all components bearing this
symbol. Products marked in this way may not be
disposed of along with normal domestic waste but
have to be handed in at a recycling collection point
for electrical and electronic appliances. Recycling
helps to reduce the consumption of raw materials
and to ease the burden on the environment.
Q
Warranty and Service
Q
guarantee
You receive a 36 month warranty on this product,
valid from the date of purchase.
The device has been carefully produced under
strict quality control.
Within the warranty period we shall rectify without
charge all material and manufacturing defects. In
the event of a defect arising during the warranty
period, please send the device to the listed Service
Operation / Maintenance and Cleaning / Disposal / Warranty and Service
Summary of Contents for 103126
Page 3: ...A 1 2 3 4 5 B 2973 010L 2973 016L 2 3 1 ...
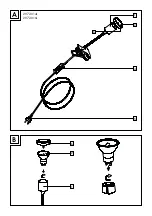
Page 4: ...A 2 4 5 B 6 2972 014L 2972 016L 1 6 2 1 ...
Page 10: ...10 ...
Page 16: ...16 ...
Page 22: ...22 ...
Page 28: ...28 ...
Page 34: ...34 ...
Page 40: ...40 ...


