Access Controller FB-10
Quick Start Guide
1.
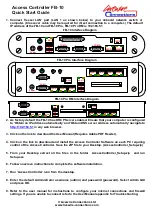
Connect ‘Vessel LAN’ port (LAN 1 as shown below) to your onboard network switch or
computer. (Crossover cable may be required for direct connection to a computer.) The default
IP address of the FB-10 and FB-10 Pro, FB-10 Pro RM is 192.168.5.1
FB-10 Interface Diagram
Power
COM 1
COM 2
LAN 1
WAN 1
WAN 2
ISDN
USB 1
USB 2
FB-10 Pro Interface Diagram
Power
COM 1
LAN 1
USB 1
USB 2
ISDN
WAN 2
WAN 1
WAN 3
WAN 5
WAN 7
WAN 6
WAN 4
FB-10 Pro RM Interface Diagram
WAN 5
WAN 7
WAN 6
WAN 4
COM 1
WAN 2
WAN 1
WAN 3
LAN 1
USB 1
USB 2
ISDN
2. As factory default the FB-10 has DHCP Server enabled. Ensure that your computer is configured
to ‘Obtain an IP address automatically’ and ‘Obtain DNS server address automatically’ navigate to
3. Click on the link to download the User Manual (Requires Adobe PDF Reader).
4. Click on the link to download and install the Access Controller Software on each PC requiring
control of the Access Controller. Save the ZIP file to your Desktop. (AccessController_Setup.zip)
5. From your Desktop extract all the files in the folder AccessController_Setup.zip and run
Setup.exe
6. Follow onscreen instructions to complete the software installation.
7.
Run ‘Access Controller’ icon from the desktop.
8. Enter the default Administrator username (
admin
) and password (
password
). Select Admin GUI
and press OK.
9. Refer to the user manual for instructions to configure your internet connections and firewall
settings. If you are unable to connect refer to the User Manual appendix for Troubleshooting.
© Livewire Connections Ltd
www.livewire-connections.com


