background image

TO SET THE DAYLIGHT SAVING TIME (DST)

1.  Depending on your location and the period of Daylight Saving Time (DST) to be in  


effective during summer, you can manually set the daylight saving time by sliding the 

DST


switch on the unit to 

+1

 position to advance the clock by one hour.

2.  Slide the 

DST

 switch to 

-1

 position to subtract one hour from current to back to normal  


daylight time.

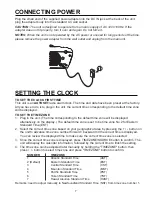
TO SET TIME AND DATE MANUALLY

Although the clock is preset at factory, you can still make time adjustment by Changing the 

settings as follow: 

Note: 

If the preset time is slightly deviated from actual current time or clock error occurred 

during the shipment or your first time use, you can also follow the steps below to make 

time/date adjustment manually.

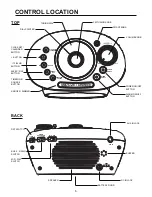
1.  Press and hold the 

CLOCK SET/CALENDAR

 button on the top of the unit for 2 sec


until the hour flashes on the display.

2.  Press the 

+

 or 

-

 button to set the correct hour (hold the button for faster advance).


Remember to set the correct AM or PM time. The AM/PM Indicators appear to the left


of the time display.

3.  Press the 

CLOCK SET/CALENDAR

 button gain. Press the 

+

 or 

-

 Button to set the


correct minute (hold the button for faster advance).

4.  Press the 

CLOCK SET/CALENDAR

 button again. The year will flash. Press the 

+

 or 

-


Button until the current year is displayed.

5.  Press the 

CLOCK SET/CALENDAR

 button again. The month will flash. Press the 

+

 or 

-


Button until the current month is displayed.

6.  Press the 

CLOCK SET/CALENDAR

 button again. The date will flash. Press the 

+

 or 

-


button until the current date is displayed.

7.  Press the 

CLOCK SET/CALENDAR 

button again (or no button within 10 seconds) to exit  


the manual setting mode.

TO SET MONTH/DATE AND 12/24 HOUR FORMAT

1.  You can select the clock display format by pressing the 

12/24HR 

button to toggle the


clock display format to 12 hour or 24 hour.

2.  You can select the calendar display format by sliding the 

M/D and D/M

 switch to toggle  


between Month/Date or Date/Month display format.

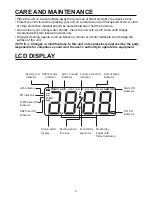
TO DISPLAY THE YEAR AND DATE

1.  Press the CLOCK/CALENDAR button. Month/Date will display for 2 seconds first and then  


Year will display for another 2 seconds.

LCR303 has a single alarm system. The unit allows you to set the alarm to wake-to selectable 

sound sources from either radio or buzzer. The unit also allows you to set alarm frequencies 

with Everyday/Weekday/Weekend alarm modes.

SETTING THE CLOCK (Cont’d)

8

USING THE ALARM

Summary of Contents for LCR360

Page 1: ...loyd s Retro Autoset Alarm Clock Radio Thank you for purchasing this Clock Radio Please read this instruction manual carefully before using this product to ensure proper use Keep this manual in a safe...

Page 2: ...any parts above please contact Cosmo Communications Tel 1 888 208 4108 WHAT S IN THE BOX INSTRUCTION MANUAL Lloyd s Retro Autoset Alarm Clock Radio Thank you for purchasing this Clock Radio Please rea...

Page 3: ...accept any interference received including interference that may cause undesired operation This class B digital apparatus complies with canadian ICES 003 Cet appareil numerique de la classe B est con...

Page 4: ...y For products intended to operate from battery power or other sources refer to the operating instruction 12 Grounding or Polarization This product may be equipped with a polarized alternating current...

Page 5: ...ning or removing covers may expose you to dangerous voltage or other hazards Refer all servicing to qualified service personnel 18 Damage Requiring Service Unplug this product from the wall outlet and...

Page 6: ...ilar materials can damage the surface of the unit WARNING Changes or modifications to this unit not expressively approved by the party responsible for compliance could void the user s authority to ope...

Page 7: ...X IN ALARM BUZZ RADIO M D D M 1 DST 1 ALARM ON OFF BUTTON FM ANTENNA FM TUNING KNOB DIAL POINTER CLOCK SET CALENDER BUTTON BUTTON 12 24 HR BUTTON SLEEP NAP BUTTON TIMEZONE SOURCE BUTTON SNOOZE DIMMER...

Page 8: ...play The default time zone is set to be time zone No 2 for Eastern Standard Time EST 2 Select the correct time zone based on your geographical area by pressing the button on the unit to advance time z...

Page 9: ...the or Button to set the correct minute hold the button for faster advance 4 Press the CLOCK SET CALENDAR button again The year will flash Press the or Button until the current year is displayed 5 Pre...

Page 10: ...IEW THE ALARM 1 After the alarm has been set to review the alarm time press the Alarm ON OFF button once The set alarm time will show on the display 2 After 3 seconds it will go back to normal time di...

Page 11: ...ur external device and plug the another end of the audio cable into the unit s AUX IN jack 2 Press the TIMEZONE SOURCE button until AUX icon appearing on the display 3 Turn on and play your external a...

Page 12: ...cle through 15 30 45 60 90 OFF until OFF is displayed and wait for 2 seconds to cancel the sleep timer Nap timer lets you to set a timer other than the regular alarm function when the unit POWER OFF T...

Page 13: ...e low battery indication icon will display and blink It is time to replace the backup battery TO INSTALL REPLACE BACKUP BATTERY 1 Make sure the AC adaptor is connected during battery replacement Other...

Page 14: ...PM time alarm not set correctly The volume level on the connected device or the unit is set too high If the original sound source MP3 on your external device is of poor quality the distortion and nois...

Reviews: