background image

Installation & Operation Manual

64

Status Display Screens 

(cont’d)

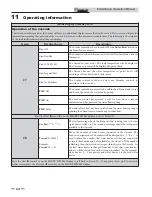
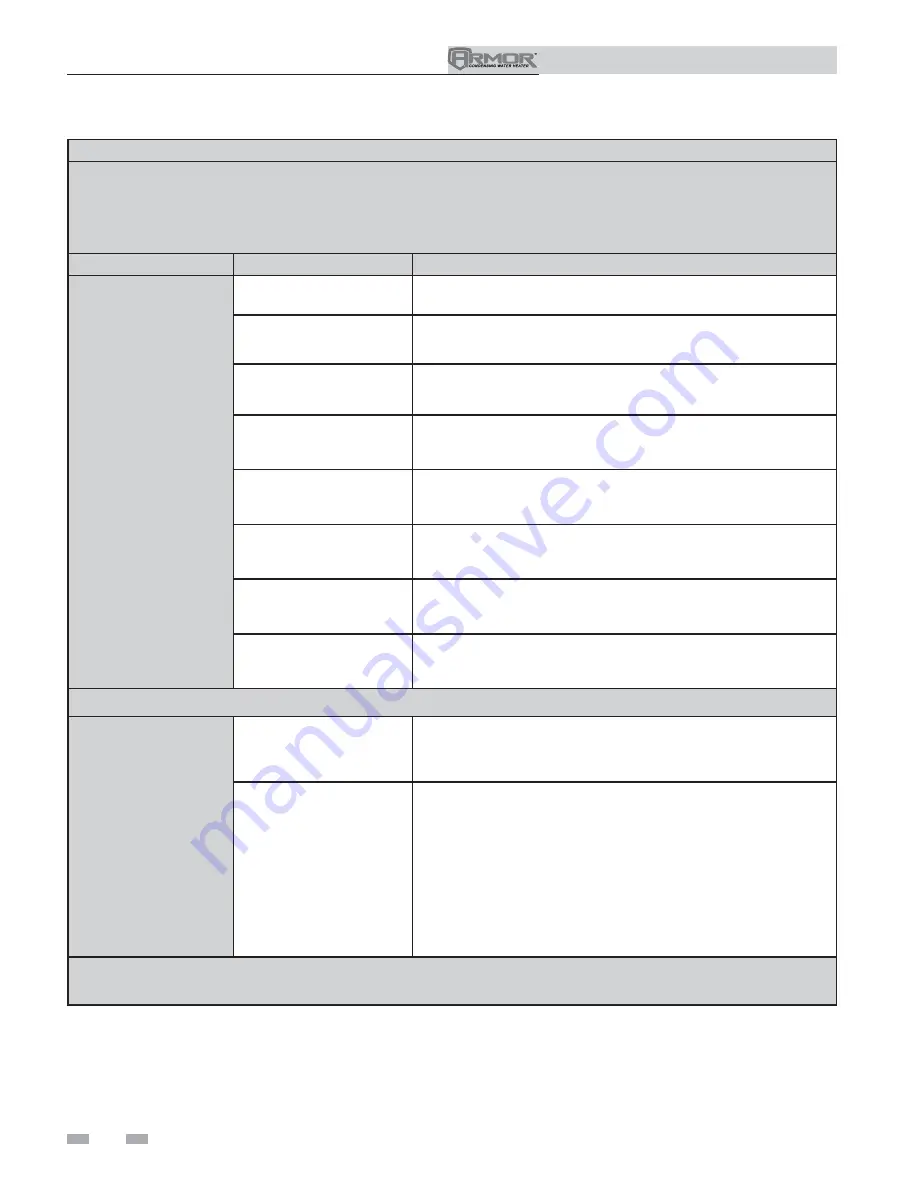
Operation of the cascade

The water heater designated as the Leader will have two additional display screens that can be viewed. These screens will provide
information regarding the operation of the Cascade. Each screen will contain two viewable items. The following is a description
of the individual items and what they can display:

Screen

Display shows:

Description

#7

Cas:

Off

The Leader control has been turned off by the 

Enter/Reset

button on

the Smart System display.  

Cas:

Standby

The Leader water heater has not received a call for heat from a remote
thermostat.

Cas:

127.4F (130)

The Cascade is now active. The tank temperature will be displayed.
The Cascade set point will be displayed in parenthesis. 

Cas:

Setpoint Met

The Cascade has met the water temperature set point, but is still
receiving a call for heat from a tank sensor.

Cas:

No Members

The Leader control could not detect any Member controls to
participate in the Cascade.

PMP:

Off

The Leader control has not received a call for heat from a tank sensor
and has not powered the water heater pump.

PMP:

On

The Leader control has received a call for heat from a remote
thermostat and has powered the water heater pump.

PMP:

Delay

The tank call for heat has been satisfied and the water heater pump is
running for a fixed time to remove any residual heat.

Press the Next 

arrow key on the SMART SYSTEM display to access Screen #8.

#8

Cas Pow:

***% ***%

The first percentage shows the firing rate that is being sent to the last
water heater called on. The second percentage shows the total power
available to the Cascade.

Present:

01234567

Example:

Present:

23----01

Shows the number of water heaters connected to the Cascade. The
Leader is designated as 0. Members will be designated 1 - 7. If a “-“ is
used in place of a number, that water heater is either not connected,
or in a lockout mode and not available for the Cascade. If the number
is flashing, then that water heater is providing heat to the Cascade.  As
the lead water heater is changed from day to day, that water heater’s
address will be shown first in the string of numbers.  In the example,
water heaters 0 - 3 are present and water heater 2 is the lead water
heater.

Press the Next 

arrow key on the SMART SYSTEM display to roll back to Screen #1.  At any point if you wish to access an

earlier screen, press the Previous 

arrow key on the SMART SYSTEM display.

11  

Operating information  

Summary of Contents for Armor AWL150PM

Page 1: ... NOT be installed in any location where gasoline or flammable vapors are likely to be present WHAT TO DO IF YOU SMELL GAS Do not try to light any appliance Do not touch any electric switch do not use any phone in your building Immediately call your gas supplier from a near by phone Follow the gas supplier s instructions If you cannot reach your gas supplier call the fire department Installation an...

Page 2: ...tall Vent and Combustion Air Piping 18 PVC CPVC Vent Piping Materials 18 Requirements for Installation in Canada 18 Installing Vent or Air Piping 18 PVC CPVC Air Intake Vent Connections 19 Air Inlet Pipe Materials 20 Stainless Steel Vent 20 Stainless Steel Air Intake Vent Connections 21 Min Max Combustion Air Vent Piping Lengths 22 Vent and Air Piping 22 Optional Room Air 23 4 SIDEWALL DIRECT VENT...

Page 3: ...r The possible damage to a flooded appliance can be extensive and present numerous safety hazards Any appliance that has been under water must be replaced When calling or writing about the water heater Please have the water heater model and serial number from the water heater rating plate Consider piping and installation when determining water heater location Any claims for damage or shortage in s...

Page 4: ...NPT water connection that returns water from the tank to the heat exchanger 15 Gas connection pipe Threaded pipe connection This pipe should be connected to the incoming gas supply for the purpose of delivering gas to the water heater 16 SMART Control Module The SMART Control responds to internal and external signals and controls the blower gas valve and pumps to meet the demand 17 Automatic air v...

Page 5: ...199 Rear View Model 285 36 29 8 19 20 37 10 25 30 34 23 2 1 28 7 17 27 Left Side inside unit Model 285 The Armor Water Heater How it works continued Left Side inside unit Models 150 199 Models 150 199 21 19 16 36 10 26 25 30 34 23 2 20 13 9 14 8 7 28 17 1 27 3 18 9 13 14 11 6 15 31 22 32 33 ...

Page 6: ...00 Left Side inside unit Models 600 800 18 29 9 13 14 6 11 27 33 22 31 32 15 Models 399 500 10 19 21 35 36 28 17 4 7 8 23 3 1 34 20 2 30 Rear View Models 399 500 Left Side inside unit Models 399 500 18 29 9 13 14 6 11 27 22 15 33 32 31 10 5 3 16 21 23 20 36 28 19 7 8 34 4 2 1 Models 600 800 ...

Page 7: ...ifferent control module for altitude operation but the operation given in this manual remains the same as the standard models A high altitude label as shown in FIG A is also affixed to the unit 7 Maximum allowed working pressure is located on the rating plate NOTICE Figure A High Altitude Label Location UNITEQUIPPEDFOR 3 000FT TO12 000FT HIGH ALTITUDE Model Number Note Change N to L for L P gas mo...

Page 8: ...m combustible materials 2 Vent pipe at least 1 from combustible materials 3 See FIG s 1 1 and 1 2 on page 9 for other clearance minimums Clearances for service access 1 See FIG s 1 1 and 1 2 on page 9 for recommended service clearances If you do not provide the minimum clearances shown it may not be possible to service the water heater without removing it from the space Closet and alcove installat...

Page 9: ...FT SIDE 24 REAR 24 Figure 1 1 Closet Installation Minimum Required Clearances WARNING For closet installations CPVC material MUST BE used in a closet structure due to elevated temperatures Failure to follow this warning could result in fire personal injury or death WARNING For alcove installations CPVC material MUST BE used in an alcove structure due to elevated temperatures Failure to follow this...

Page 10: ...onal Fuel Gas Code ANSI Z223 1 and or CAN CGA B149 Installation Code Appliances located in residential garages and in adjacent spaces that open to the garage and are not part of the living space of a dwelling shall be installed so that all burners and burner ignition devices are located not less than 18 inches 46 cm above the floor The appliance shall be located or protected so that it is not subj...

Page 11: ...le 3B must be used at the flue collar connection Size To ensure proper pipe size is in place see Table 3D Check to see that this size is used throughout the vent system Manufacturer For a stainless steel application you must use only the listed manufacturers and their type product listed in Table 3A for CAT IV positive pressure venting with flue producing condensate Supports Non combustible suppor...

Page 12: ...stem are located and other spaces of the building Turn on clothes dryers and any appliance not connected to the common venting system Turn on any exhaust fans such as range hoods and bathroom exhausts so they will operate at maximum speed Do not operate a summer exhaust fan Close fireplace dampers d Place in operation the appliance being inspected Follow the lighting instructions Adjust thermostat...

Page 13: ...ize Models 150 399 Table 2A The 500 800 Models do not require an orifice installation for propane operation but they will require a valve adjustment Models 150 285 1 Remove the top and front access covers from the unit no tools required for removal 2 Remove the three screws securing the gas valve to the venturi FIG 2 2 3 Locate the propane orifice disk from the conversion kit bag Verify that the s...

Page 14: ... left side of the unit in the lower left corner 9 Replace the top and front access covers DANGER Armor 399 Inspect the O ring when the blower is disassembled The O ring must be in good condition and must be installed Failure to comply will cause a gas leak resulting in severe personal injury or death Figure 2 4 Gas Valve Adjustment Model 500 Model 500 1 Remove the top access cover from the unit no...

Page 15: ...00 Model one and a half 1 1 2 turns on the 700 Model and one turn on the 800 Model see FIG 2 5 4 Use a combustion analyzer to verify CO2 is within the range of 9 6 10 5 If not adjust the screw counterclockwise incrementally to raise CO2 and clockwise to lower CO2 FIG 2 5 5 After adjustment is complete attach the propane conversion label in the conversion kit bag next to the boiler rating plate Att...

Page 16: ...ipe Sidewall Termination See page 25 for more details Figure 3 2 Stainless Steel Two Pipe Sidewall Termination See page 25 for more details Direct venting options Sidewall Vent Figure 3 3 PVC CPVC Concentric Sidewall Termination Models 150 600 Only See page 28 for more details ...

Page 17: ...e 31 for more details Direct venting options Vertical Vent Figure 3 6 PVC CPVC Concentric Vertical Termination Models 150 600 Only See page 33 for more details Direct venting options Vertical Vent Sidewall Air Figure 3 7 PVC CPVC Vertical Vent Sidewall Air Figure 3 8 Stainless Steel Vertical Vent Sidewall Air Stainless steel vent air design and terminations will vary slightly by manufacturer NOTIC...

Page 18: ... not be interchanged with other vent systems or unlisted pipe fittings For concentric vent installations the inner vent tube must be replaced with field supplied certified vent material to comply with this requirement 4 The 3 Concentric Vent Kit available from Lochinvar see Section 4 Sidewall Termination Optional Concentric Vent and the 3 Concentric Vent Kit available from IPEX are both approved f...

Page 19: ... ANSI ASTM D2665 CPVC schedule 40 ANSI ASTM F441 AL29 4C UL1738 ULC S636 Pipe cement primer PVC ANSI ASTM D2564 IPEX System 636 Cements Primers CPVC ANSI ASTM F493 NOTICE DO NOT USE CELLULAR FOAM CORE PIPE Approved Stainless Steel Vent Manufacturers Make Model ProTech Systems Simpson Dura Vent Co FasNSeal Vent Z Flex Nova Flex Group Z Vent Heat Fab Selkirk Corporation Saf T Vent PVC CPVC Air intak...

Page 20: ...screws or pop rivets Apply Aluminum Foil Duct Tape or silicone sealant to all screws or rivets installed in the vent pipe d Ensure that the air inlet pipes are properly supported The PVC CPVC or ABS air inlet pipe should be cleaned and sealed with the pipe manufacturer s recommended solvents and standard commercial pipe cement for the material used The PVC CPVC ABS Dryer Vent or Flex Duct air inle...

Page 21: ...proved vent other than standard diameter is used Consult a Heat Fab representative for questions Table 3C Stainless Steel Vent Termination Kit s Model Kit Number 700 800 KIT3137 Stainless steel air intake vent connections 1 Combustion Air Intake Connector FIG s 3 12 thru 3 14 Used to provide combustion air directly to the unit from outdoors A fitting is provided on the unit for final connection Co...

Page 22: ...er Heater Stainless Steel Venting Models 285 600 Minimum Maximum allowable combustion air and vent piping lengths are as follows Combustion Air 12 equivalent feet minimum 100 equivalent feet maximum Vent 12 equivalent feet minimum 100 equivalent feet maximum When determining equivalent combustion air and vent length add 5 feet for each 90 elbow and 3 feet for each 45 elbow EXAMPLE 20 feet of PVC p...

Page 23: ... to another location per this manual Optional room air Commercial applications utilizing the Armor water heater may be installed with a single pipe carrying the flue products to the outside while using combustion air from the equipment room In order to use the room air venting option the following conditions and considerations must be followed The unit MUST be installed with the appropriate room a...

Page 24: ...ge on building surfaces or plants d Avoid possibility of accidental contact of flue products with people or pets e Do not locate the terminations where wind eddies could affect performance or cause recirculation such as inside building corners near adjacent buildings or surfaces window wells stairwells alcoves courtyards or other recessed areas WARNING Sidewall vent and air inlet terminations must...

Page 25: ...bject to buildup of leaves or sediment VENT AIR TERMINATION 12 MIN 12 MIN 12 MIN Figure 4 3A Clearance to Gravity Air Inlets 12 305 MM MIN 15 381 MM MAX 12 305 MM MIN FROM BOILER VENT PIPE CONNECTION TO BOILER INTAKE AIR CONNECTION BIRD SCREEN Figure 4 1C Alternate Stainless Steel Vent Termination Typical Stainless Steel Sidewall Termination of Air and Vent Models 285 600 w Field Supplied Fittings...

Page 26: ...Cut a hole for the vent pipe For either combustible or noncombustible construction size the vent pipe hole with at least a 1 2 inch clearance around the vent pipe outer diameter 4 inch hole for 3 inch vent pipe 5 inch hole for 4 inch vent pipe 7 inch hole 191 mm hole for 6 inch 152 mm vent pipe Drill 3 16 diameter holes for inserting the plastic anchors into the wall 2 Install the vent and air int...

Page 27: ...earances required by CSA B149 1 Installation Code 3 The air inlet of a Armor water heater is part of a direct vent connection It is not classified as a forced air intake with regard to spacing from adjacent water heater vents WARNING 12 MIN BETWEEN EDGE OF AIR INLET AND ADJACENT VENT OUTLET VENT AIR TERMINATION VENT AIR Figure 4 5A Multiple Vent Terminations must also comply with Figure 4 1A Figur...

Page 28: ...low in FIG 4 6 Field supplied pipe and fittings are required to complete the installation The required combustion vent pipe materials are listed in Table 3A on page 19 of this manual Figure 4 6 Concentric Sidewall Termination Sidewall termination installation 1 Determine the best location for the termination kit see FIG 4 6 2 The total length of piping for vent or air must not exceed the limits gi...

Page 29: ...c fitting and pipe assembly through the structure s hole Do not allow insulation or other materials to accumulate inside the pipe assembly when installing through the hole 7 Install the rain cap and small diameter pipe assembly into the Y concentric fitting and large pipe assembly Ensure small diameter pipe is bottomed and cemented in the Y concentric fitting for CVK3003 installations and fastened...

Page 30: ...s be made as shown to avoid recirculation of flue gases Dimension A in FIG 4 13 represents the distance between pipes or rain shields as touching or a 2 inch maximum separation Figure 4 13 Concentric Vent and Combustion Air Termination Dimension A as Touching or 2 inches Maximum Separation Figure 4 12 Concentric Vent Sidewall Attachment DO NOT use field supplied couplings to extend pipes Airflow r...

Page 31: ...of the coupling must be at least 1 foot above the air intake When the vent termination uses a rain cap as illustrated in FIG 5 1B maintain at least 36 914 mm above the air inlet The air inlet pipe and vent pipe can be located in any desired position on the roof but must always be no further than 2 feet apart and with the vent termination at least 1 foot above the air intake Figure 5 1A PVC CPVC Ve...

Page 32: ...oot above the air intake When the vent termination uses a rain cap as illustrated in FIG 5 1B maintain at least 36 914 mm above the air inlet The air inlet pipe and vent pipe can be located in any desired position on the roof but must always be no further than 2 feet apart and with the vent termination at least 1 foot above the air intake 4 Maintain the required dimensions of the finished terminat...

Page 33: ...isassembly is desired for cleaning see FIG 4 11 page 29 When using the alternate screw assembly method drill a clearance hole in the rain cap and a pilot hole in the vent pipe for the screw size being used Failure to drill adequate holes may cause cracking of PVC components allowing combustion products to be recirculated Failure to follow this warning could result in personal injury or death 2 Cut...

Page 34: ...minations When two 2 or more direct vent appliances are vented near each other each appliance must be individually vented see FIG 5 7 NEVER common vent or breach vent this appliance When two 2 or more direct vent appliances are vented near each other two 2 vent terminations may be installed as shown in FIG 5 7 The next two 2 vent terminations must be at least 36 inches away from the first two 2 te...

Page 35: ... potable water with a hardness of 5 to 25 grains per gallon and total dissolved solids not exceeding 350 ppm The required temperature rise and the standard circulating pump are sized based on the heating of potable water with a hardness of 5 to 25 grains per gallon and a total dissolved solids not exceeding 350 ppm Consult the manufacturer when heating potable water exceeding these specifications ...

Page 36: ...7 turns 700 1 6 turns 800 1 5 turns RELIEF VALVE FLOW SWITCH PADDLE TEE WITH 1 FITTING ON TOP CLOSE NIPPLE TEE WITH 3 4 FITTING ON TOP 6 Install the assembled flow switch into the 1 inch fitting of the tee installed in Step 4 see FIG 6 1 Flow switch adjustment Refer to Table 6A for the proper setting of the sensitivity screw For reference the position of the screw prior to setting should be turned...

Page 37: ...L LOW TEMPERATURE BUILDING RETURN 180 HOT WATER SUPPLY MIXING VALVE NOTICE Please note that these illustrations are meant to show system piping concept only the installer is responsible for all equipment and detailing required by local codes The piping will not support the weight of the water heater circulator pump Do not attempt to support the weight of the water heater circulator pump with the p...

Page 38: ...er Single Tank NOTICE Please note that these illustrations are meant to show system piping concept only the installer is responsible for all equipment and detailing required by local codes The piping will not support the weight of the water heater circulator pump Do not attempt to support the weight of the water heater circulator pump with the piping or its accessories Refer to the pump manufactur...

Page 39: ...6 Single Heater Double Tank NOTICE Please note that these illustrations are meant to show system piping concept only the installer is responsible for all equipment and detailing required by local codes The piping will not support the weight of the water heater circulator pump Do not attempt to support the weight of the water heater circulator pump with the piping or its accessories Refer to the pu...

Page 40: ...3 3 4 285 2 2 1 2 2 1 2 3 3 4 4 399 2 1 2 3 3 1 2 4 4 5 5 500 3 3 1 2 4 5 5 5 6 600 3 3 1 2 4 5 5 5 6 700 3 4 5 5 6 6 6 800 3 4 5 6 6 6 6 NOTICE Please note that these illustrations are meant to show system piping concept only the installer is responsible for all equipment and detailing required by local codes The piping will not support the weight of the water heater circulator pump Do not attemp...

Page 41: ...ly the installer is responsible for all equipment and detailing required by local codes Model Number of Units 2 3 4 5 6 7 8 Required Pipe Sizes in NPT 150 1 1 2 2 2 2 2 1 2 3 3 199 1 1 2 2 2 1 2 2 1 2 3 3 4 285 2 2 1 2 2 1 2 3 3 4 4 399 2 1 2 3 3 1 2 4 4 5 5 500 3 3 1 2 4 5 5 5 6 600 3 3 1 2 4 5 5 5 6 700 3 4 5 5 6 6 6 800 3 4 5 6 6 6 6 The piping will not support the weight of the water heater ci...

Page 42: ...lacing the water heater in operation check the water heater and its gas connection for leaks a The appliance must be disconnected from the gas supply piping system during any pressure testing of that system at a test pressure in excess of 1 2 PSIG 3 5 kPa b The appliance must be isolated from the gas supply piping system by closing a manual shutoff valve during any pressure testing of the gas supp...

Page 43: ...ches w c with gas flowing verify during water heater startup 2 Install 100 lockup gas pressure regulator in supply line if inlet pressure can exceed 14 inches w c at any time Adjust lockup regulator for 14 inches w c maximum Propane gas Pipe sizing for propane gas 1 Contact gas supplier to size pipes tanks and 100 lockup gas pressure regulator Propane Supply Pressure Requirements 1 Adjust propane ...

Page 44: ...n FIG s 7 6 thru 7 9 on page 45 4 Slowly turn on the gas supply at the field installed manual gas valve WARNING 5 Turn the power switch to the ON position 6 Adjust the temperature set point on the control panel of the SMART SYSTEM control module to call for heat 7 Observe the gas supply pressure as the burner fires at 100 of rated input Percent of burner input will be displayed on the control pane...

Page 45: ...EW ONE 1 FULL TURN AND PLACE THE MANOMETER TUBING OVER THE PRESSURE TAP Figure 7 8 Inlet Gas Supply Check Model 500 DO NOT adjust or attempt to measure gas valve outlet pressure The gas valve is factory set for the correct outlet pressure This setting is suitable for natural gas and propane requiring no field adjustment Attempting to alter or measure the gas valve outlet pressure could result in d...

Page 46: ...tions 2 In Canada CSA C22 1 Canadian Electrical Code Part 1 and any local codes Line voltage connections 1 Connect 120 VAC power wiring to the line voltage terminal strip in the junction box as shown in FIG 8 1 2 Provide and install a fused disconnect or service switch 15 amp recommended as required by the code see FIG 8 1 3 The DHW water heater pump is shipped loose on all Armor models Wire the w...

Page 47: ... in series and connect them to the terminals on the connection board FIG 8 3 Flow switch 1 A flow switch is used to guarantee flow through the water heater before allowing it to fire The flow switch must be installed in line with the water heater 2 Connect these terminals to the normally open contacts on the flow switch FIG 8 3 Water heater Building Management System BMS 1 An external control may ...

Page 48: ...ade system to work properly the tank sensor must be installed The tank sensor should be wired to the low voltage connection board at the terminals marked for the tank sensor see FIG 8 3 The Leader control will use the water temperature at the tank sensor to control the operation of the Cascade Communication between the Leader water heater and the Member water heaters is accomplished by using shiel...

Page 49: ...Installation Operation Manual 49 8 Field wiring continued Figure 8 3 Low Voltage Field Wiring Connections ...

Page 50: ...by the authority having jurisdiction In the absence of other authority PVC and CPVC pipe must comply with ASTM D1785 or D2845 Cement and primer must comply with ASME D2564 or F493 For Canada use CSA or ULC certified PVC or CPVC pipe fittings and cement 8 A condensate removal pump is required if the water heater is below the drain When installing a condensate pump select one approved for use with c...

Page 51: ...ld result in damage to the valve causing potential severe personal injury death or substantial property damage PVC TEE ASSEMBLY FACTORY SUPPLIED TO FLOOR DRAIN 2 PVC CAP WITH BLOCKED DRAIN SWITCH RETAINING SCREW CONDENSATE FROM HEAT EXCHANGER Figure 10 1 Condensate Trap WARNING WARNING Propane water heaters only Your propane supplier mixes an odorant with the propane to make its presence detectabl...

Page 52: ...ts Air in the system will interfere with circulation and cause heat distribution problems and noise Check vent piping and air piping 1 Check for gastight seal at every connection seam of air piping and vent piping Venting system must be sealed gastight to prevent flue gas spillage and carbon monoxide emissions which will result in severe personal injury or death Check gas piping 1 Check around the...

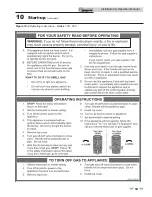
Page 53: ...Installation Operation Manual 53 Figure 10 2 Operating Instructions Models 150 285 10 Start up continued ...

Page 54: ...Installation Operation Manual 54 10 Start up Figure 10 3 Operating Instructions Models 399 800 ...

Page 55: ...he current heating cycle ends Table 10A Flue Products Chart 8 Once the combustion analysis is complete test the safety shutoff device by turning the manual shutoff valve to the OFF position and ensuring that the water heater shuts down and registers an alarm Open the manual shutoff valve reset the control and return to Service Mode 9 Turn the main power off to the water heater and replace the flue...

Page 56: ...e Cascade designating the Leader control and the Member controls Set clock The SMART SYSTEM control has a built in clock that it uses for its night setback feature and for logging events This clock must be set when the water heater is installed and anytime the water heater has been powered off for more than one month Use the following procedure to set the clock 1 Press and hold the MENU key for at...

Page 57: ...nitored by the water heater outlet temperature sensor When the outlet temperature exceeds 185 F the unit will reduce the fan speed If the outlet water temperature exceeds 195 F the control will shut the unit down until it cools off The control module monitors the flue temperature by a sensor located in the flue exhaust If the flue temperature exceeds 215 F the control will reduce the maximum fan s...

Page 58: ...re the second water heater on the Cascade For a new startup this would be the first Member water heater The water heater will fire at its ignition speed and will then modulate its firing rate to maintain the set point Monitor external limits Connections are provided on the connection board for external limits such as flow switch gas pressure switches and an auxiliary device proving switch The SMAR...

Page 59: ... off sequence will be as follows DAY SWITCHING ON SEQUENCE Day 1 L M1 M2 M3 M4 M5 M6 M7 Day 1 1 hour M1 M2 M3 M4 M5 M6 M7 L Day 1 2 hour M2 M3 M4 M5 M6 M7 L M1 Access modes User The user can adjust water tank target temperature by using the UP and DOWN buttons FIG 11 1 at any time during normal operation By entering the USER code 0704 the user can also change temperature units time and date and ni...

Page 60: ...he blocked drain switch and auto reset high limit are closed the control starts the 5 second trial for ignition by sending spark voltage to the spark electrode and opening the gas valve WHR IGNITION OUT 123 9F 129 5 If the control does not detect flame by the end of the trial for ignition the control performs a 10 second postpurge another prepurge and tries to light the burner again If the burner ...

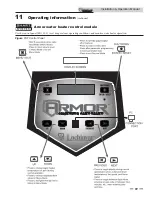
Page 61: ...ration Manual 61 Armor water heater control module Figure 11 1 Control Panel Use the control panel FIG 11 1 to set temperatures operating conditions and monitor water heater operation 11 Operating information continued ...

Page 62: ...it has fired and is running at the displayed percentage Postpurge The call for heat has been satisfied and the unit runs the fan for an additional 10 seconds to clear the combustion chamber and vent system of residual flue products Service The unit has been placed in a temporary mode that will allow the unit to fire at 100 of rate for the purpose of combustion analysis OUT F The outlet temperature...

Page 63: ...splay to access Screen 4 4 FAN SPD RPM The control will display the actual fan motor RPM FLAME SIG uA The control will display the flame signal in dc microamps Press the Next arrow key on the SMART SYSTEM display to access Screen 5 5 WHR CFH OFF The control has not received a call for heat from a tank thermostat or tank sensor ON The control has received a call for heat from a tank thermostat or t...

Page 64: ...pump PMP On The Leader control has received a call for heat from a remote thermostat and has powered the water heater pump PMP Delay The tank call for heat has been satisfied and the water heater pump is running for a fixed time to remove any residual heat Press the Next arrow key on the SMART SYSTEM display to access Screen 8 8 Cas Pow The first percentage shows the firing rate that is being sent...

Page 65: ...ctions Perform start up checkout and performance verification per Section 10 of this manual Flame inspection stable uniform Flame signal at least 10 microamps at high fire Clean the heat exchanger if flue temperature is more than 54 F above return water temperature Check Delta T Temperature Rise If combustion or performance indicate need Clean heat exchanger Remove and clean burner using compresse...

Page 66: ... manual and the Armor Water Heater Service Manual Inspect water heater interior 1 Remove the front access cover and inspect the interior of the water heater 2 Vacuum any sediment from inside the water heater and components Remove any obstructions Clean condensate trap 1 Inspect the condensate drain line condensate PVC fittings and condensate trap 2 Remove the PVC cap retaining screw from the PVC c...

Page 67: ... result in unsafe pressure buildup which can result in severe personal injury death or substantial property damage Following installation the valve lever must be operated AT LEAST ONCE A YEAR to ensure that waterways are clear Certain naturally occurring mineral deposits may adhere to the valve rendering it inoperative When manually operating the lever water will discharge and precautions must be ...

Page 68: ...ater heater in Section 10 Startup Do not drain the water heater unless it will be exposed to freezing temperatures 2 Allow time for the water heater to cool to room temperature if it has been firing 3 Remove the blower assembly gas air arm from the heat exchanger access cover Set bolts aside 4 Remove the nuts securing the heat exchanger access cover to the heat exchanger and set aside 5 Remove the...

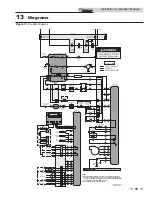
Page 69: ...RK ROD INTEGRATED CONTROL GROUND JUNCTION BOX INTEGRATED CONTROL 120 VAC LOW VOLTAGE HIGH VOLTAGE CAUTION HIGH VOLTAGE SPARK LEAD BLOWER TERMINAL STRIP TERMINAL STRIP CN3 9 CN3 7 CN3 8 CN3 6 CN3 4 CN3 3 CN3 1 CN3 10 DISPLAY CONNECTION BOARD INLET SENSOR OUTLET SENSOR FLUE SENSOR X4 9 X4 7 X4 8 X4 6 X4 4 X4 3 X4 1 X4 10 INTEGRATED CONTROL CN4 11 CN4 12 CN4 10 CN4 4 ALARM CONTACTS RUN TIME CONTACTS ...

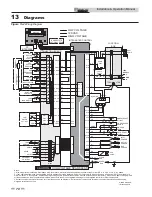
Page 70: ... X6 6 BL GY R EXTERNAL CONTROL AUTO RESET HI LIMIT CAUTION HIGH VOLTAGE SPARK LEAD CN5 3 CN5 4 CN5 2 24 VAC COM L N GND TR1 X8 120 VAC LOW VOLTAGE HIGH VOLTAGE X3 PC INTERFACE CN4 14 8 7 6 5 4 3 2 1 Notes 1 All wiring must be installed in accordance with local state provincial and national code requirements per either N E C in USA or C S A in Canada 2 If any original equipment wire as supplied wit...

Page 71: ...Notes ...

Page 72: ...off testing and instructions sediment trap periodic cleaning of screens in vent terminations wall thickness for direct vent terminations removal of B149 2 references approval of the 3 concentric vent kit for ULC S636 the addition of the Scald Warning Label and sidewall vent termination kit number correction Revision H ECO C02870 reflects the addition of a mixing valve to the piping diagrams FIG s ...

Reviews: