100221773_2000189439_Rev. 01
www. lochinvar .com
43
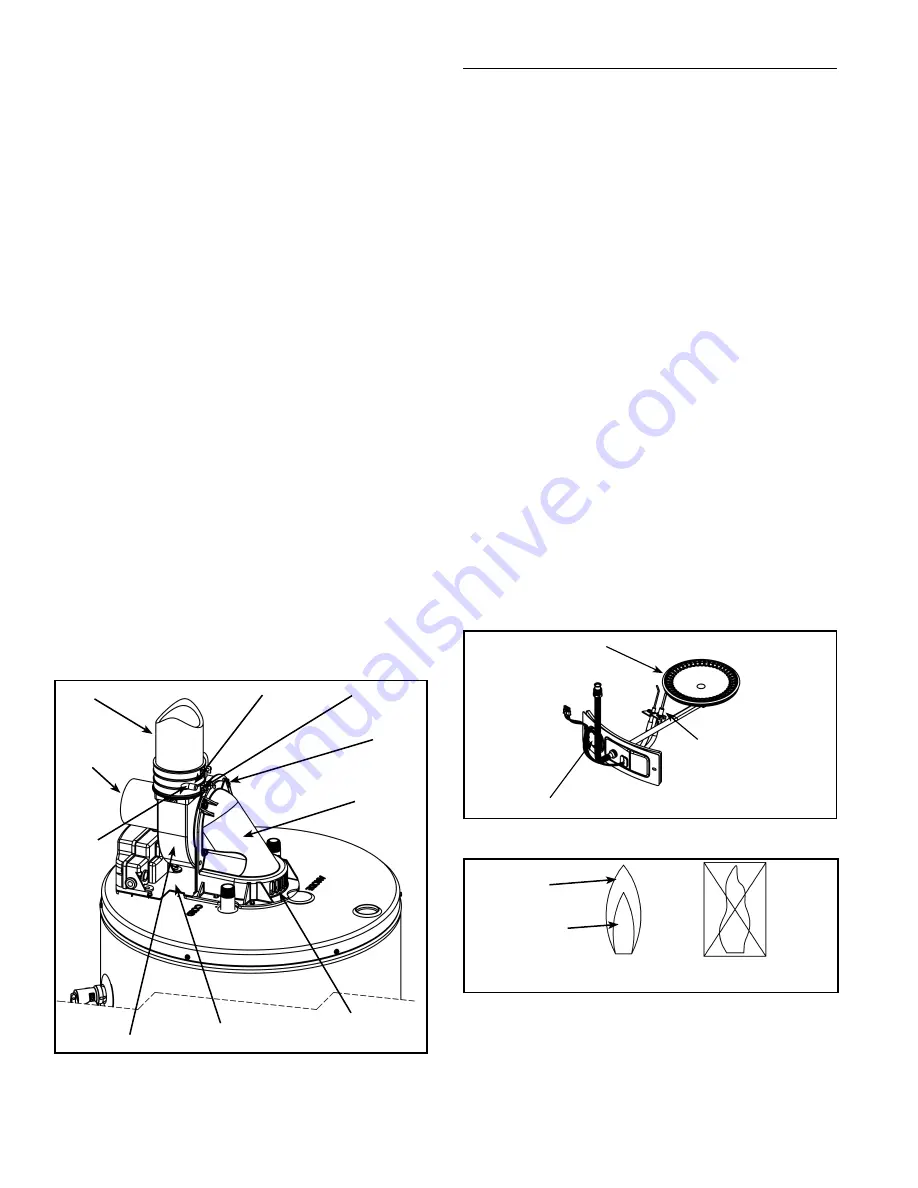
7. Accessing the blower wheel through the outlet, use
the paint brush to brush off the outer edge of the
blower wheel to dislodge any dirt stuck on the blades
and the inside of the housing. Rotate the wheel until
all blades are clear.
Note:
The wheel is a balanced
component. Do not bend, dent or distort the blades as
this can upset the wheel balance and affect the blower
operation. Vacuum out the loosened dirt.
8. Accessing the inside of the blower wheel through the
rear of the housing, gently brush off the inside of the
blades using the toothbrush. Again, take care not to
distort the blades. Rotate the wheel until all blades are
cleaned and vacuum the debris. Do not remove any
of the balancing chips attached to the blades.
9. Inspect the flue collector hood (still attached to the
heater) and vacuum out the dust and debris that may
have accumulated.
10. With all parts cleaned and the blower wheel turning
freely, reinstall the blower to the mounting plate
aligning the (4) studs and pushing tight against the
mounting plate.
11. Reinstall the (4) 11/32” nuts and tighten securely. All
(4) nuts must be in place and secure to safely operate
the blower.
12. Reattach the vent piping and coupling to the top of the
blower, tighten the bottom gear clamp and ensure the
piping is secure.
13. With all components clean and secure, reconnect the
electrical power to the heater.
14. Reset the thermostat to the desired temperature
setting and turn the gas control switch back to the
“ON” position.
Note:
If the water in the heater is hot,
the unit will wait to operate until there is a need for
more hot water.
BLOWER
DILUTION
AIR INTAKES
COUPLING
BLOWER
FLUE
COLLECTOR
HOOD
11/32”
NUTS
MOUNTING
PLATE
GEAR
CLAMP
VENT
PIPE
MOTOR
DRAIN
PORT
Figure 48.
BURNER OPERATION AND INSPECTION
Flood damage to a water heater may not be readily visible
or immediately detectable. However, over a period of time
a flooded water heater will create dangerous conditions
which can cause death, serious bodily injury, or property
damage. Contact a qualified installer or service agency to
replace a flooded water heater. Do not attempt to repair
the unit! It must be replaced!
At least once a year a visual inspection should be made of
the main burner and the hot surface igniter assembly for
proper flame characteristics and ignition sequences. This
can be done by removing the outer door and viewing the
main burner operation through the viewport on the inner
door (see Figure 49). The main burner should provide
complete combustion of gas, ignite rapidly, give reasonably
quiet operation, and cause no excessive flame lifting from
the burner ports. If the proper flame characteristics are
not evident (see Figure 50), make sure that the flow of
combustion and ventilation air is not blocked.
You should also check for sooting. Soot is not normal and
will impair proper combustion. A visual inspection of the
main burner and hot surface igniter should also be done
at least once a year (see Figure 49).
Soot build-up indicates a problem that requires correction
before further use. Turn “OFF” gas to water heater by
unplugging the power cord and leave off until repairs are
made. Failure to correct the cause of the sooting can result
in a fire causing death, serious injury, or property damage.
VIEWPORT
MAIN
BURNER
IGNITER
AND
FLAME
ROD
Figure 49.
CORRECT FLAME
SOFT BLUE
INCORRECT
FLAME LAZY
YELLOW
BLUE TIPS
LIGHT BLUE INNER
CONES ARE
SATISFACTORY
Figure 50.


