53
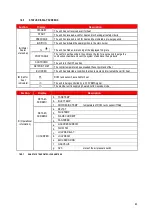
PIN CONNECTION
OUTPUT / INPUT
NOTES
1-2
ALARM CONTACTS
Volt free – Close on alarm
An internal volt free contact across pins 1 and 2 will close in the event of the heater locking
out. This connection can be used by a BMS to monitor the operation of the heater.
3-4
RUNTIME
CONTACTS
Volt free – Close when unit
running
An internal volt free contact across pins 3 and 4 will close in the event of the burner
operating. This connection can be used by a BMS to monitor the operation of the heater
5-6
24VAC RECIRC
PUMP
RELAY COIL
24VAC Output – when
recirc sensor calls –
switches on Neutral
When the heater gets a call for heat from the DHW RECIRC SENSOR a 24VAC supply will
be sent to a DHW recirculation pump relay (field supplied)
7-8
24VAC LOUVER
RELAY COIL (COM)
24VAC Output – When unit
calls for heat.
When the heater gets a call for heat, a 24VAC supply becomes present on pin 7. Used in
conjunction with the ground pin (pin 8), these terminals can be used to send a signal to
energise an auxiliary device such as a fan dilution system or mechanical ventilation system.
9-10
LOUVER PROVING
SWITCH
24VAC Output – When unit
calls for heat.
If an auxiliary device such as a fan dilution system or mechanical ventilation system is to be
used, the link should be taken out of pins 9 and 10 and the auxiliary deice safety circuit
wiring installed. If there is no continuity across the terminals the heater will not fire.
11-12
GAS PRESSURE
SWITCH
24VAC Output – constant
when unit is powered
If a gas pressure switch is to be used to ensure the incoming gas pressure is correct, the
link should be taken out of pins 11 and 12 and the gas pressure switch wiring installed. If
there is no continuity across the terminals the heater will not fire.
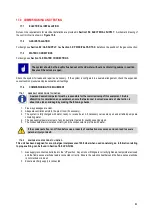
13-
14
FLOW SWITCH
24VAC Output –
constant when unit is
powered
If a flow switch is to be used to ensure the primary pump is operating, the link should be taken out of
pins 13 and 14 and the flow switch wiring installed. If there is no continuity across the terminals the
heater will not fire.
15-
16
TANK
THERMOSTAT
24VAC Output –
constant when unit is
powered
This connection should not be used for controling DHW temperature. The supplied temperature sensor
should be connected to pins 29 & 30. For further information, please refer to Section 13.0:
The Tank thermostat can be used as an enable – when a tank sensor is fitted and the BMS
Thermostat is enabled see section 15.2.1 The tank sensor (terminals 29 & 30) is still used for
temperature control, the thermostat connection just used to enable.
17-
18
HEAT/LOOP
DEMAND 3
24VAC Output –
constant when unit is
powered
This connection should not be used with a water heater.
19-
20
HEAT/LOOP
DEMAND 2
24VAC Output –
constant when unit is
powered
This connection should not be used with a water heater.
21-
22
HEAT/LOOP
DEMAND 1
24VAC Output –
constant when unit is
powered
This connection should not be used with a water heater.
23-
24
SYSTEM
SENSOR
Contacts read a
resistance
This connection should not be used with a water heater.
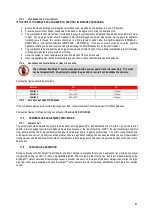
25-
26
OUTDOOR
SENSOR
Contacts read a
resistance
This connection should not be used with a water heater.
27-
28
DHW RECIRC
SENSOR
Contacts read a
resistance
The heater can control a DHW recirculation pump. A sensor must be installed in the circulation loop
return and connected to terminals 27 and 28.
29-
30
TANK
SENSOR
24VAC Output – When
unit calls for heat.
A sensor located in the direct vessel must be connected to terminals 29 and 30 to control the output
from the heater. This connection is not polarity sensitive. This sensor is included with the EcoKnight™
water heater.
31-
34
CASCADE
Communication
If the heaters are to be operated in a cascade, shielded 2-wire twisted pair communication cable should
be used. The shielding should be connected to pin 31 or 34 and then all “A” terminals (pin 32) should
be linked together and all “B” terminals (pin 33) should be linked together.
35-
36
BMS IN
0 – 10 V DC
input
When the heater is to be controlled by a 0-10V DC analogue output from a Building Management
System (BMS), the 0V line should be connected to pin 35 and the 0-10V line should be connected to
pin 36. See section 21.7
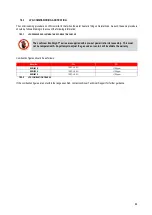
37-
38
SYS PUMP IN
0 – 10 V DC
input
This connection should not be used with a water heater.
39-
40
BLR PUMP OUT
0 – 10 V DC
output
This connection should not be used with a water heater.
41-
42
RATE OUT
0 – 10 V DC
output
Provides a 0-10V signal that is proportional to the firing rate of the heater. This may be used by a BMS
system to monitor the actual rate of the heater.
43-
46
MODBUS/BACNET
OPTION
Communication
When an optional ModBus or BACnet interface module is installed the RS-485 cable is connected to
these terminals
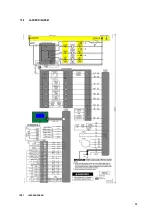
15.4.2
LOW
VOLTAGE
CONNECTION
TERMINAL
DETAILS
Summary of Contents for ECOKNIGHT EKW116CE
Page 28: ...28 Max distance between brackets ...
Page 29: ...29 ...
Page 30: ...30 ...
Page 34: ...34 ...
Page 35: ...35 ...
Page 55: ...55 15 8 WIRING DIAGRAM 15 8 1 WIRING DIAGRAM ...
Page 56: ...56 15 9 LADDER DIAGRAM 15 9 1 LADDER DIAGRAM ...
Page 87: ...87 ...
Page 88: ...88 ...


