ENGLISH
6
5. Profile preparation
Determine the correct position of the lock in the gate frame. The mounting holes can be prepared
by means of the drawing below.
NOTE! The hole of the self-latching bolt, needs to be larger (Ø 1”) at the back of the gate frame
then at the front (Ø3/4” mm). This allows you to fit the Free Vinci easily into the gate frame when
a minimum distance (4-3/8”) between the gate frame and the first gate bar is required.
6. Changing the codepanel to the entrance side
Before mounting the Free Vinci to the gate, check if the code entry side is at the correct side of the
gate. If not, follow the instructions below to change the codepanel to the entrance side of the gate.
8-
9/
16
”
4-
23
/3
2”
5-
9/
16
”
13
/1
6”
MIN. 4-3/
8”
1-1/4
”
2x Ø5/8”
2x Ø3/8”
Ø3/4”
Ø1”
3-5/8” 4”
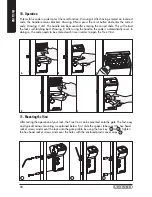
Step 1: Remove the closing cover.
First remove the cover screw and then slide out the closing cover and the dust- & raincover.
Summary of Contents for FREE VINCI LFKQ X2L
Page 1: ...USER GUIDE ENGLISH FREE VINCI LFKQ X2L...
Page 2: ......
Page 11: ...ENGLISH 11...
Page 12: ......


