background image

ENGLISH

8

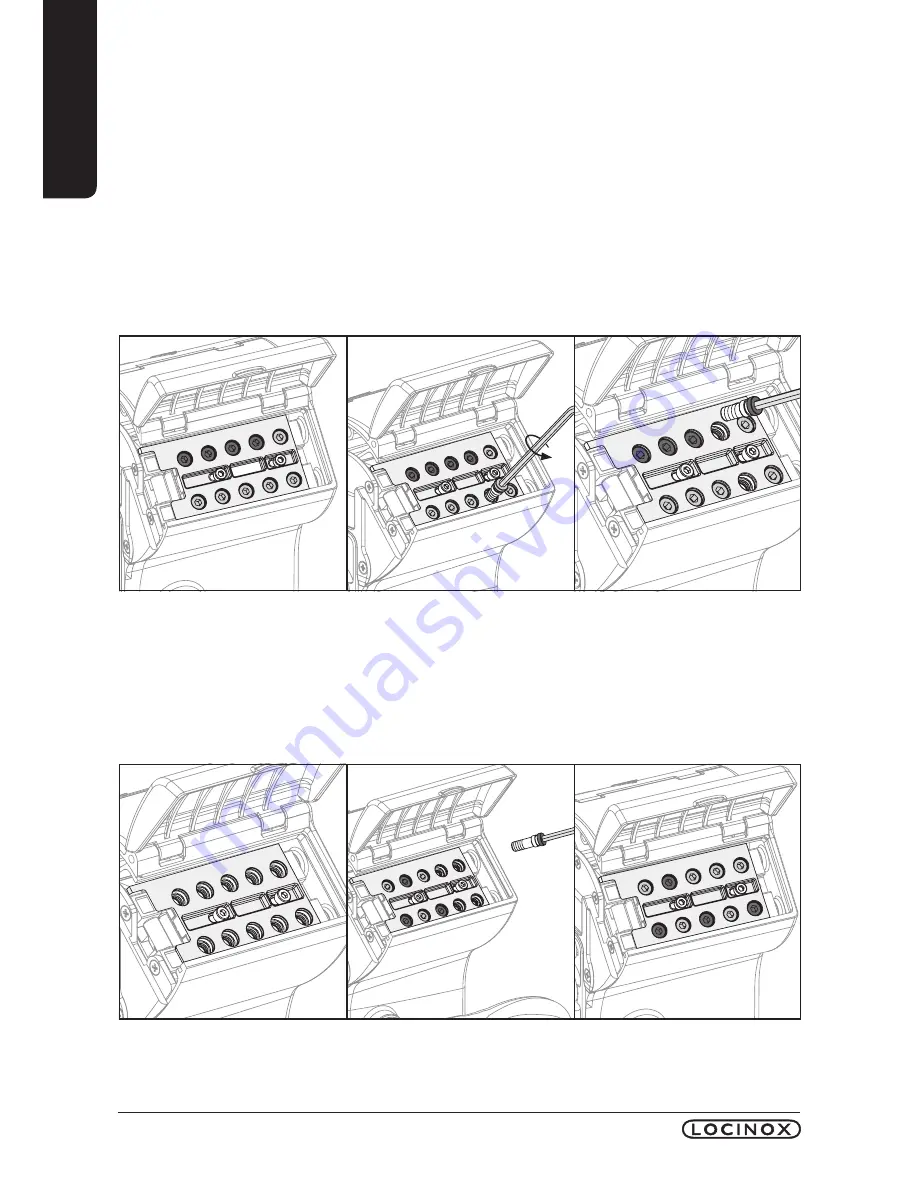
Step 2:  Set your personal code
Insert the green code screws in the position you want your personal code to be.  Fill the remaining 

holes with the red screws.  All holes must be filled with a screw.  Tighten the screws down so they 

are firmly seated.

7. Code setting

Because  of  security  reasons,  the  Free  Vinci  is  developed  in  such  a  manner  that  the  code 

can  only  be  changed  when  it  is  not  mounted.  The  default  setting  of  the  code  is  1-2-3-4.


The steps below explain how you can modify your own personal code in a fast and simple manner. 

The Free Vinci enables the setting of a 4 to 6-digit code.

Step 1:  Remove the closing cover and code panel.
After removing the code panel, you will find the red (stop) and green (go) code screws. From the 

factory, the green screws are automatically set in position 1-2-3-4, as shown. Remove all code

screws from the code mechanism with the enclosed Allen key.

Summary of Contents for FREE VINCI LFKQ X2L

Page 1: ...USER GUIDE ENGLISH FREE VINCI LFKQ X2L...

Page 2: ......

Page 3: ...transcribed stored in a retrieval system or be translated into any language in any form or by any means whether electronic mechanical magnetic optical chemical manual or otherwise unless explicit writ...

Page 4: ...will find all relevant user information concerning the Free Vinci 2 Package contents Please check if your package contains the following items Please contact your supplier should any of the above item...

Page 5: ...ching bolt by means of the handle The code panel is protected by a polyamide cover This prevents dust and rain from penetrating The quality code lock was designed in a very user friendly manner Changi...

Page 6: ...frame when a minimum distance 4 3 8 between the gate frame and the first gate bar is required 6 Changing the codepanel to the entrance side Before mounting the Free Vinci to the gate check if the code...

Page 7: ...in Chap ter 7 Code setting With the numeric plate in the correct position you are ready to replace the code panel CAUTION The reset button always needs to be on the latch bolt side of the lock Step 4...

Page 8: ...that the code can only be changed when it is not mounted The default setting of the code is 1 2 3 4 The steps below explain how you can modify your own personal code in a fast and simple manner The Fr...

Page 9: ...nstall the handle shaft so that the handle s set screw tightens into the spreader side of the shaft 9 Turn the rollerbolt to match the closing direction CAUTION Before mounting the Free Vinci to the g...

Page 10: ...After using the handle the code is automatically reset In doing so the code needs to be entered each time in order to open the Free Vinci 11 Mounting the Vinci After testing the operation of your loc...

Page 11: ...ENGLISH 11...

Page 12: ......

Reviews: