EN
SlimStone-X
13
7.6 REPLACE SWITCHSTONE-STD [7]
• Physically remove the SwitchStone-STD from the
network
• Install and connect the new SwitchStone-STD
• Confirm that the SwitchStone-STD is in the reset
status (= all leds are flashing, except for power). In
case it’s not in reset status, see chapter 8.1 to reset
the SwitchStone-STD.
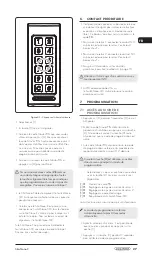
• Access programming mode (see 7.1)
• Select [7] and confirm with [#]
• The SlimStone-X will add the SwitchStone-STD to
the network. During the procedure the waiting light
sequence (see figure 5.1) will be shown.
In case the SwitchStone-STD was not found,
all keys will flash 3 times. You will return to the
main programming menu.
8. FACTORY RESET UPON LOSS
OF MASTER PIN
When the Master PIN is lost, both the
SwitchStone-STD and SlimStone-X need to be reset.
The detailed procedures are described in paragraph
8.1 and 8.2. Once both devices are reset, repeat
the system installation process, as described in
paragraph 5.
8.1 RESETTING A SWITCHSTONE-STD
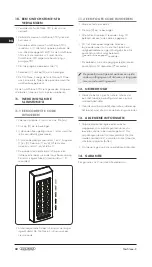
• Press and hold the reset button for 5 seconds to
reset the SwitchStone-STD
IN1
C
C
NO
NO
NC
NC
R2
R1
BUS
BUS
IN2
SWITCHSTONE
POWER
IN 1
OUT 1
BUS
IN 2
OUT 2
• Once the reset is complete, all leds except the
power led will flash
8.2 RESETTING A SLIMSTONE-X
Write down the 9-digit serial number which can be
found on the side of the SlimStone-X
SlimStone-X *SSX-000 000 000*
• Press and hold [C] for 5 seconds
• [C ] lights up, [#] starts flashing
• Enter the 9-digit serial number of the keypad
• Press [#] to confirm
• The waiting pattern (see figure 5.1) is shown
• If the reset was successful, either [1] or [6] will start
flashing while [#] remains lit
[1] Indicates that all devices in the network are
currently reset. Proceed with creating a new
network as described in paragraph 5.
[6] Means that the SwitchStone-STD hasn’t been
reset. If you want to create a new network
from scratch, the SwitchStone-STD also
needs to be reset first. Once all devices are
reset, [1] will start flashing.
9. REPLACING A SLIMSTONE-X
• Physically remove the SlimStone-X from the
network
• Physically connect the new SlimStone-X to the
network
• After the waiting light sequence (see figure 5.1),
[6] will flash while [#] is permanently lit. In case
this pattern is not shown, please reset the keypad
before proceeding, according to the procedure
described in paragraph 8.2.
• Select [6], [#] will start flashing
• Enter the Master PIN code, press [#] to confirm
• The SlimStone-X will show the waiting pattern
indicating it’s trying to connect to
the SwitchStone-STD
• If successful, the SlimStone-X will go to the normal
operating mode. If the procedure fails, verify the
cabling and try again.


