background image

DU40•20 Technical Manual EN 150624

© 2015 www.Lock4Safe.com

Page 4 of 4

Now dial the factory code 10 20 30 40 on the

Change Index

5 x

Turn RIGHT, pass number “10” four times and stop exactly on the number on the

Changing Index

the fifth time.

4 x

Turn  LEFT,  pass  second  code  number  “20”  three  times  and  stop  exactly  on  the
number on the

Changing Index

the fourth time.

3 x

Turn RIGHT, pass third code number “30”  twice and stop exactly on the number
on the

Changing Index

the third time.

2 x

Turn  LEFT,  pass  fourth  code  number  “40”  once  and  stop  exactly  on  the  number
on the

Changing Index

the second time.

When turning the dial, if a number is passed, start over at the beginning.

After the new Code is completely entered,

turn change key LEFT and remove it.

The new Code is

installed.

Try the new code several times (using Opening Index) before closing the door!

What if …

…accidentally the cam got moved before installation?

As long as the code has not been changed with the change key, the lock can be prepared for
mounting following the steps below:

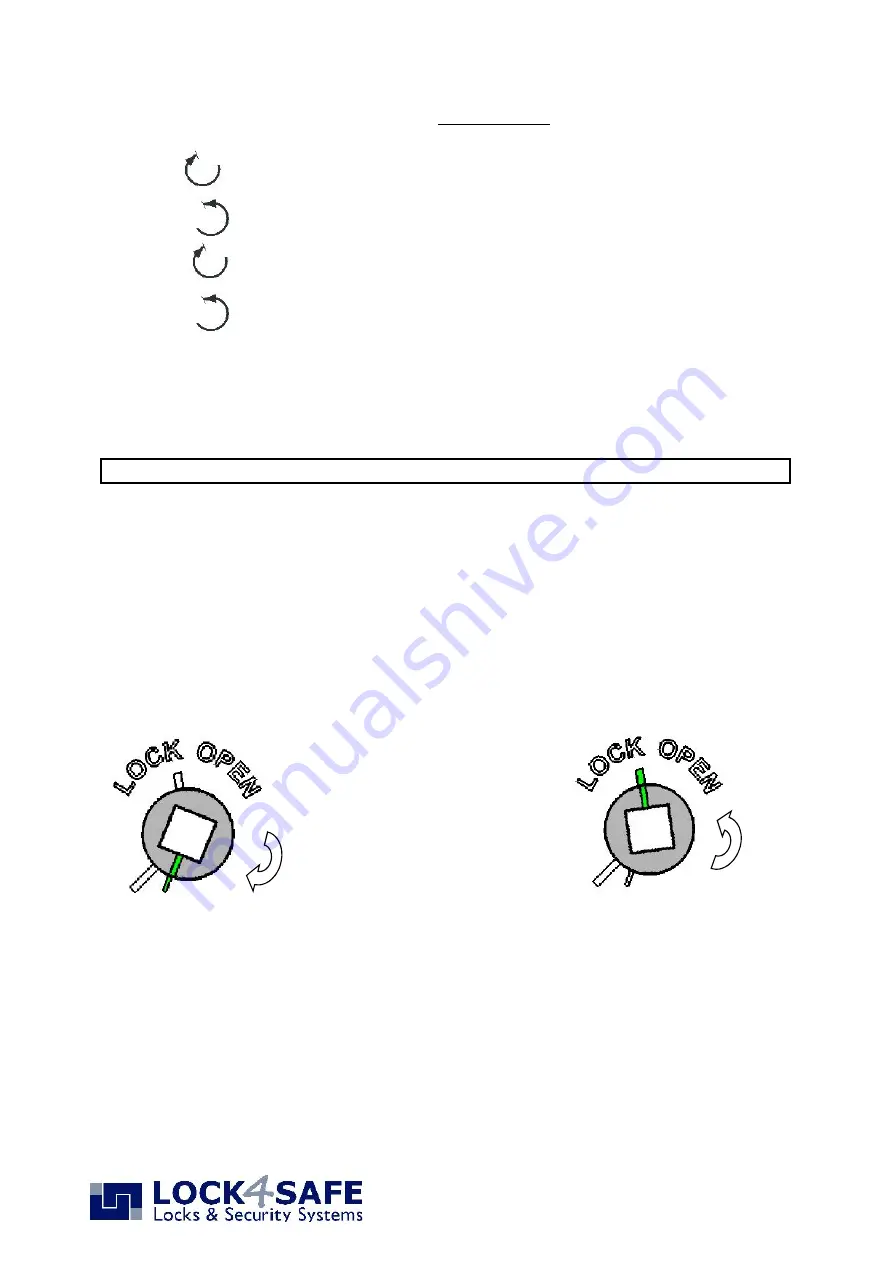
1.

Hold the lock so that you look at the cover and the bolt is to the right.

2.

Turn the cam clockwise minimum 5 complete turns and stop when the cam is lined up as
shown in figure 1.

3.

Turn cam counterclockwise until lock opens.  The cam should be lined up with the “LOCK
OPEN” line on the cover (see figure 2).

Do not deviate from this instruction as it is part of the VdS certification.

5x

Fig 1

Fig 2

Summary of Contents for DUET DU4020

Page 1: ... DIxxxx as shown in this instruction or with any approved entry unit and separate dial The lock is driven by a 4 7 mm 3 16 inch square spindle a spline key is not required The distance between change and opening index is 8 numbers The construction of the security container needs to include protection against destructive force from outside and should not give access to security relevant parts of th...

Page 2: ...be needed to accommodate a relocker Use Loctite to secure the screws approximately 3 5 Nm torque Plug the four input s prong connector into the ENT slot of the lock Thereafter press the nose of the plug lightly behind the metal housing so that it does not come loose during use 5 Cut the shaft for the mechanical dial and deburr both ends Length 41 mm D door thickness Insert the cut shaft into the s...

Page 3: ...er the spindle only to separate it from the cable 12 Remove the spacer With the lock in OPEN position bolt retracted hold the dial in a way that approximately 93 is lined up with the dial s opening mark and push it with light pressure into the lock The dial and shaft cannot be pulled back out as they are held by a starlock washer 13 Place the small plastic plug into the shaft hole at the rear of t...

Page 4: ...dial if a number is passed start over at the beginning After the new Code is completely entered turn change key LEFT and remove it The new Code is installed Try the new code several times using Opening Index before closing the door What if accidentally the cam got moved before installation As long as the code has not been changed with the change key the lock can be prepared for mounting following ...

Reviews: