background image

WARNING: 

This product can expose you to chemicals including Lead, 

which is known to the State of California to cause cancer. For more informa-

tion go to www.P65Warnings.ca.gov.

applicables aux appareils radio exempts de licence. L’exploitation est autorisée aux 

deux conditions suivantes: 

1. L’appareil ne doit pas produire de brouillage;

2. L’appareil doit accepter tout brouillage radioélectrique subi, même si le brouillage

est susceptible d’en compromettre le fonctionnement.

IC Radiation Exposure Statement

This equipment meets the exemption from the routine evaluation limits in section 2.5 of 

RSS-102.  It  should  be  installed  and  operated  with  a  minimum  distance  of  20cm 

between the radiator and any part of your body.

Cet équipement est conforme à l'exemption des limites d'évaluation habituelle de la 

section 2.5 de la norme RSS-102. Il doit être installé et utilisé à une distance minimale 

de 20 cm entre le radiateur et toute partie de votre corps.

FOR COMMERCIAL USE & PROFESSIONAL INSTALLATION

For additional support, 

visit http:// Lockly

Pro

.com/support 

or email prosales@lockly.com

Summary of Contents for LOCKLY GUARD ATHENA SLIDE EDITION 228SL

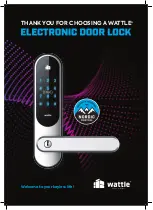
Page 1: ...SLIDE EDITION 228SL SWING EDITION 228SW FOR COMMERCIAL USE PROFESSIONAL INSTALLATION USER MANUAL ATHENA...

Page 2: ...g Mode 3 3 Adding an Access Code 3 4 Deleting an Access Code 3 5 Checking the Access Codes 3 6 Adding a Fingerprint 3 7 Fingerprint Scanning Directions 3 8 Fingerprint Scanning Tips Troubleshoot 3 9 D...

Page 3: ...from being used Live Monitoring and Voice Control Through your smartphone monitor door access from anywhere in the world and securely control who comes and goes Offline Access CodeTM OAC The offline...

Page 4: ...2 SECTION 2 1 2 1 Product Overview Exterior Welcome Safe Mode Battery Indicator OK Button Fingerprint Reader Handle Touchscreen Keypad Buttons RFID card Key Hole Cover Mirco USB Port Key Hole Reboot...

Page 5: ...SECTION 2 2 3 2 2 Product Overview Interior Battery Cover Reset Program Button Battery compartment Operated by 4 X AA size alkaline batteries not included Inside Handle Door Sensor...

Page 6: ...Codes adding and deleting fingerprints adding and deleting RFID cards and also how to configure your OAC Offline Access Code For any questions you can always visit http Lockly com help for assistance...

Page 7: ...hear a short beep Open the LocklyPro smart phone app to add your lock using the Activation Code Press Reset Button for three 3 seconds lockly smart lock reset to factory default Reset Pin 2 5 Rebooti...

Page 8: ...or any 5V 0 5A power supply It normally takes 15 secs to boot up the lock Once Lockly touchscreen is activated enter your Access Code Do not removed the USB plug yet until you have successfully unloc...

Page 9: ...batteries are correctly oriented Replacement of batteries does not affect programmed data Replace only with new batteries DO NOT mix with used batteries AA 1 5V X 4 3 1 2 Whenever batteries are replac...

Page 10: ...when you are done entering your Access Code Your new Lockly Guard Access Code can be any combination of 6 to 8 digits Once a new Access Code is entered the Default Access Code of 123456 would be delet...

Page 11: ...llow the following steps to add delete or check your Access Codes Add Passcode Mode Number Delete Passcode View Passcode Program Button To enter Programming Mode remove the battery compartment cover o...

Page 12: ...s Code Enter your new 6 8 digit Access Code and press when you are finished You will then re enter the code to confirm your new Access Code Remember just touch the digit you need within the circle aro...

Page 13: ...E to delete an Access Code If you are not in Programming Mode please see Section 3 2 to enter Programming Mode After pressing 2DE press Pd to delete an Access Code Active Access Codes will then be dis...

Page 14: ...registered Please add another Access Code before attempting to delete the existing code While in Programming Mode select 3CH to check registered Access Codes If you are not in Programming Mode please...

Page 15: ...ollowing examples show which types of fingerprint patterns will be acceptable It is highly recommended to enroll at least one finger from each hand in case the hand you are using is unavailable such a...

Page 16: ...nt panel on the exterior of Lockly Guard 3 6 Adding a Fingerprint Continued You must successfully scan your fingerprint six 6 times for it to properly register Every time you scan your fingerprint the...

Page 17: ...your fingerprint FAIL will show on the keypad If FAIL is displayed press OK to return to the previous screen to rescan your finger For instructions on scanning an optimal fingerprint please proceed to...

Page 18: ...is clean and free from dirt Children ages 12 and under are not recom mended to use fingerprint access due to the constant changes of their fingers during growth Elderly with fading fingerprints may ha...

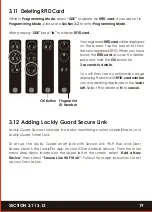
Page 19: ...3 seconds to delete Example shown 02 You will then see a confirmation page displaying and with the fingerprint number you are deleting displayed in the lower left Select Y to delete or N to cancel Alt...

Page 20: ...an RFID card If you are not in Programming Mode please see Section 3 2 to enter Programming Mode After pressing 1AD press Id to add an RFID card Place the RFID card to the screen where the RFID card...

Page 21: ...ctions to set up your Secure Link 3 11 Deleting RFID Card While in Programming Mode select 2DE to delete an RFID card If you are not in Programming Mode please see Section 3 2 to enter Programming Mod...

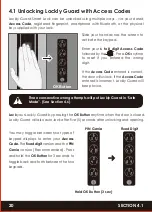
Page 22: ...is correct the door will unlock If the Access Code entered is incorrect Lockly Guard will beep twice OK Button Lock your Lockly Guard by pressing the OK Button anytime when the door is closed Lockly...

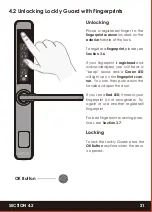
Page 23: ...ndle of the lock To register a fingerprint please see Section 3 6 If your fingerprint is registered and acknowledged you will hear a beep sound and a Green LED will light up on the fingerprint scan ne...

Page 24: ...to lock and unlock with smartphone Please download the app by visiting the link below or search LocklyPro from the correct app store Scan or visit LocklyPro com app Place your RFID card closer to the...

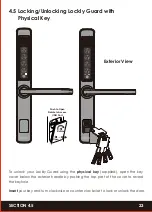
Page 25: ...hysical key supplied open the key cover below the exterior handle by pushing the top part of the cover to reveal the keyhole Insert your key and turn clockwise or counter clockwise to lock or unlock t...

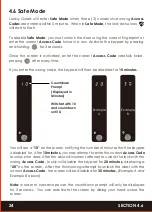
Page 26: ...power the countdown prompt will only be displayed for 3 seconds You can reactivate the screen by sliding your hand across the screen 4 6 Safe Mode Countdown Prompt Displayed in Minutes Will start wit...

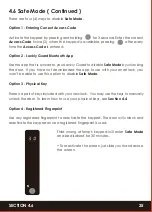
Page 27: ...tered Option 2 Lockly Guard Bluetooth App Use the app that is synced to your Lockly Guard to disable Safe Mode by unlocking the door If you have not downloaded the app to use with your smart lock you...

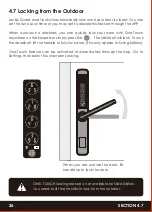
Page 28: ...e keypad or simply press the The latchbolt will lock To lock the deadbolt lift the handle to fully lock door This only applies to Swing Edition One Touch feature can be activated or deactivated throug...

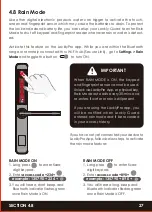
Page 29: ...erprint sensor cannot be used Unlock via LocklyPro App or physical key Rain Mode auto exits every 30 mins and re enters if water or rain is still present If you are using the LocklyPro app you will be...

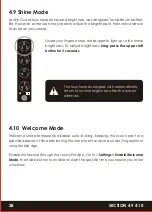
Page 30: ...ess long press the upper left button for 3 seconds Welcome Mode temporarily disables auto locking keeping the door open for a specified period of time eliminating the need to enter access codes finger...

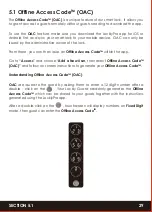
Page 31: ...obile device OAC can only be issued by the administrative owner of the lock From there you can then issue an Offline Access CodeTM within the app Go to Access and choose Add a New User then select Off...

Page 32: ...by using a 9V battery against the bottom of the exterior side of the smart lock Please see Section 2 6 for more info Physical Keys Even though you have your fingerprints registered RFID cards and Acc...

Page 33: ...8 1 Safety Precautions Read the following instructions for your own safety Do not attempt to disassemble the smart lock by yourself It can cause pro duct damage void warranty and cause injuries Do not...

Page 34: ...one or more of the following measures Reorient or relocate the receiving antenna Increase the separation between the equipment and receiver Connect the equipment into an outlet on a circuit different...

Page 35: ...d en compromettre le fonctionnement IC Radiation Exposure Statement This equipment meets the exemption from the routine evaluation limits in section 2 5 of RSS 102 It should be installed and operated...

Page 36: ...demarks and trade names are those of their respective owners Google Android Google Play and Google Home are trademarks of Google LLC For digital versions and instructional videos please visit the foll...

Reviews: