background image

13

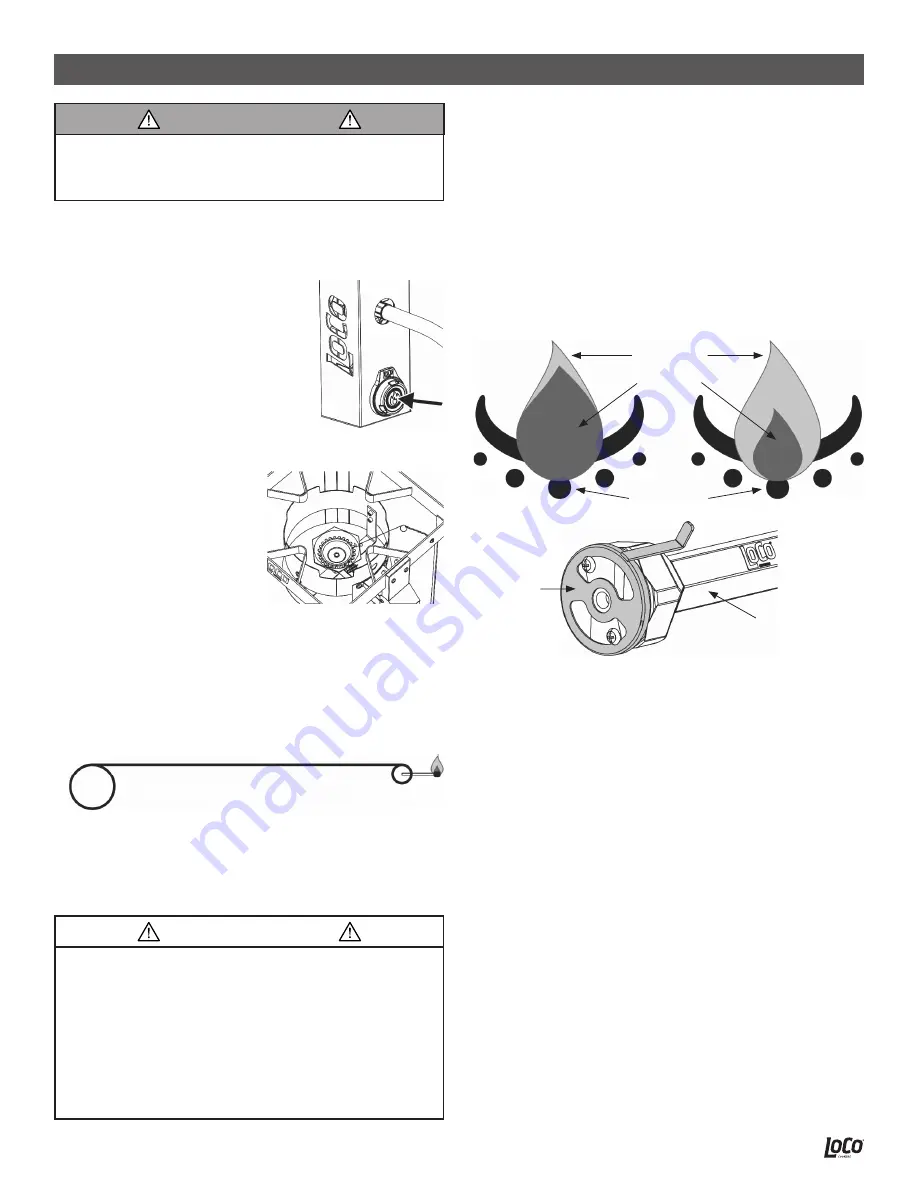
BURNER FLAME CHECK

Light the burner and adjust the flame with the 

regulator control valve. Always check the flame 

prior to each use. The air damper mounted on 

the burner helps control the amount of primary 

air that mixes with the LP gas. A blue flame with 

little or no yellow flame will provide the best heat. 

Adjust the air damper by turning it clockwise or 

counterclockwise to achieve the desired flame.

WHEN BURNER FLAME IS ACCIDENTALLY 

EXTINGUISHED:

  1.  Turn LP tank OFF by turning hand wheel 

clockwise to a full stop.

  2.  Turn regulator control knob 

counterclockwise to the OFF position.

  3. Inspect the hose and make sure 

connections are complete. After waiting 

5 minutes, restart the appliance following 

“INSTRUCTIONS FOR LIGHTING 

BURNER.”

SHUT DOWN INSTRUCTIONS:

  1.  Turn LP tank OFF by turning hand wheel 

clockwise to a full stop.

  2.  Turn regulator control knob 

counterclockwise to the OFF position.

  4.  Open the LP tank valve fully by turning 

counterclockwise.

 5. 

Electronic Ignitor 

Lighting:

 Press and hold 

the ignition button while 

rotating the regulator 

control knob clockwise until 

the burner is lit. DO NOT 

stand with head or arms 

over burner.


Match Lighting:


Using a long ignited 

match (fireplace 

match), place flame 

directly over the 

burner. If using a 

short/paper book 

match, first place the unlit match into the 

match holder which is attached by a chain 

to the stand, then light the match. DO NOT 

stand with head or arms over burner. Slowly 

turn the regulator control knob clockwise 

until burner is lit.

  6.  When the burner is lit, turn the regulator 

control knob to the desired heat output 

position between ON and OFF.

Match Holder

OPERATING INSTRUCTIONS

LP hose is a tripping hazard.

Special Care must be observed.

WARNING

If ignition does not occur in 5 seconds, 

turn the regulator control knob OFF, wait 5 

minutes, then repeat the lighting procedure. 

If the burner does not light with the regulator 

control knob on, or if the flame goes out after 

lighting, gas will continue to flow out of the 

burner and could accidentally ignite with risk 

of injury.

CAUTION

Burner holes

Correct

Incorrect

Yellow flame

Blue flame

Burner

Air damper

Summary of Contents for LCFFSS12

Page 1: ...the consumer CONSUMER Keep this manual for future reference READ INSTRUCTION MANUAL BEFORE ATTEMPTING TO ASSEMBLE OR OPERATE THIS PRODUCT Adult assembly required Keep screws and parts out of reach of...

Page 2: ...Equipped for use on Propane Main Max Input Rating 50 000 BTU H Certified under ANSI Z21 89 CSA 1 18 2017 Outdoor Cooking Specialty Gas Appliance This appliance is not for frying turkeys WARNING Never...

Page 3: ...okers com TABLE OF CONTENTS Warnings Parts Diagram and Parts List Hardware Assembly Instructions Operating Instructions Care and Maintenance Troubleshooting Warranty Information 1 3 6 7 8 8 11 12 14 1...

Page 4: ...circumstances contain the fire In the event of rain snow hail sleet or other forms of precipitation while cooking with oil or grease cover the cooking pot immediately and turn off the appliance burne...

Page 5: ...or and hose assembly supplied with the appliance must be used Replacement pressure regulators and hose assemblies shall be those specified by the appliance manufacturer Replace only with regulator Mod...

Page 6: ...tank inside a vehicle which may become overheated by the sun Dust Cap 5 When the appliance is not in use the gas must be turned off at the supply cylinder 6 Storage of an appliance indoors is permiss...

Page 7: ...LP tanks in an upright position during use transit or storage Leak test new and exchanged LP tanks BEFORE connecting to the appliance LP TANK LEAK TEST For your safety a leak test must be repeated ea...

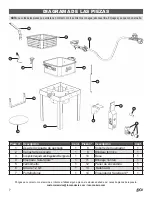
Page 8: ...eeded customerservice lococookers com lococookers com Part Description Qty Part Description Qty 1 Fish Basket Handle 1 8 Burner Bracket 1 2 Fish Basket 1 9 Heat Shield 1 3 Regulator Hose Burner Assemb...

Page 9: ...illips head screwdriver Adjustable wrench Not included Assembly Hardware A M6x14 Screw 6 B M6 Flat Washer 6 C M6x22 Screw 2 D M5x12 Screw 2 2 Remove wing nut washer and hex nut from threaded stud on b...

Page 10: ...9 ASSEMBLY INSTRUCTIONS 3 9 One washer and wing nut previously removed from burner Hand tighten 4 A x2 B x2 B Cutout in venturi shield rests over burner A 11...

Page 11: ...10 lococookers com 14 4 Plug electrode wire into back of ignitor 7 13 14 14 5 6 C x2 D x2 12 D D C ASSEMBLY INSTRUCTIONS...

Page 12: ...11 8 1 2 G E F E x3 F x3 G x3 H x3 H Thermometer clips to fry pot for easy viewing 5 Basket rests on edge of pot for draining ASSEMBLY INSTRUCTIONS...

Page 13: ...kwise to a full stop 4 Remove the protective cap from LP tank Always use cap and strap supplied with valve DO NOT use a POL transport plug It will defeat the safety feature of the valve 5 Hold regulat...

Page 14: ...tronic Ignitor Lighting Press and hold the ignition button while rotating the regulator control knob clockwise until the burner is lit DO NOT stand with head or arms over burner Match Lighting Using a...

Page 15: ...A VESSEL WITHOUT A MAXIMUM FILL LINE 1 Place your food into the basket 2 Place the basket and food into the empty cooking vessel 3 Fill the vessel with water just until the food is completely submerge...

Page 16: ...use CARE AND MAINTENANCE PROPER CARE AND MAINTENANCE WILL KEEP YOUR APPLIANCE OPERATING SMOOTHLY CAUTION Allow appliance to fully cool to 115 F 46 C before performing any cleaning Keep the appliance...

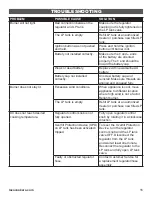
Page 17: ...sure threads are aligned and engaged fully Burner does not stay lit Excessive wind conditions When appliance is cool move appliance to different location where high wind is not a factor Relight burne...

Page 18: ...er s purchaser s expense Defects or damage caused by the use of other than genuine parts are not covered by this warranty This warranty shall be effective from the date of purchase as shown on the pur...

Page 19: ...18 lococookers com...

Page 20: ...LoCo Crazy Good Cookers LLC 506 Manchester Expressway Suite A2 Columbus Georgia 31904 Email customerservice lococookers com Connect with us lococookers lococookers com Made in China...

Page 21: ...UMIDOR Guarde este manual para referencia futura LEA EL MANUAL DE INSTRUCCIONES ANTES DE INTENTAR MONTAR U OPERAR ESTE PRODUCTO Requiere montaje de adultos Mantenga los tornillos y las piezas fuera de...

Page 22: ...50 000 BTU H Certificado bajo ANSI Z21 89 CSA 1 18 2017 Aparato de gas especial para cocinar al aire libre Este aparato no es para fre r pavos ADVERTENCIA Nunca opere este aparato sin supervisi n Nun...

Page 23: ...E Advertencias Diagrama de piezas y lista de piezas Accesorios Instrucciones de montaje Instrucciones de funcionamiento Cuidado y mantenimiento Resoluci n de problemas Informaci n de garant a 1 3 6 7...

Page 24: ...recipitaci n mientras cocina con aceite o grasa cubra la olla de cocci n inmediatamente y apague los quemadores del aparato y el suministro de gas Nunca intente mover el aparato o la olla de cocci n A...

Page 25: ...los conjuntos de manguera de repuesto deben ser los especificados por el fabricante del aparato Reemplace solo con el regulador modelo n GYK 1 8 o JY70A9A T Los l quidos de cocci n calientes pueden p...

Page 26: ...cubierto o cualquier otra estructura Nunca deje un tanque LP dentro de un veh culo que pueda sobrecalentarse por el sol 5 Cuando el aparato no est en uso el gas debe apagarse en el cilindro de sumini...

Page 27: ...ido LP a la atm sfera Esta es una pr ctica peligrosa Para eliminar el gas de un tanque LP comun quese con un distribuidor de LP o con el departamento de bomberos local para obtener ayuda CAMBIO DEL TA...

Page 28: ...de repuesto customerservice lococookers com lococookers com Pieza n Descripci n Cant Pieza n Descripci n Cant 1 Asa de la canasta de pescado 1 8 Soporte del quemador 1 2 Canasta de pescado 1 9 Blindaj...

Page 29: ...ps Llave ajustable no incluidos Accesorios de montaje A Tornillo M6x14 6 B Arandela plana M6 6 C Tornillo M6x22 2 D Tornillo M5x12 2 2 3 3 1 A x4 B x4 10 B 8 B A A Retire la tuerca de mariposa arandel...

Page 30: ...9 INSTRUCCIONES DE MONTAJE 3 9 Una arandela y tuerca de mariposa previamente extra das de quemador Apriete a mano 4 A x2 B x2 B A 11 El recorte en el protector venturi descansa sobre el quemador...

Page 31: ...10 lococookers com 14 4 Enchufe el cable del electrodo en la parte posterior del encendedor 7 13 14 14 5 6 C x2 D x2 12 D D C INSTRUCCIONES DE MONTAJE...

Page 32: ...1 INSTRUCCIONES DE MONTAJE 8 1 2 G E F E x3 F x3 G x3 H x3 H El term metro se sujeta a la olla para fre r para una f cil visualizaci n 5 La canasta descansa sobre el borde de la olla para el escurrido...

Page 33: ...sentido horario hasta el tope completo 4 Retire la tapa protectora del tanque LP Use siempre la tapa y la tira provista con la v lvula NO utilice una tapa de transporte POL Da ar el dispositivo de se...

Page 34: ...mpletamente la v lvula del tanque LP gir ndola en sentido contrario a las agujas del reloj 5 Encendido del encendedor electr nico Mantenga presionado el bot n de encendido mientras gira la perilla de...

Page 35: ...ECIPIENTE SIN UNA L NEA DE LLENADO M XIMO 1 Coloque su comida en la canasta 2 Coloque la canasta y la comida en el recipiente de cocci n vac o 3 Llene el recipiente con agua solo hasta que la comida e...

Page 36: ...fondo el aparato antes de cada uso 8 Almacene todos los componentes en un lugar limpio y seco cuando no est en uso CUIDADO Y MANTENIMIENTO UN CUIDADO Y MANTENIMIENTO ADECUADOS MANTENDR N SU APARATO F...

Page 37: ...os y enganchados por completo El quemador no permanece encendido Condiciones de viento excesivas Cuando el aparato est fr o mu valo a un lugar diferente donde el viento no sea un factor perturbador Vu...

Page 38: ...sumidor comprador Los defectos o da os causados por el uso de piezas que no sean originales no est n cubiertos por esta garant a Esta garant a entrar en vigencia a partir de la fecha de compra como se...

Page 39: ...18 lococookers com...

Page 40: ...Crazy Good Cookers LLC 506 Manchester Expressway Suite A2 Columbus Georgia 31904 Correo electr nico customerservice lococookers com Con ctese con nosotros en lococookers lococookers com Fabricado en C...

Reviews: