background image

12

TWIST & DRAIN

TM

ASSEMBLY INSTRUCTIONS

6

2

1

3

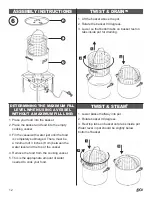
1. Lift the basket above the pot.
2. Rotate the basket 90 degrees.
3. Lower so that bottom tabs on basket rest on 

tabs inside pot for draining.

1. Lower basket halfway into pot.
2. Rotate basket 90 degrees.
3. Rest top tabs on basket onto tabs inside pot.
Water level in pot should be slightly below 

bottom of basket.

1

2

3

1

2

3

1. Place your food into the basket.
2. Place the basket and food into the empty 

cooking vessel.

3. Fill the vessel with water just until the food 

is completely submerged. There must be 
a minimum of 3 inches (8 cm) between the 
water level and the top of the vessel.

4. Remove the food from the cooking vessel.
5. This is the appropriate amount of water 

needed to cook your food.

TWIST & STEAM

®

DETERMINING THE MAXIMUM FILL 

LEVEL WHEN USING A VESSEL 

WITHOUT A MAXIMUM FILL LINE:

Summary of Contents for LCTSKSS100

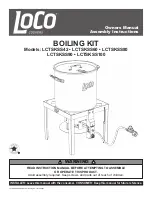
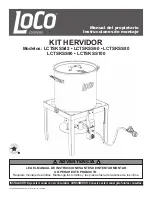
Page 1: ...E THIS PRODUCT Adult assembly required Keep screws and parts out of reach of children BOILING KIT Models LCTSKSS42 LCTSKSS60 LCTSKSS80 LCTSKSS90 LCTSKSS100 LCTSKSS42 60 80 90 100 Boiling Kit IM 062822 WARNING INSTALLER Leave this manual with the consumer CONSUMER Keep this manual for future reference ...

Page 2: ... from the appliance and immediately call your fire department Failure to follow these instructions could result in fire explosion or burn hazard which could cause property damage personal injury or death DANGER If you smell gas Shut off gas to the appliance Extinguish any open flame If odor continues keep away from the appliance and immediately call your fire department Failure to follow these ins...

Page 3: ... Instructions Care and Maintenance Troubleshooting Warranty Information 2 4 7 8 9 9 12 13 15 15 16 17 Do not place an empty cooking pot on the appliance or allow a filled pot to boil dry while appliance is in operation Use caution when placing anything in the cooking pot while the appliance is in operation WARNING ...

Page 4: ...uisher readily available In the event of a fire do not attempt to extinguish with water Immediately call the fire department 911 A Type BC or ABC fire extinguisher may in some circumstances contain the fire In the event of rain snow hail sleet or other forms of precipitation while cooking cover the cooking pot immediately and turn off the appliance burners and gas supply Never attempt to move the ...

Page 5: ...e this appliance when temperature is below this minimum Use caution when in close proximity to appliance Falling or tripping near the gas appliance may result in the splashing or igniting of hot cooking liquids and potentially cause personal injury or property damage Keep the cooking area adjacent to the appliance clear of debris and free of anything flammable or combustible Never attempt to attac...

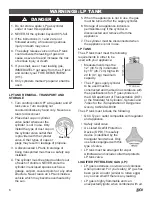
Page 6: ...P tank inside a vehicle which may become overheated by the sun Dust Cap 5 When the appliance is not in use the gas must be turned off at the supply cylinder 6 Storage of an appliance indoors is permissible only if the cylinder is disconnected and removed from the appliance 7 The cylinder must be disconnected when the appliance is not in use LP TANK The LP tank must meet the following requirements ...

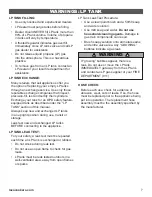
Page 7: ...d LP tanks in an upright position during use transit or storage Leak test new and exchanged LP tanks BEFORE connecting to the appliance LP TANK LEAK TEST For your safety a leak test must be repeated each time an LP tank is exchanged or refilled Do not smoke during leak test Do not use an open flame to check for gas leaks LP tank must be leak tested outdoors in a well ventilated area away from open...

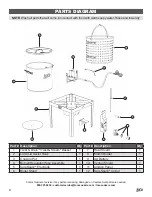
Page 8: ...eeded 800 391 0436 customerservice lococookers com lococookers com Part Description Qty Part Description Qty 1 Twist DrainTM Twist Steam Basket 1 7 Heat Shield 1 2 Lid w Lid Assist Hook 1 8 Match Holder 1 3 Cooking Pot 1 9 AA Battery 1 4 Burner Regulator Hose Assembly 1 10 Venturi Shield 1 5 SureSparkTM Electrode 1 11 Ignition Panel 1 6 Boiler Stand 1 12 SureSparkTM Ignitor 1 2 1 3 6 4 8 9 7 12 5 ...

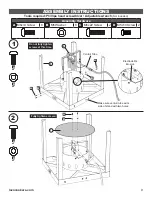
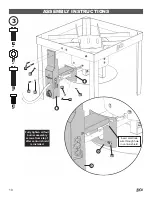
Page 9: ... wrench Not included A x4 B x4 4 6 A B B A Venturi Tube Make sure venturi tube exits side of stand with two holes Do not fully tighten screws at this time A x2 B x2 A B 7 Fully tighten screws Electrode fits into slot Assembly Hardware A M6x14 Screw 8 B M6 Washer 8 C M6x22 Screw 2 D M5x10 Screw 2 ...

Page 10: ...LY INSTRUCTIONS 3 A x2 B x2 Fully tighten all four burner assembly screws from step 1 after venturi shield is installed B A 10 B A 11 C x2 C Insert electrode wire through hole in venturi shield 10 11 D x2 D D D ...

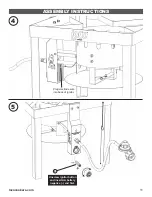
Page 11: ...11 lococookers com 5 ASSEMBLY INSTRUCTIONS 4 Plug electrode wire into back of ignitor 9 Unscrew ignitor button and insert AA battery negative end first ...

Page 12: ...hould be slightly below bottom of basket 1 2 3 1 2 3 1 Place your food into the basket 2 Place the basket and food into the empty cooking vessel 3 Fill the vessel with water just until the food is completely submerged There must be a minimum of 3 inches 8 cm between the water level and the top of the vessel 4 Remove the food from the cooking vessel 5 This is the appropriate amount of water needed ...

Page 13: ...s leaks Appliance must be leak tested outdoors in a well ventilated area away from open flames or sparks STEPS TO LEAK TEST 1 Turn LP tank valve and regulator control knob to the OFF position and make sure regulator is tightly connected to LP tank If growing bubbles appear there is a leak IMMEDIATELY turn off LP tank valve If bubbles continue IMMEDIATELY get away from the LP tank and contact your ...

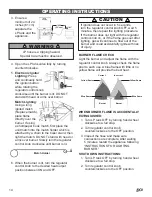
Page 14: ...s check the flame prior to each use A blue flame with little or no yellow flame will provide the best heat WHEN BURNER FLAME IS ACCIDENTALLY EXTINGUISHED 1 Turn LP tank OFF by turning hand wheel clockwise to a full stop 2 Turn regulator control knob counterclockwise to the OFF position 3 Inspect the hose and make sure connections are complete After waiting 5 minutes restart the appliance following...

Page 15: ... To clean the burner tube venturi first disconnect the regulator hose from the burner tube Look inside the burner tube for nests webs or mud To remove obstructions use a flexible brush or bend a small hook on the end of a flexible wire When obstructions are clear the regulator hose can be connected to the burner tube 6 Confirm that all components are completely dry before using or placing in stora...

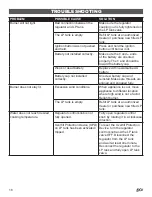
Page 16: ...ectly Unscrew battery cap and reinstall Make sure threads are aligned and engaged fully Burner does not stay lit Excessive wind conditions When appliance is cool move appliance to different location where high wind is not a factor Relight burner The LP tank is empty Refill LP tank at an authorized dealer or purchase new filled LP tank Water does not reach desired cooking temperature Regulator cont...

Page 17: ...he consumer s purchaser s expense Defects or damage caused by the use of other than genuine parts are not covered by this warranty This warranty shall be effective from the date of purchase as shown on the purchaser s receipt This warranty is valid for the original consumer purchaser only and excludes industrial commercial or business use of the product product damage due to shipment or failure wh...

Page 18: ...LoCo Crazy Good Cookers LLC 506 Manchester Expressway Suite A2 Columbus Georgia 31904 800 391 0436 Email customerservice lococookers com Connect with us lococookers lococookers com Made in China ...

Page 19: ...O Requiere montaje de adultos Mantenga los tornillos y las piezas fuera del alcance de los niños KIT HERVIDOR Modelos LCTSKSS42 LCTSKSS60 LCTSKSS80 LCTSKSS90 LCTSKSS100 LCTSKSS42 60 80 90 100 Kit hervidor IM 062822 ADVERTENCIA INSTALADOR Deje este manual con el consumidor CONSUMIDOR Conserve este manual para futuras consultas ...

Page 20: ...ame de inmediato a su departamento de bomberos El incumplimiento de estas instrucciones puede provocar incendios explosiones o quemaduras lo que puede causar daños a la propiedad lesiones personales o la muerte PELIGRO Si huele a gas Cierre el suministro de gas al aparato Apague cualquier llama expuesta Si el olor persiste manténgase alejado del aparato e inmediatamente llame a su departamento de ...

Page 21: ...iento Resolución de problemas Información de garantía 2 4 7 8 9 9 12 13 15 15 16 17 ADVERTENCIA No coloque una olla de cocción vacía sobre el electrodoméstico ni permita que una olla llena hierva en seco mientras el electrodoméstico está en funcionamiento Tenga cuidado al colocar cualquier cosa en la olla de cocción mientras el aparato está en funcionamiento ...

Page 22: ...n caso de incendio no intente extinguirlo con agua Llame inmediatamente al departamento de bomberos 911 Un extintor tipo BC o ABC puede en algunas circunstancias contener el fuego En caso de lluvia nieve granizo aguanieve u otras formas de precipitación mientras cocina cubra la olla de inmediato y apague los quemadores del aparato y el suministro de gas Nunca intente mover el aparato o la olla de ...

Page 23: ... 32 ºF 0 ºC Nunca use este aparato cuando la temperatura esté por debajo de este mínimo Tenga precaución cuando esté cerca del aparato Caerse o tropezarse cerca del aparato de gas puede provocar salpicaduras o ignición de los líquidos de cocción calientes y potencialmente causar lesiones personales o daños a la propiedad Mantenga el área de cocción adyacente al aparato libre de escombros y de cual...

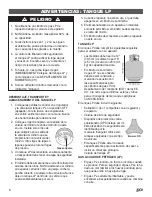
Page 24: ...cubierto o cualquier otra estructura Nunca deje un tanque LP dentro de un vehículo que pueda sobrecalentarse por el sol Tapa antipolvo 5 Cuando el aparato no esté en uso el gas debe apagarse en el cilindro de suministro 6 El almacenamiento de un aparato en interiores solo está permitido si el cilindro se desconecta y se retira del mismo 7 El cilindro debe desconectarse cuando el aparato no esté en...

Page 25: ... cambiados en posición vertical durante el uso tránsito o almacenamiento Pruebe fugas en tanques LP nuevos e intercambiados ANTES de conectarlo al aparato PRUEBA DE FUGAS DE TANQUE LP Para su seguridad se debe repetir una prueba de fugas cada vez que se cambia o rellena un tanque LP No fume durante la prueba de fugas NO use una llama abierta para verificar si hay fugas de gas El tanque debe somete...

Page 26: ...zas de repuesto 800 391 0436 customerservice lococookers com lococookers com Pieza n Descripción Cant Pieza n Descripción Cant 1 Canasta Twist DrainTM Twist Steam 1 7 Blindaje térmico 1 2 Tapa con gancho de agarre 1 8 Portafósforos 1 3 Olla de cocción 1 9 Batería AA 1 4 Conjunto de quemador regulador manguera 1 10 Blindaje Venturi 1 5 Electrodo SureSparkTM 1 11 Panel de encendido 1 6 Base del herv...

Page 27: ...B x4 4 6 A B B A Tubo venturi Asegúrese de que el tubo venturi salga del lado de la base con dos agujeros No apriete completamente los tornillos en este momento A x2 B x2 A B 7 Apriete completamente los tornillos Electrodo en la ranura Accesorios de montaje A Tornillo M6x14 8 B Arandela M6 8 C Tornillo M6x22 2 D Tornillo M5x10 2 ...

Page 28: ...ompletamente los cuatro tornillos del conjunto del quemador del paso 1 después de instalar el protector venturi 3 A x2 B x2 B A 10 B A 11 C x2 C 10 11 D x2 D D D Inserte el cable del electrodo a través del orificio en el protector venturi ...

Page 29: ...lococookers com 9 5 INSTRUCCIONES DE MONTAJE 4 Enchufe el cable del electrodo en la parte posterior del encendedor Desenrosque el botón del encendedor e inserte el extremo negativo de la batería AA primero ...

Page 30: ... en la olla debe estar ligeramente por debajo del fondo de la canasta 1 2 3 1 2 3 1 Coloque su comida en la canasta 2 Coloque la canasta y la comida en el recipiente de cocción vacío 3 Llene el recipiente con agua solo hasta que la comida esté completamente sumergida Debe haber un mínimo de 3 pulgadas 8 cm entre el nivel del agua y la parte superior del recipiente 4 Retire los alimentos del recipi...

Page 31: ...ctora del tanque LP Use siempre la tapa y la tira provista con la válvula NO utilice una tapa de transporte POL Dañará el dispositivo de seguridad de la válvula 5 Sostenga el regulador inserte la boquilla en la válvula del tanque LP Apriete a mano la tuerca de acoplamiento mientras sostiene el regulador en línea recta con la válvula del tanque LP para no cruzar la conexión 6 Gire la tuerca de acop...

Page 32: ...llama amarilla proporcionará el mejor calor CUANDO LA LLAMA DEL QUEMADOR SE APAGA ACCIDENTEMENTE 1 Apague el tanque LP girando la rueda manual en sentido horario hasta el tope completo 2 Gire la perilla de control del regulador en sentido antihorario a la posición OFF apagado 3 Inspeccione la manguera y asegúrese de que las conexiones estén completas Después de esperar 5 minutos reinicie el aparat...

Page 33: ...rían un exceso de gas 5 Para limpiar el tubo del quemador venturi primero desconecte la manguera del regulador del tubo del quemador Mire dentro del tubo del quemador en busca de nidos telarañas o lodo Para eliminar obstrucciones use un cepillo flexible o doble un gancho pequeño en el extremo de un cable flexible Cuando las obstrucciones están despejadas la manguera del regulador se puede conectar...

Page 34: ...batería y vuelva a instalarla Asegúrese de que los cables estén alineados y enganchados por completo El quemador no permanece encendido Condiciones de viento excesivas Cuando el aparato esté frío muévalo a un lugar diferente donde el viento no sea un factor perturbador Vuelva a encender el quemador El tanque LP está vacío Vuelva a llenar el tanque LP en un distribuidor autorizado o compre un tanqu...

Page 35: ...o del consumidor comprador Los defectos o daños causados por el uso de piezas que no sean originales no están cubiertos por esta garantía Esta garantía entrará en vigencia a partir de la fecha de compra como se muestra en el recibo del comprador Esta garantía es válida solo para el consumidor comprador original y excluye el uso industrial comercial o comercial del producto daño del producto debido...

Page 36: ... Good Cookers LLC 506 Manchester Expressway Suite A2 Columbus Georgia 31904 800 391 0436 Correo electrónico customerservice lococookers com Conéctese con nosotros en lococookers lococookers com Fabricado en China ...

Reviews: