background image

5 -

Conditional Access module (CA module)

In order to receive coded digital stations, a Conditional Access module 
(CA module) and a Smart Card must be inserted in the CI slot of your TV 
set (see page 5 and 6). 
The CA module and the Smart Card are not part of the TV set's scope 
of delivery. They are usually available from your dealer. Loewe does not  
provide any guarantee for the functioning of the CA module.

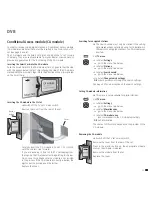
Inserting the Smart Card into the CA module

Push the Smart Card into the CA module as far as it goes so that the side 
with the gold coloured contact chip is facing the side of the CA module 
marked with the provider's logo. Note the direction of the arrow printed 
on the Smart Card.

Inserting the CA module in the CI slot

 Switch off the TV set's mains switch.

Remove the cover from the rear of the set.

Carefully insert the CA module in CI slot 1 or CI slot 2 
with the contact side forward.
If you are standing in front of the TV set (display) then 
the logo on the CA module must be pointing to the rear. 
Do not use force. Make sure the module is not twisted 
in the process. If the CA module is correctly installed, the 
ejector button protrudes a little further.
Replace the cover.

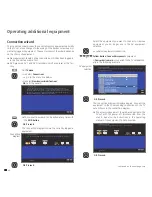
Searching for encrypted stations

➠  

The search wizard must only be started if the setting 
option 

no

 has been selected during first installation in 

the search for encrypted stations or no CA-module was 
inserted.

Call 

TV menu

.


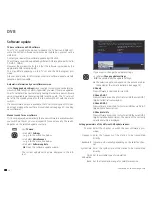
34

 Select 

Settings


go to the menu line below.


34

 Select 

Stations


go to the menu line below.


34

 Select 

Search wizard


go to the menu line below.

34 

Select

 Change search settings

,


OK


wizard guides you through the search settings.

See page 24 for a description of the search settings.

Calling CA module information

 This menu is only available for digital stations.

Call 

TV menu

.


34

 Select 

Settings


go to the menu line below.


34

 Select 

Miscellaneous


go to the menu line below.

 34 

 Select 

CA module: xxx 

(xxx corresponds to the CA module provider),


OK


call information.

The content of this menu depends on the provider of the 
CA module.

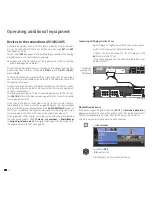
Removing the CA module

 Switch off the TV set's mains switch.

Remove the cover from the rear of the set.

Press in the ejector button on the appropriate module 
drawer, the module is released.

Remove the module from the set.

Replace the cover.

DVB

Cover

Ejector
button

Summary of Contents for Individual 40 Compose Full-HD+ 100

Page 1: ...Operating instructions Individual 52 Compose Full HD 100 Individual 46 Compose Full HD 100 Individual 40 Compose Full HD 100 TV 3 3 2 4 7 0 2 3 233 33247 023...

Page 2: ...P 28 Configure Picture in Picture PIP mode 29 Electronic Programme Guide 30 Electronic Programme Guide EPG 30 Configuring EPG 31 Teletext 32 Teletext 32 Teletext menu 33 Digital teletext MHEG 5 33 Rad...

Page 3: ...ure Pause start offset TV viewing 2 page 20 Sound off on page 62 LED display for current operating mode page 11 62 Switch over to TV mode page 62 Switch over to operate recorder page 55 Timer overview...

Page 4: ...the menu to the left Display Standby Operation Operation without on screen display Radio EPG data capture or timer recording Button R Radio on off 1 back to TV mode Switch on the radio from the standb...

Page 5: ...ection Common Interface 1 CI Slot 1 S VHS connection AVS e g for camcorder Video in AVS Audio in right AVS Audio in left AVS AUDIO IN1 C centre audio input analogue AUDIO LINK surround audio outputs a...

Page 6: ...logue AUDIO LINK surround audio outputs analogue HDMI1 HDMI DVI input 1 ANT SAT Satellite antenna Sat tuner 1 AUDIO IN2 audio input analogue Speakers Right Speakers Right Speakers Left Speakers Left H...

Page 7: ...ith your TV set and adapt it to your requirements Ask your dealer in this regard About this operating manual For many questions concerning the technology you will find an answer in the index of your T...

Page 8: ...TV sound are correctly registered connected and set It is started automatically at the end of the initial installation wizard but can also be called separately see page 47 You will find the sound comp...

Page 9: ...is equipment must only be connected to a mains power supply which has the same voltage and frequency as that specified on the rating plate use the mains cable provided The mains plug of the TV set mus...

Page 10: ...batteries should no longer be disposed of in the do mestic waste according to the Battery Ordinance Dispose of your batteries at no charge in the collection containers which are set up for this purpos...

Page 11: ...the small plug of the mains cable into the mains connection on the rear of the TV then plug the large plug into a mains power outlet Connecting the antenna Analogue DVB C DVB T antenna Plug the antenn...

Page 12: ...hed on for the first time however it can also be called later manually in the TV index see Repeat initial installation on page 16 The first step with the wizard starts when selecting the language for...

Page 13: ...ibilities Select the country for country specific pre settings If UK or IRL is selected for the location of TV set it is pos sible to activate MHEG 5 UK Freeview for the TV set A dialogue appears wher...

Page 14: ...idth of 7 or 8 MHz will be set auto matically If you have registered and connected a recorder in the connection wizard the Digital Link Plus transmission begins at the end of the sound components wiza...

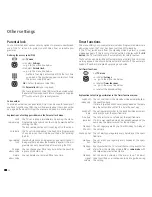
Page 15: ...ecording Settings TV menu Settings Here you can search for stations automatically or manually as well as set the menu language timer functions parental lock on screen displays etc Stations Operating c...

Page 16: ...f automatically at a specific time Select the keyword Switch off Automatic with OK you will go to the setting END OK P P OK a z Activate Previous next letter Select letter Page Index Language Integrat...

Page 17: ...PLII mode 9 Sound adjustment Headphone volume Loudness more Sound mode Dolby PLII mode 9 Headphone volume Loudness more Loudspeaker sound 2 Headphone sound 2 Auto volume AV output signal Maximum volu...

Page 18: ...next avail able station is switched to Call last viewed station for TV sets with MHEG 5 software 56 You can switch back and forth quickly between two stations using this buttons With the station list...

Page 19: ...tion terrestrial via antenna Digital DVB C station via cable Digital DVB S station via satellite Coded station Select video source Please ensure that the appropriate devices have also been registered...

Page 20: ...een selected in the sound components wizard see page 52 Speech Classical Pop Custom music and Custom film sound Adjust the headphones volume Proper boost of bass and treble tones at low volume Here yo...

Page 21: ...n of the signal source see glossary Signal input groups In the index of the TV set all the picture and sound adjustments can be reset to the factory values for all signal sources in one step under Res...

Page 22: ...hed between proportionally correct and format filling reproduction Dark margins are visible on the right and left of the picture in proportionally correct reproduction Switching over Keep the M button...

Page 23: ...ly operation Additional selection possibilities for DVB stations In the status display additional selection possibilities can be offered for specific programmes depending on the DVB programme provider...

Page 24: ...antennae via the green button see page 13 With selection of set location the conventional TV standard colour standard is the default This should only be changed if stations with other standards are t...

Page 25: ...lanations of some search settings Various settings are possible depending on the selected signal source Some settings have already been explained in the initial installation see page 12 onwards Select...

Page 26: ...sition one character to the left deletes the character Enter the letters one after another with the numeric buttons on the remote control Like using a mobile phone keypad press a numeric button until...

Page 27: ...rste 2 ZDF 3 WDR K ln 4 Bayrisches FS 5 hr fernsehen 6 Phoenix 7 BR alpha 8 3sat 9 EinsExtra 10 EinsFestival 11 SAT 1 12 RTL Select station Next favourite list Clear favourite list Change sorting Page...

Page 28: ...eturns to the TV picture and the PIP window closes Start and end Picture in Picture mode Show hide PIP In the Standard PIP function a green frame indicates that the station selection acts onthePIPpict...

Page 29: ...the TV picture and still keep an eye on the PIP picture You can tempo rarily ban commercials or programme sections to the PIP picture in this way The PIP picture becomes the TV picture again PIP off C...

Page 30: ...an be programmed Starting and ending EPG Switch EPG on off Awizardwillguideyouthroughthenecessarypresettings the first time you start the EPG If you have analogue reception you enter the data capture...

Page 31: ...reasons The programmes can be sorted either according to their start times chronologically or according to stations cor responding to station list Calling additional information about the programmes B...

Page 32: ...tik Die neuen Gesetzesentw rfe 120 Wird auch der Nahverkehr teurer 121 Australien Keine Zugest ndnisse 122 Tote bei Zugungl ck in Schweden 532 Tennis Auftaktmatch wurde abgebrochen 204 Formel 1 Neues...

Page 33: ...to other languages Russian Greek Polish and Turkish Improved graphic representation of the Teletext Not offered by all stations Digital teletext MHEG 5 In the UK or Ireland the teletext for DVB T stat...

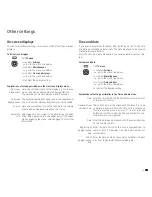
Page 34: ...e set changes from green to orange Switch on the screen with the remote control Red button OK button or RADIO button Switch on the screen on the TV set Press R on the TV set operating ring Radio menu...

Page 35: ...is not twisted in the process If the CA module is correctly installed the ejector button protrudes a little further Replace the cover Searching for encrypted stations The search wizard must only be s...

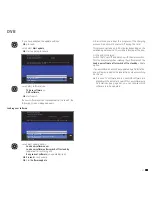
Page 36: ...ption path This may differ depending on the TV set and the DVB program pro vided Ask your local dealer for information whether a software update via DVB reception path is possible Automatic informatio...

Page 37: ...h This is unnecessary when loading the software with the Load new software after switch off to standby update option If a new software has not been updated by a DVB station you will be reminded of thi...

Page 38: ...are also active when the TV set has been switched off to standby If the TV set switches on from the standby mode by alarm a screen message appears If this is not confirmed within 5 minutes with the O...

Page 39: ...he time and date are recorded automatically The date may have to be entered manually for some stations Enter the time and date manually if you receive station without tele text Call time and date Call...

Page 40: ...t New devices modifications OK calls the wizard The connection wizard can be exited at any time with the END button OK Proceed The connection diagram shows the currently logged in equipment OK Proceed...

Page 41: ...al device If no is selected the analogue sound is used OK Proceed If you have registered a recorder into the connection wizard the Digital Link Plus transmission starts If a Digital Link Plus capable...

Page 42: ...ket is to be transmit ted digitally a cinch cable must be plugged between the coaxial digital output of the accessory equipment and the AUDIO DIGITAL IN socket of the TV set In addition the digital au...

Page 43: ...ket of the TV set Use a fully equipped Euro AV cable available from your dealer for this If you want to receive and record analogue stations with the receiver tuner built into the recorder the recorde...

Page 44: ...lect HDMI1 DVI or HDMI2 DVI socket OK switch over Start playback on the connected HDMI device The best possible format for the picture is detected and set auto matically Digital Link HD in CEC capable...

Page 45: ...put of the PC or accessory equipment to the AUDIO DIGITAL IN socket of the TV set with a cinch cable The digital audio input can be assigned to the PC IN socket by TV menu Connections Miscellaneous As...

Page 46: ...to the AUDIO IN1 L R sockets of the TV set by a dual cinch cable Alternatively connect the digital audio output of the exter nal device to the AUDIO DIGITAL IN socket of the TV set with a cinch cable...

Page 47: ...uency of the speakers Setting of the distances between listener and speakers Level settings for the speakers Setting of the phase position for the subwoofer channel All data and selection possibilitie...

Page 48: ...nents wizard If you have not connected any speakers directly to the TV set the two front speakers and the centre speaker Centerspeaker I Compose are connected to the subwoofer of the Individual sound...

Page 49: ...components wizard Sound playback via speakers system Enter here that you want to hear the TV sound over a speaker system If you connect active speakers please use the setting Speakers system Mark Spe...

Page 50: ...ditionally for External speakers or TV speakers go to the menu line below and 34 set the lower limit frequency of the centre speaker in 10 Hz steps Select the start value of the frequency response of...

Page 51: ...P or start playback with music on a DVD player 34 Test both values 0 and 180 and select the one with which you get a clearer bass reproduction from your listening position OK to confirm the setting an...

Page 52: ...amplifier and the centre input of the TV set AUDIO IN1 C with a cinch cable Attention Do not use the centre speaker connection of the amplifier use the centre pre amp output instead Connecting digita...

Page 53: ...e digital audio input In order to be able to hear the digital sound of an external device con nected to an AV input an AV input can be assigned to the digital audio input socket AUDIO DIGITAL IN When...

Page 54: ...n timer recordings via EPG Serial can also be selected If you use an external recorder without Digital Link Plus you have to select the recording source in the recorder e g AUX This is also the case w...

Page 55: ...lly from the TV set to the recorder after programming is complete For DVD recorders in addition the recording quality SQ or EQ is also transmitted The recording then is controlled by the recorder and...

Page 56: ...see the first page of the photo overview see right column If several media are available select with 34memory medium and then with OK start PhotoViewer Ending the PhotoViewer Remove used memory mediu...

Page 57: ...heard during the PhotoViewer operation Select memory medium from which the photos are to be reproduced This menu item is only displayed if at least two memory media are available Open folder Folders w...

Page 58: ...Box is ended during playback the MusicBox remembers the appropriate place in the title If the TV set is not switched off or the memory medium removed in the meantime the playback continues at this poi...

Page 59: ...one keypad see page 15 OK Call Albums by The albums of the selected artist are displayed sorted alphabetically 56Mark album and select with OK 56Select title in album and play with OK in MusicBox stat...

Page 60: ...Elton John Eros Ramazzotti Rolling Stones Title_1 mp3 Title_2 mp3 Title_3 mp3 Title_4 mp3 Title_5 mp3 Title_6 mp3 Title_7 mp3 Open folder Adopt to play list Page P P Files Playlist14 OK INFO END OK P...

Page 61: ...displayed Red button Call MusicBox list Or END Call MusicBox status window MusicBox Menu In the MusicBox menu you make sound settings can select the memory medium and set the repeat mode MusicBox must...

Page 62: ...utton is pressed the display of the selected operating mode lights up TV REC DVD RADIO This allows you to check which operating mode the remote control is set to every time you press a button Setting...

Page 63: ...ort fine tuning forward long search forward Stop Functions for the Loewe DVD recorder Centros 1202 2102 HD ViewVision DR TV Sound off on LED indicator for current operating mode Switch over to operate...

Page 64: ...the basic adjustment Close the menu Specifying the switch off position This is where you specify the position that the TV will take when it is switched off In order for the TV set to return to the det...

Page 65: ...wn in the connection diagram b The AV standard is set incorrectly c The signal type is set incorrectly a In the connection wizard TV menu Connections New devices modifications compare the connection d...

Page 66: ...age sound selection green button b Connect AUDIO DIGITAL OUT from the TV set to a digital input of the external digital audio amplifier and select the appropriate input to this The picture of a connec...

Page 67: ...K M N Colour standard SECAM PAL NTSC NTSC V PAL V 60 Hz Sound standard Mono Stereo 2 Ton Nicam B G I L Dolby Digital Dolby Virtual Speaker DTS Audio nominal power sine 2 x 20 watt Teletext TOP FLOF L...

Page 68: ...be implemented Here as well it is possible to choose the colours of housing and trim Loewe Individual Sound Projector With the Loewe Individual Sound Projector you can easily enjoy digital Surround S...

Page 69: ...ose Full HD 100 Wall Mount delivery status Screen Wall Mount 2 1 Table Stand I 40 46 Compose Floor Stand 5 MU SP 2 Center Floor Stand I Compose Screen Floor Stand MU Screen Lift Plus 1 Individual 40 C...

Page 70: ...ovie systems The individual channels are broadcast sepa rately in this standard The three front channels right left and centre the two surround channels right and left and the external subwoofer chann...

Page 71: ...e focal point of a parabolic antenna The designation LNC Low Noise Converter indicates that conversion to lower intermediate frequency takes place The supplemental block in the LNB refers to the fact...

Page 72: ...a transmission Glossary T Terrestrial In data transmission a wireless transmission that does not use satellites as intermediate station is referred to as terrestrial TFT Thin Film Transistor One widel...

Page 73: ...MusicBox 58 All albums 59 All titles 59 Artists 59 Browse sort 59 Files 59 Playlist 60 Repeat 61 Select play music 58 Muting 20 N New devices modifications 40 Numeric buttons 15 16 18 O On screen dis...

Page 74: ...taliana SRL Largo del Perlar 12 37135 Verona VR Italia Tel 39 045 82 51 611 Fax 39 045 82 51 622 Email Stefano Borgognoni loewe it PL Trading pz 2004 Ltd 27 Aliat Hanoar St Givataiim 53401 Israel Tel...

Reviews: