


L o g a n G r a p h i c P r o d u c t s I n c . , 1 1 0 0 B r o w n S t r e e t , Wa u c o n d a , I L 6 0 0 8 4 To l l F r e e 1 8 0 0 3 3 1 6 2 3 2 w w w. l o g a n g r a p h i c . c o m
FRAMER'S
EDGE
C O U T E A U X À PA S S E - PA R T O U T
MODÈLES 650, 655 ET 660
C O R TA D O R D E L Á M I N A P E R I M É T R I C A
MODELOS 650, 655 Y 660
PA S S E PA R T O U T S C H N E I D E R
MODELLE
650, 655 & 660
TA G L I E R I N E P E R PA S S E PA R T O U T
MODELLI 650, 655 E 660
El cortador de Lámina Perimétrica
Framer’s Edge de Logan ha sido diseñado
específicamente con el enmarcador en
mente. Todos los materiales son
resistentes para soportar los rigores del
corte profesional de láminas perimétricas
y proveer la exactitud que los
enmarcadores exigen.
Características que Logan introdujo en el
campo de actividad hace años como el
brazo de escuadra, la guía de la lámina
perimétrica, el tope de producción movible
y la barra de corte de aluminio de alta
tecnología ha sido todos re-diseñados
para reducir la fatiga, el cambio de
cuchillas simple y el ajuste exacto de las
cuchilla para mantener rectos los cortes y
sin sobrecortes. Además, la cabeza de
corte contiene un indicador nuevo que
elimina los sobrecortes.
Estamos seguros que la calidad, exactitud
y confiabilidad del Framer’s Edge será
todo lo que usted espera de un cortador
profesional de lámina perimétrica.
Este manual de instrucción se ha escrito
para familiarizarlo a fondo con este
producto. Como se refiere al principio,
contestará a muchas preguntas que
puedan presentarse durante el uso. Usted
encontrará que el tiempo que le dedique
será una buena inversión, y estará
cortando láminas perimétricas de calidad
muy pronto.
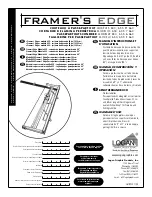
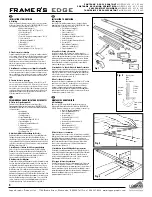
NOTA*
Este manual de instrucción cubre la
instalación y las instrucciones de
operación para los siguientes
modelos del Framer’s Edge:
#650 Cortador de láminas
perimétricas de 40”
#655 Cortador de láminas
perimétricas de 48”
#660 Cortador de láminas
perimétricas de 60”
INTRODUCCIÓN
Le système de découpe « Framer’s Edge »
de Logan a été conçu spécialement pour
correspondre aux besoins de l’encadreur.
Tous les composants sont en matériau
solide pour résister aux conditions
extrêmes de la découpe professionnelle de
passe-partout, tout en procurant la
précision requise par les encadreurs.
Des caractéristiques techniques introduits
sur le marché par Logan il y a quelques
années, tels que le bras d’équerrage, le rail
parallèle, la butée de production mobile et
le rail de guidage haute technologie en
aluminium, ont été améliorés pour
diminuer l’effort. Le remplacement de la
lame est facilité par un réglage précis pour
obtenir des coupes droites sans risque de
surcoupe. En outre, la tête de découpe est
équipée d’une jauge qui permet d’éliminer
les surcoupes.
Nous sommes convaincus que la qualité, la
précision et la fiabilité du « Framer’s Edge »
sont tout ce que vous attendez d’un
système de découpe professionnel.
Ce manuel d’instructions a été conçu pour
vous permettre de faire connaissance de
façon approfondie avec ce produit. Si vous
consacrez un peu de temps à en prendre
connaissance dès le début, il répondra à un
grand nombre de questions que vous vous
poserez pendant son utilisation. Vous
verrez que le temps que vous aurez passé
ne sera pas perdu, et que vous serez alors
très vite en mesure de découper des passe-
partout de qualité.
REMARQUE*
Ce mode d’emploi concerne
l’installation et les instructions
d’utilisation des modèles « Framer’s
Edge » suivants :
#650 Système de découpe 40 po (101,6 cm)
#655 Système de découpe 48 po (121,92 cm)
#660 Système de découpe 60 po (152,4 cm)
INTRODUCTION
La taglierina per la Bordatrice per cornici
Logan è stata specificamente ideata per i
corniciai. Tutti i materiali sono robusti per
resistere ai rigori del taglio di
passepartout professionale e per
assicurare la precisione richiesta dai
corniciai.
Caratteristiche introdotte nel settore da
Logan anni fa come il braccio di
squadratura, la guida del passepartout,
l’arresto di produzione mobile e
l’innovativa barra di taglio in alluminio,
sono state tutte riprogettate per
alleggerire il lavoro, cambiare
agevolmente le lame e regolare con
precisione la lama al fine di assicurare
tagli diritti evitando le imprecisioni. La
testa di taglio contiene, inoltre, un nuovo
calibro per eliminare i tagli irregolari.
Siamo certi che la qualità, la precisione e
l’affidabilità della Bordatrice
soddisferanno tutte le vostre aspettative
riguardo a una taglierina per passepartout
professionale!.
Il presente manuale d’uso intende fornirvi
le informazioni più complete possibili
riguardo a questo prodotto. Se lo si
consulta fin dall’inizio, risponderà a
numerose domande che potrebbero
sorgere durante l’uso. Scoprirete che ne
sarà valsa la pena quando eseguirete tagli
di massima qualità in brevissimo tempo!
NOTA*
Il presente manuale d’uso fornisce le
istruzioni di installazione e
funzionamento per i seguenti modelli
di Bordatrice:
#650 Taglierina da 40”
#655 Taglierina da 48”
#660 Taglierina da 60”
INTRODUZIONE
Das Passepartoutschneidesystem Logan
Framer’s Edge wurde genau auf die
Bedürfnisse von Einrahmern
zugeschnitten. Alle verwendeten
Materialen sind sehr strapazierfähig,
genügen professionellen Anforderungen
und ermöglichen exakteste
Schneidergebnisse.
Von Logan vor vielen Jahren in die
Einrahmerbranche eingeführte
Zubehörteile wie Anschlagarm,
Passepartoutführung, Schiebestopp und
die hochwertige Aluminimum-
Schneidschiene wurden weiterentwickelt,
um das Gerät noch stabiler, zu machen
und den Klingenwechsel sowie die
Klingeneinstellung zur Vermeidung von
Überschnitten zu vereinfachen. Ein neues
Anzeigeplättchen hilft außerdem, solche
Überschnitte zu eliminieren.
Das vorliegende Benutzerhandbuch macht
Sie ausführlich mit dem Produkt vertraut.
Wenn Sie es vor dem ersten Gebrauch
des Gerätes studieren, werden Ihnen viele
Fragen schon vorab beantwortet. Bitte
nehmen Sie sich die Zeit dazu, Sie werden
sehen, dass Sie schon in kurzer Zeit
hochwertige Passepartoutzuschnitte
anfertigen können.
ANMERKUNG:
Dieses Benutzerhandbuch beschreibt
die Einrichtung und Funktionsweise
der Framer’s Edge Modelle:
Nr. 650
102 cm
Nr. 655
122 cm
Nr. 660
152 cm
EINLEITUNG


