background image


© 2015 Logicor (CH) Ltd 


 clear-heater.co.uk 

Page 30 

MENU 

 Settings Icon (p. 7) / ILHWS (p.19) / Adjust water heaters (p.26) 

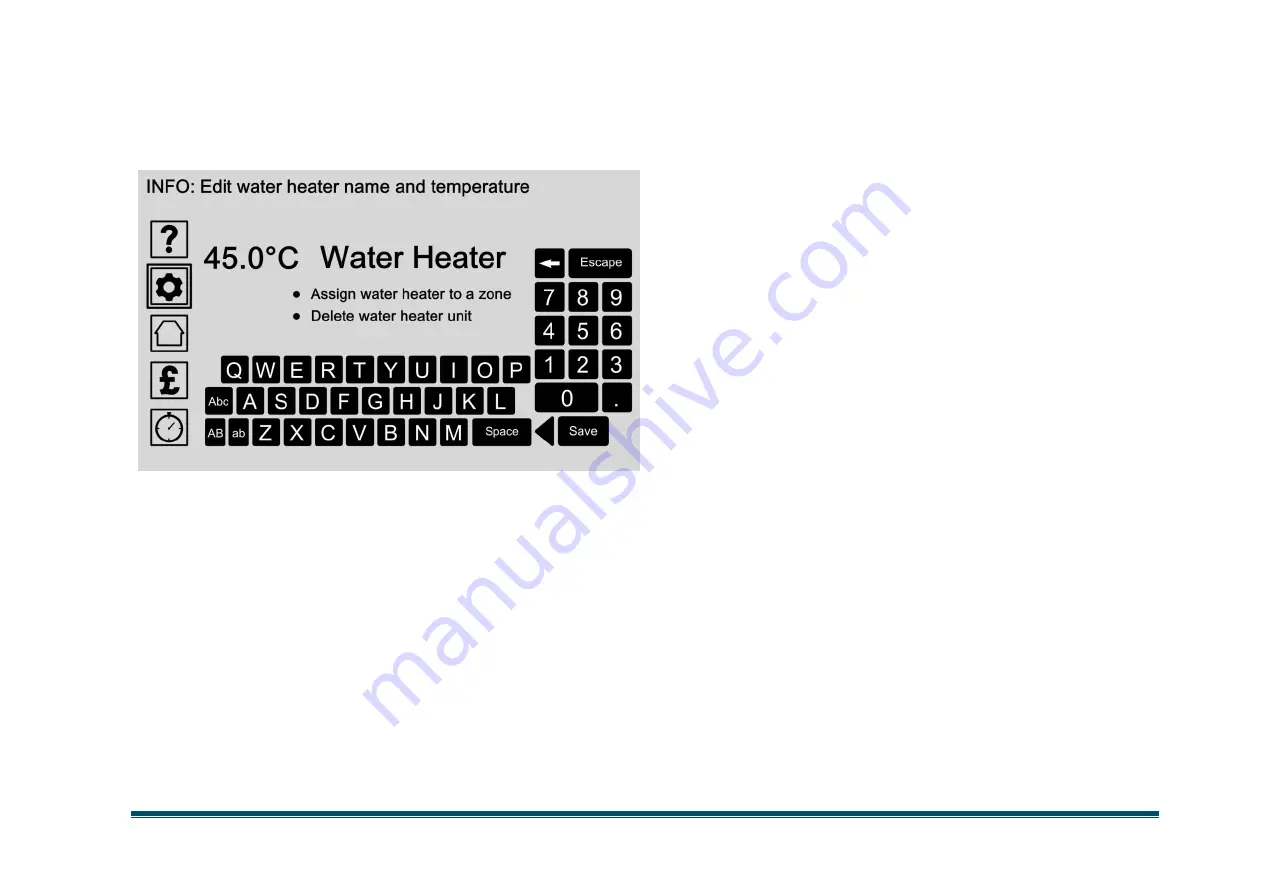
Edit water heater name & temperature


Edit Water Heater Name & Temperature 

Give each water heater unit a unique name and 
temperature by entering the details with the keypad.  

Water heater units can also be assigned to a zone or 
deleted from the system. 

Options: 


Edit water heater name and temperature


Touch the screen and type the name and 
temperature details using the keypad.  
Press the save button to store your entry. 


Assign water heater to a zone 

(Page 24)  

The water heater unit can be assigned to a zone by 
selecting this option. 


Delete water heater unit 

(Page 31)  

Water heater units can be deleted from the system by 
selecting this option. You will be asked to confirm your 
selection on the next screen. Water heater units can 
always be added again after you delete it. 


Summary of Contents for InLine Hot Water System

Page 1: ...Version Issue Date 17 Dec 2015 InLine Hot Water System Control Panel User Guide Logicor CH Ltd...

Page 2: ...iv SAFETY PART 2 OF 2 V Safety Maintenance continued v Cleaning v INTRODUCTION 1 Control Panel 2 InLine Hot Water System 3 SECTION 1 HELP MODE 4 Help Mode 5 SECTION 2 CONTROL PANEL HEATER SETTINGS 6...

Page 3: ...Brightness Settings 16 Recalibration 17 Load Original Settings 18 InLine Hot Water System Settings 19 Adjust Complete System 20 Adjust Zones 21 Edit Zone Name Temperature 22 Add New Zone 23 Assign Wat...

Page 4: ...r Heater Unit 31 SECTION 3 STATUS SCREEN 32 Status Screen Summary 33 Status Screen InLine Hot Water System 34 SECTION 4 COST ENERGY SETTINGS 35 Cost Energy Settings 36 Adjust Cost Energy Settings 37 S...

Page 5: ...Hot Water System in the most effective position to heat the water your property needs safely and efficiently Safety Maintenance WARNING InLine Hot Water System units must not be used if there is any...

Page 6: ...lear Heater System and provides a convenient safe and quick method to dry clothes positioned a safe distance from the Clear Heater System At no point must clothing be hung directly over an InLine Hot...

Page 7: ...ble with CHS How to use this guide This user guide is designed to help you get the most from your InLine Hot Water System and understand the different functions available on the control panel Your con...

Page 8: ...pped with Wifi capability to receive software updates via the internet A new feature to be launched in 2015 will be the ability to connect via your Smartphone or iPad The control panel is pre programm...

Page 9: ...r in different parts of the UK varies in the amount of dissolved mineral ions it contains A water softener is supplied with all units and must be mandatorily fitted in all instances to maintain the pe...

Page 10: ...elp Mode Select the Help Icon on your control panel display then turn to page 5 Section 1 Help Mode Page 4 Section 2 Control Panel Heater Settings Page 6 Section 3 Status Screen Page 32 Section 4 Cost...

Page 11: ...you additional information about the current control panel display Pressing the screen again takes you back to your previous screen Options Press Help Icon Touch the help icon at any time to enter hel...

Page 12: ...Heater Settings Select the Temperature Icon on your control panel display then turn to page 7 Section 1 Help Mode Page 4 Section 2 Control Panel Heater Settings Page 6 Section 3 Status Screen Page 32...

Page 13: ...nLine Hot Water System option Options Main settings Page 8 Adjust the main settings of the control panel including Wifi time and date tariff settings units of measurement and screen display options Lo...

Page 14: ...date is needed for the control panel to accurately regulate your heater system and provide you with up to date performance and cost data Tariff settings Page 11 Enter your tariff rate to get accurate...

Page 15: ...your Smartphone Use the keypads to type in your settings and press the save button to store your settings The INFO message at the top displays the current Wifi status Options Manual setup Enter your...

Page 16: ...and temperature units Options Enter time Enter the current time by first selecting that area on the screen The time format is Hours Minutes Seconds Use the keypads to type in your settings and press...

Page 17: ...tariff rate on the control panel if and when your tariff changes Options Enter your electricity tariff Enter your electricity tariff per kWh by first selecting that area on the screen Use the keypads...

Page 18: ...e system temperature accurately Alternatively you can change the units of temperature manually via the Time Date screen on page 10 Options Select your country Touch the screen to select your country l...

Page 19: ...calibration allows you to fine tune the touch screen sensitivity settings Options Status Screen Options Page 14 Choose which performance data appears on the main status screen Brightness Settings Page...

Page 20: ...First choose your heater system from the list If you only have one heater system available only one option will be listed Please check our website for product updates Options Choose Clear Heater Syst...

Page 21: ...from the list of options Once your choice is selected it will display a tick next to the item and will be displayed on the main status screen The status screen is reached by pressing the Home Icon Opt...

Page 22: ...p mode Options Edit display brightness level Touch the plus and minus symbols to increase or decrease the brightness setting between 1 and 10 Press the save button to store your entry Edit LED brightn...

Page 23: ...right and middle of the screen to automatically adjust to your settings When completed the confirmation screen will display the results Options Press top left corner of display Press the dot at the t...

Page 24: ...you want to reset the system back to the original factory settings Once reset you will have to re enter all your settings and preferences again Options Select YES Choose YES to load the original facto...

Page 25: ...m this menu Select an option from the list Options Complete system Page 20 Adjust the temperature of the whole system or turn the system on or off Adjust zones Page 21 A zone is a group of water heate...

Page 26: ...tering numbers in the keypad You can also turn the system on and off Leave the system on if you want the control panel to optimise your water heating for you Options Adjust complete system temperature...

Page 27: ...g you time when making adjustments Scroll through the list to select an existing zone to adjust or press Add new zone to add a new zone to the system Options Adjust an existing zone Page 22 Choose a z...

Page 28: ...be deleted from the system Options Edit zone name and temperature Touch the screen and type the name and temperature details using the keypad Press the save button to store your entry Assign water hea...

Page 29: ...he system Options Edit zone name and water temperature Touch the screen and type the name and temperature details using the keypad Press the save button to store your entry Assign heater units to zone...

Page 30: ...water heater units assigned to a zone will then use that zone s settings Assigned water heater units will display a tick next to the name Options Assign water heater units to zone Select water heater...

Page 31: ...tem Only the zone will be deleted and not the individual water heater units Confirm your choice by selecting yes or no Options Select YES Choose YES to delete this zone from the system Warning This ac...

Page 32: ...ing Options Adjust an existing water heater unit Page 30 Choose a water heater name from the list of existing water heater units to be able to edit the name and temperature Page 30 assign the water he...

Page 33: ...your new heater unit and enter the heater ID number here to automatically add it to the system Options Enter heater ID Touch the screen and enter the water heater identification number using the keypa...

Page 34: ...umber on the underside of the base Once you enter this number on the previous screen Page 27 the control panel attempts to connect the new water heater unit automatically Options Wait while connecting...

Page 35: ...the new water heater unit automatically The results are shown on this screen If successful you can adjust its individual settings or repeat the process to add an additional water heater unit Options A...

Page 36: ...eted from the system Options Edit water heater name and temperature Touch the screen and type the name and temperature details using the keypad Press the save button to store your entry Assign water h...

Page 37: ...n this screen by selecting YES or NO If you make a mistake a water heater unit can always be added again by selecting the add new water heater option on page 26 Options Select YES Choose YES to delete...

Page 38: ...tus Screen Select the Status Home Icon on your control panel display then turn to page 33 Section 1 Help Mode Page 4 Section 2 Control Panel Heater Settings Page 6 Section 3 Status Screen Page 32 Sect...

Page 39: ...at any time brings you back to the status screen You can choose which status readings are displayed here by pressing the Control Panel Heater Settings Icon then choosing Main Settings Screen Options...

Page 40: ...e icon at any time brings you back to the status screen You can choose which status readings are displayed here by pressing the Control Panel Heater Settings Icon then choosing Main Settings Screen Op...

Page 41: ...ergy Settings Select the Cost Energy Settings Pound Icon on your control panel display then turn to page 36 Section 1 Help Mode Page 4 Section 2 Control Panel Heater Settings Page 6 Section 3 Status S...

Page 42: ...Choose your heater system from the list to start editing your targets Please check our website for product updates Options Select Clear Heater System Select Clear Heater System if installed to start...

Page 43: ...where necessary and enter your preferred value or budget target with the keypad As you change one reading all other readings automatically update and adjust to your chosen target Press the save button...

Page 44: ...White plastic casing Base Chrome plated Aluminium Electric Supply Located on the rear of the control panel connection via CAT5 or CAT6 patch lead to a Logicor bespoke power supply unit The socket out...

Page 45: ...Height 470 mm Depth 90 mm Weight 15kg Colour White Chrome IP Rating Ingress Protection IPX1 MATERIALS External Case ABS Base Chrome plated ABS Internal Case Steel Electric Supply Located at the right...

Page 46: ...2015 Logicor CH Ltd clear heater co uk Page 40...

Page 47: ...MANUFACTURER Logicor CH Ltd Unit 7 Thornes Office Park Monckton Road Wakefield WF2 7AN West Yorkshire UK www logicor co uk www clear heater co uk...

Reviews: