WIPING MODES AND SETTINGS
Logicube OmniWIPE-
2™ User’s Manual
12
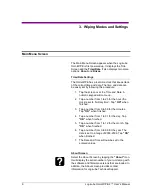
3. Tap the
“WipeOut”
icon. The WipeOut Settings
screen will appear.
4. Tap the
“Passes”
icon to set the number of
passes. Use the numeric keypad to enter the
number of passes. Tap
“OK”
when finished.
5. Tap the
“Speed”
icon to choose the best speed, if
necessary.
NOTE:
The unit will automatically adjust itself to
the best speed for the attached drives.
6. Tap the
“Value”
icon to change the pattern of the
final pass. The options are 0xf6, 0x00, 0xff, and
Random.
7. Press the
Start/Stop
button twice.
8. A message will appear stating that portions of your
Target drive(s) will be overwritten. If you are
prepared to continue, tap
“Yes”
. If want to abort
the operation, tap
“No”
.
9.
If “Yes” is chosen, a second message will appear
stating that you are about to erase the Target. If
you wish to continue, tap
“Yes”
. If you want to
abort the operation, tap
“No”
.
10.
If “Yes” is chosen, the WipeOut Target operation
will begin and a status screen will appear.
11. The Logicube OmniWIPE will notify you when
erasing is complete. Tap the
“Back”
icon to return
to the main menu.
Security Erase Mode
Introduction
Security Erase Mode is a much more automated
process for wiping data. This mode sends
“Security
AT” commands to the drives themselves. This allows
the drives to wipe at a very high rate of speed. It also
eliminates the need for a Master drive to hold the
original pattern from.
Security Erase Mode will write a pattern of zeroes to
the entire drive. It does this with the chosen number
of passes. It also has the ability to detect drives that
are protected with a BIOS-enabled password, and

