background image

11

Remote Control

1

2

3

4

5

6

7

8

9

0

10+

REPEAT

TITLE

ENTER

MODE

SUBTITLE

AUDIO

MUTE

SOURCE

STEP

DISPLAY

MENU

VOL+

VOL-

SLOW

ZOOM

1
2

3

5

8

9

11

10

12

6

4

7

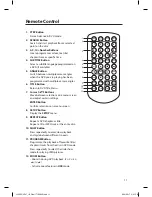
1.  STEP Button

Frame Advance in DVD mode.

2.  SEARCH Button

Search and start playback from a selected 

point on the disc.

3.  0-9, 10+ Number Buttons

Create programmes or locate a title/

chapter/track or specific time.

4.  SUBTITLE Button

Select a subtitle language programmed on 

a DVD (if available).

5.  ANGLE Button

Switch between multiple camera angles 

when the DVD you are playing has been 

programmed with multiple camera angles.

6.  TITLE Button

Return to DVD Title Menu.

7.  Cursor 

 Buttons

Move between selections on a menu screen 

and adjust certain settings.


ENTER Button
Confirm selections on a menu screen.

8.  SETUP Button

Display the SETUP menu.

9.  REPEAT Button

Repeat a DVD chapter or title.
Repeat a CD or MP3 track or the entire disc.

10. SLOW Button

Press repeatedly to enter slow playback, 

and cycle between different speeds.

11. PROGRAM Button

Programme the playback of favourite titles/

chapters/tracks from the disc in DVD mode.
Press repeatedly to select the slide show 

mode for playing JPEG pictures.

12. ZOOM Button

•  Zoom in during DVD playback. (2×, 3×, 4×, 

1

2

×, 

1

3

×, 

1

4

×)

•  Activate zoom feature in USB mode.

L12SPDVD17_IB_Final171006V3.indd   11

9/10/2017   5:41 PM

Summary of Contents for L12SPDVD17

Page 1: ...Instruction Manual 12 Portable DVD Player L12SPDVD17 L12SPDVD17_IB_Final171006V3 indd 1 9 10 2017 5 41 PM...

Page 2: ...L12SPDVD17_IB_Final171006V3 indd 2 9 10 2017 5 41 PM...

Page 3: ...cting to a Stereo Receiver or Amplifier 17 Connecting an external device with Audio Video Outputs 17 Using Earphones 18 Using a USB Device or SD MMC Card 18 General Operation 18 Compatible Disc Types...

Page 4: ...ng the General Settings 25 Customising the Audio Settings 27 Customising the Video Settings 28 Customising the Preferences 28 Customising the Password Settings 30 Maintenance 31 Hints and Tips 32 Spec...

Page 5: ...mains immediately Withdraw the mains plug and consult your dealer Ventilation To prevent the risk of electric shock or fire hazard due to overheating ensure that curtains and other materials do not ob...

Page 6: ...this manual Do not expose the battery to direct sunlight or sources of excessive heat Attention should be drawn to the environmental aspects of battery disposal Supervision Children should be supervi...

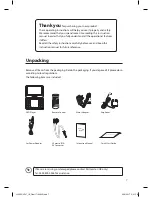
Page 7: ...BTITLE AUDIO MUTE SOURCE STEP DISPLAY MENU VOL VOL SLOW ZOOM Instruction Manual Quick Start Guide Thank youfor purchasing your new product These operating instructions will help you use it properly an...

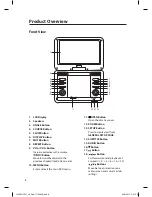
Page 8: ...he main DVD menu SETUP ZOOM AUDIO SUBTITLE MUTE REPEAT SLOW DISPLAY ANGLE SOURCE 4 13 6 15 8 17 19 10 3 1 2 12 5 14 7 16 18 9 11 20 21 22 11 OPEN Button Open the disc tray cover 12 ZOOM Button 13 SETU...

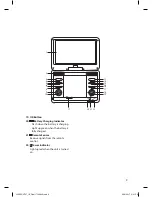
Page 9: ...9 11 20 21 22 19 OK Button 20 Battery Charging Indicator Flash when the battery is charging Light up green when the battery is fully charged 21 Remote Sensor Receive signals from the remote control 22...

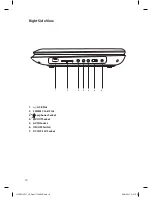
Page 10: ...OFF DC IN 9 12V 1 3 4 5 6 6 2 1 USB Slot 2 SD MMC Card Slot 3 Earphones Socket 4 AV OUT Socket 5 AV IN Socket 6 ON OFF Switch 7 DC IN 9 12V Socket Right Side View L12SPDVD17_IB_Final171006V3 indd 10...

Page 11: ...th multiple camera angles 6 TITLE Button Return to DVD Title Menu 7 Cursor Buttons Move between selections on a menu screen and adjust certain settings ENTER Button Confirm selections on a menu screen...

Page 12: ...d exit the main DVD menu 17 AUDIO Button Select one of the audio sound tracks on a DVD if more than one is available or select the audio output mode on a CD 18 Button Start playback or pause 19 STOP B...

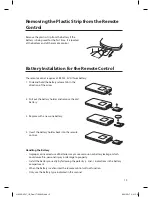
Page 13: ...tteries may cause corrosion or battery leakage which could cause fire personal injury or damage to property Install the battery correctly by following the polarity and indications in the battery compa...

Page 14: ...older tray is secure in the remote control Seek medical advice if you believe a cell has been swallowed Handling the Remote Control If you are having difficulty with the tab use a paper clip to help s...

Page 15: ...remote control at the unit no more than 2 metres from the remote control sensor and within a 40 arc of the front of the unit The operating distance may vary depending on the brightness of the interior...

Page 16: ...ry It may take up to 4 hours to fully charge the battery Every time you see the Low Battery indicator on the screen you must connect your mains adapter to the unit and the mains socket The battery wil...

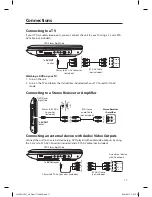
Page 17: ...Cable not included RCA AV Cable not included L L White White White Red Red Red Yellow Yellow Yellow AUDIO IN AUDIO OUT R R VIDEO IN VIDEO OUT DVD Player Right Side DVD Player Right Side DVD Player Rig...

Page 18: ...lect Media 1 2 3 4 5 6 7 8 9 0 10 REPEAT TITLE ENTER MODE SUBTITLE AUDIO MUTE SOURCE STEP DISPLAY MENU VOL VOL SLOW ZOOM AV IN AV OUT ON OFF DC IN 9 12V OR 4 Press 1 2 3 4 5 6 7 8 9 0 10 REPEAT TITLE...

Page 19: ...0 REPEAT TITLE ENTER MODE SUBTITLE AUDIO MUTE SOURCE STEP DISPLAY MENU VOL VOL SLOW ZOOM 8 Press SOURCE 1 2 3 4 5 6 7 8 9 0 10 REPEAT TITLE ENTER MODE SUBTITLE AUDIO MUTE SOURCE STEP DISPLAY MENU VOL...

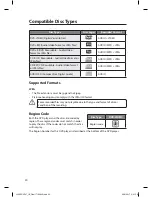
Page 20: ...ompact Disc Digital Audio AUDIO Supported Formats JPEG The file extensions must be jpg and not jpeg Picture encoding must comply with the JPEG ISO format Some recorded files may not playable due to th...

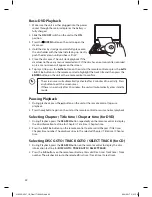
Page 21: ...r off Basic Playback Ensure that the screen protection film is removed before use Some DVDs are produced in a manner that allows for specific or limited operation during playback Therefore this unit m...

Page 22: ...s any button to exit the screen saver If there is no activity after 20 minutes the unit will automatically enter standby mode Pausing Playback 1 During playback press the button on the unit or the rem...

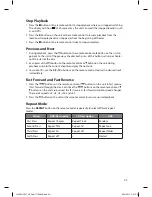
Page 23: ...ayback will skip the current chapter and play the next one 3 For audio CDs use the 0 9 10 buttons on the remote control to play the desired track immediately Fast Forward and Fast Reverse 1 Press the...

Page 24: ...t recorded angle a After approximately two seconds playback will continue from the new angle you selected This function can only be used for discs on which scenes shot from multiple angles have been r...

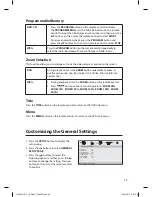
Page 25: ...al size JPEG 1 During playback press the ZOOM button on the remote control 2 Press button to zoom in out the picture ZOOM 50 ZOOM 75 ZOOM 100 ZOOM 125 ZOOM 150 ZOOM 200 Title Press the TITLE button on...

Page 26: ...can display recorded explanatory captions SCREEN SAVER Select ON to display the screen saver A moving DVD logo appears on a dark screen to prevent screen burn when disc playback is stopped paused or...

Page 27: ...ss button on the unit or the remote control to confirm DOWNMIX Allows you to set the stereo analogue output of your DVD player LT RT Select this option if your DVD player is connected to a Dolby decod...

Page 28: ...ns to change the setting Press button on the unit or the remote control to confirm BRIGHTNESS Set the brightness level of video output CONTRAST Set the contrast level of video output HUE Set the hue v...

Page 29: ...to the following ratings 1 Kid Safe 2 G 3 PG 4 PG13 5 PGR 6 R 7 NC17 8 Adult Unlock the disc by entering the 4 digit password you have set in PASSWORD setup at the PASSWORD SETUP PAGE If you change th...

Page 30: ...SSWORD A 4 digit password will be required to play a prohibited disc If the disc is locked and the system prompts you to enter the password 1 Use the 0 9 buttons to input the current password in the O...

Page 31: ...or antistatic spray They may damage the disc Storing Discs Do not store discs in places subjected to direct sunlight or near heat sources Do not store discs in places subjected to moisture and dust s...

Page 32: ...sed Press the button Make sure the unit is not in fast forward or fast reverse mode Press the button Make sure the AUDIO VIDEO input output connections are correct The DTS DVD cannot be decoded to hav...

Page 33: ...disc and try a different one Improperly formatted discs will not play on this DVD player No key operation via the DVD Player and or the remote control is effective Turn the unit off and then back to...

Page 34: ...er Consumption Power Consumption of Off Mode 0 29 W Power Consumption of Standby Mode N A Network Standby Power Consumption N A Time interval for power management function switches the unit automatica...

Page 35: ...MMC card Port 2 0 1 AV In Socket 1 AV Out Socket 1 Earphones Socket 1 CD Tray 1 Dimension W D H 310 9 215 6 45 mm DVD player Net Weight 1 1 kg DVD player only not including the accessories Features a...

Page 36: ...he very next day Visit www partmaster co uk or call 0344 800 3456 UK customers only Calls charged at National Rate Rovi Proprietary Rights This item incorporates copy protection technology that is pro...

Reviews: