background image

Saf

et

W

ar

nings 

Pr

oduc

t O

ver

view

s

Connec

tions

Sy

st

em 

Set

-up

Pla

yable 

Disc 

/ Suppor

tiv

For

ma

ts 

/ P

la

yback 

Func

tions

H

in

ts 

and 

Tips 


and 

Specifica

tion

GB-21

Wide Screen

This is the correct mode for playing wide-screen videos on 

• 

the unit screen or other external wide-screens.

Letter Box

When a wide-screen video is played in this mode on a 

• 

conventional screen, black bands appear at the top and 

bottom of the screen.

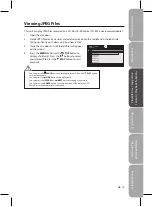
System Setup

Press the 

1. 

SETUP

 button in stop mode.

Press the 

2. 


 buttons to select System Page.

Press the 

3. 

 buttons select the option (TV 

Display, Parental, Password or Default), then 

press the   button.
Press the 

4. 

 buttons to adjust the settings, 

then press the 

ENTER

 button to confirm.

Repeat steps 3 and 4 to adjust other options. 

5. 

Press the   button to return to the previous 

menu.
Press the 

6. 

SETUP

 button or 

RETURN

 button to exit the menu.

TV Display

Pan Scan

When a wide-screen video is played, this mode clips the 

• 

right and left sides of the image so that it can be viewed on 

a conventional screen.
Some wide-screen videos that do not permit Pan Scan mode 

• 

playback are automatically played in letterbox mode (black 

bands that appear at the top and bottom of the screen).

The displayable picture size is preset on the DVD. Therefore the playback picture of some DVDs may not 

• 

conform to the picture size selected.
When you play DVDs recorded in the 4:3 aspect ratio, the playback picture will always appear in the 4:3 aspect 

• 

ratio regardless of the TV display setting.

Go To System Page

- - System Page - -

System

Language

Video

Parental

Default

Password

Wide

No

TV Display

Pan Scan

Letter Box

Wide Screen

Summary of Contents for L7PDVD10

Page 1: ...7 Portable DVD Player Instruction Manual L7PDVD10...

Page 2: ...use 9 Using the Car Power Adapter for in car use 9 Using the Built in Battery 10 Connections 11 Connecting a TV 11 Using Earphones 11 Compatible Disc Types 12 Supported Formats 12 Region Code 12 Turn...

Page 3: ...Chapter 18 Repeating a Title 18 To Resume Normal Playback 18 Repeating a Single Track 18 Repeating a Whole Disc 18 To Resume Normal Playback 18 Repeating a Specific Section 18 To Resume Normal Playbac...

Page 4: ...UK only Tel 0870 6001 338 for assistance Unpacking the DVD Player Remove all packaging from DVD Player Retain the packaging If you dispose of it please do so according to local regulations The followi...

Page 5: ...s for DVD or previous track for CD PAUSE Button Pause playback and frame advance PLAY Button Start or resume playback of a disc STOP Button Stop playing a disc SEARCH Button Press to perform fast forw...

Page 6: ...chapter track or specific time REPEAT A B Button 8 Perform point to point repeat playback on a DVD or CD REPEAT DISC Button Repeat a DVD chapter or title Repeat a CD track or the entire disc SETUP But...

Page 7: ...accordance with the local regulations Small button cell batteries such as the one used in the remote control are easily swallowed by young children and this is dangerous Keep loose button cells away f...

Page 8: ...Hints and Tips and Specification GB 8 Remote Control Operation Range Point the remote control at the DVD player no more than 2 metres from the remote control sensor and within 40 of the front of the...

Page 9: ...tely the mains adapter should be disconnected from the mains socket outlet completely Disconnect the car power adapter when not in use Not for use in 24V vehicles Only use the car power adapter provid...

Page 10: ...ery should not be exposed to direct sunlight and other sources of heat When the built in battery power is low Battery Low will display on the screen and the unit will stop playing Recharge the built i...

Page 11: ...ion Left Side of Unit TV To AUDIO VIDEO OUT Sockets White White Red Red Yellow Yellow Audio Video Cable not included Watching a DVD on your TV Turn on the unit 1 Turn on the TV and follow the instruct...

Page 12: ...deo format or JPEG files AUDIO VIDEO JPEG AUDIO CD Compact Disc Digital Audio AUDIO Supported Formats JPEG The file extensions has to be jpg and not jpeg Pictures encoding must comply with JPEG ISO fo...

Page 13: ...efore proceeding to step 2 Slide the open switch rightwards to open the disc door 2 Hold the disc by its sides and carefully place onto the spindle with the label side facing up 3 Gently push the disc...

Page 14: ...below to select the preferred language and sound system While a disc is playing press the 1 AUDIO button to show the current audio format number For example Audio 1 3 Dolby D 2ch English Press the 2...

Page 15: ...atedly to change the scene to the next recorded angle After approximately two seconds playback will continue from the new angle you selected If no button is pressed within 10 seconds playback continue...

Page 16: ...chapter track by directly selecting the chapter track number Press the 1 GOTO button to search for your desired chapter track Press the 2 buttons to highlight the chapter track field and then press t...

Page 17: ...on in play mode Press the b buttons to move the highlighted bar to Stop and then press the ENTER button All the input programs will be cleared Press the c ENTER button to confirm Exit Normal playback...

Page 18: ...l the Repeat One indicator displays on the screen The current track is played repeatedly Repeating a Whole Disc You can play an entire disc repeatedly While the CD is playing press the REPEAT DISC but...

Page 19: ...click Close the disc door A list of folders files will appear 3 on the screen Press the 4 MENU button or the STOP button to display a folder list Press the buttons to select your desired file Press th...

Page 20: ...your preferred language then press the ENTER button to confirm Repeat steps 3 and 4 to adjust other options Press the 5 button to return to the previous menu Press the 6 SETUP button or RETURN button...

Page 21: ...ps 3 and 4 to adjust other options 5 Press the button to return to the previous menu Press the 6 SETUP button or RETURN button to exit the menu TV Display Pan Scan When a wide screen video is played t...

Page 22: ...less you cancel the parental lock function Parental Control Setup DVDs are rated according to their content and some are equipped with a password function The contents allowed by parental lock level a...

Page 23: ...keep the disc clean If you cannot wipe off the dust with a soft cloth wipe the disc lightly with a slightly moistened soft cloth and finish with a dry cloth Do not use any type of solvent such as thin...

Page 24: ...ot be decoded to have speaker output The unit has overheated Shut it off for 30 minutes to allow it to cool down The volume control is too low Increase the volume No picture The region number of the d...

Page 25: ...Display 7 TFT Type Audio Audio Characteristic Dolby Digital Decoding 2 Channel Analog Yes Speaker One Mono Speakers Power Adapter Power Supply Power Consumption AC 100 240V 50 60Hz For EU Users AC 230...

Page 26: ...you spill any liquid into the unit it can cause serious damage Switch it off at the mains immediately Withdraw the mains plug and consult your dealer Ventilation To prevent the risk of electric shock...

Page 27: ...ure the disc tray is empty Always remove the disc when the unit is not in use Failure to do so will risk severely damaging the disc and the unit Do not stack devices heat from other devices may affect...

Page 28: ...one 114 010331W002 Instruction Manual 811 837391W071 Quick Start Guide 810 837395W030 P N 811 837391W071 DSG Retail Ltd Maylands Avenue Hemel Hempstead Herts HP2 7TG England This symbol on the product...

Reviews: