background image

19

  Audio CD, JPEG Picture CD Playback

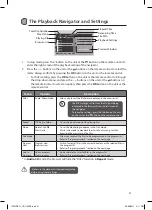
Loading a Disc

1�  Slide the 

ON/OFF

 switch to the 

ON

 position�

2�  Slide the front panel to open the disc compartment�
3�  Hold the disc by its sides and carefully place onto the disc holder with the label side 

facing up� Gently push the disc down until you hear a “click” sound�

4�  Slide the front panel to close the disc compartment�

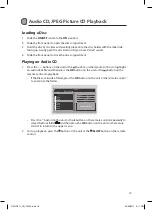
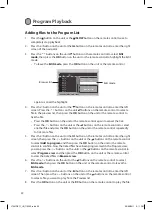
Playing an Audio CD

1�  Press the 

 buttons on the unit or the   buttons on the remote control to highlight 

an audio track file and then press the 

OK

 button on the unit or the   button on the 

remote control to playback�

• 

If the files are inside a folder, press the 

OK

 button on the unit or the remote control 

to enter into the folder�

• 

Press the   button on the unit or the   button on the remote control repeatedly to 

select the Root folder 

 and then press the 

OK

 button on the unit or the remote 

control to return to the upper menu�

2�  To stop playback, press the   button on the unit or the 

/SLOW

 button on the remote 

control�

4 / 11

Repeat

: Off

Mode

: Normal

Edit mode

Music Playing

/Track03.CDA

..

Track01

Track02

Track03

Track04

Track05

Track06

Track07

00:00:03

/ 00:04:26

L7SLIDE11_IB_110322.indd   19

23/03/2011   2:11 PM

Summary of Contents for L7SLIDE11

Page 1: ...7 Portable DVD Player Instruction Manual L7SLIDE11 L7SLIDE11_IB_110322 indd 1 23 03 2011 2 11 PM...

Page 2: ...L7SLIDE11_IB_110322 indd 2 23 03 2011 2 11 PM...

Page 3: ...L7SLIDE11_IB_110322 indd 3 23 03 2011 2 11 PM...

Page 4: ...er 12 Charging the Battery 12 Using the Car Power Adapter for in car use 13 Connections 13 Connecting to a TV 13 Watching a DVD on your TV 13 Using Earphones 14 Using a USB Flash Drive or SD MMC MS Ca...

Page 5: ...ist 23 Customising the Language Settings 24 OSD Language 24 Subtitle 24 MPEG4 Subtitle 24 Audio 24 DVD menu 24 Customising the Video Settings 25 Aspect Ratio 25 TV System 25 Picture Mode 25 Customisin...

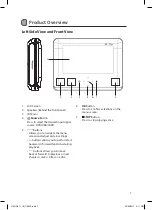
Page 6: ...TO OK Thank youfor purchasing of your new Logik 7 Portable DVD Player We recommend that you spend some time reading this instruction manual in order that you fully understand all the operational featu...

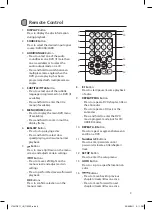
Page 7: ...navigate the menu screen and adjust certain settings buttons allows you to perform fast backward forward functions during playback buttons allows you to move back or forward to previous or next chapt...

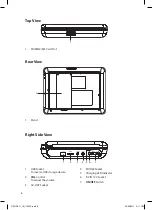
Page 8: ...CHG OFF 2 1 6 5 4 3 7 1 SD MMC MS Card Slot 1 Stand 1 USB Socket To insert a USB storage device 2 VOL Control To adjust the volume 3 AV OUT Socket 4 PHONE Socket 5 Charging LED Indicator 6 DC IN 12V S...

Page 9: ...one of the audio soundtracks on a DVD if more than one is available or to select the audio output mode on a CD Press and hold to switch between multiple camera angles when the DVD you are playing has...

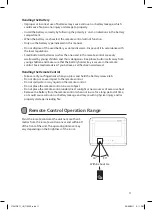
Page 10: ...of the remote control Battery Replacement for the Remote Control The remote control requires a CR2025 3V Lithium battery 1 Slide and hold the battery release tab in the direction of the arrow 2 Pull o...

Page 11: ...e a cell has been swallowed Handling the Remote Control Take care of your fingernails when you press and hold the battery release tab Do not drop or cause impact to the remote control Do not spill wat...

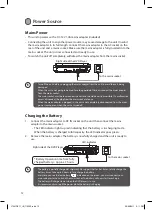
Page 12: ...the DVD Player Battery Operation time from fully charged battery Approx 3 hours To the mains socket LED indicator USB VOL AV OUT PHONE DC IN 12V CHG ON OFF Power adaptor Turn off the unit before unplu...

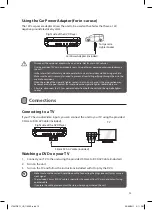
Page 13: ...dapter when not in use Not for use in 24V vehicles Use the provided 12V car power adapter only Using other car power adapters could damage the unit In the interest of traffic safety do not operate thi...

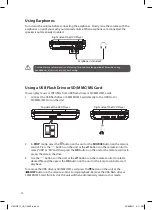
Page 14: ...K button on the unit or the remote control to start playback To remove the USB drive or SD MMC MS card press the button on the unit or the SLOW button on the remote control to stop playback Remove the...

Page 15: ...ns has to be jpg and not jpeg Pictures encoding must comply with JPEG ISO format Region Code Both the DVD player and the discs are coded by region These regional codes must match in order to play the...

Page 16: ...hold the DVD player in your hands or use the stand located at the rear of the unit The unit starts playback if the disc does not have any menus recorded on it If the disc has one or more titles record...

Page 17: ...x2 x4 x8 and x16 2 Press the OK button on the unit or the button on the remote control to resume normal playback Pause Playback 1 Press the button on the remote control to pause playback still mode T...

Page 18: ...IO ANGLE button on the remote control to view the number of current angles available 2 Press and hold the AUDIO ANGLE button on the remote control button repeatedly to change the scene to the next rec...

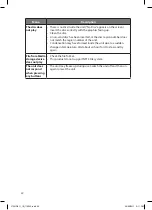
Page 19: ...k file and then press the OK button on the unit or the button on the remote control to playback If the files are inside a folder press the OK button on the unit or the remote control to enter into the...

Page 20: ...or the remote control to return the upper level 2 To playback the MPEG4 file or slideshow the picture press the OK button on the unit or the remote control 3 Press the buttons on the unit or the butto...

Page 21: ...list on the Disc Edit Mode Allow you to select the files to be programmed in the program list Refer to Program playback section on the next page Program View Program view Browser view Switch to view...

Page 22: ...repeatedly to tick more files 5 Press the button on the unit or the button on the remote control to enter the right screen then press the buttons on the unit or the buttons on the remote control to se...

Page 23: ...er List 1 Press the buttons on the unit or the buttons on the remote control to select the Browser view then press the OK button on the unit or the remote control to change from Browser view to Progra...

Page 24: ...e SETUP button on the remote control on the remote control to exit the menu OSD Language Select the system display language Subtitle Turn on off the subtitle feature of the disc MPEG4 Subtitle Select...

Page 25: ...P button on the remote control to exit the menu Aspect Ratio Select the aspect ratio of the viewing screen both internal display or external display if the disc has more than one aspect ratio 4 3LB 4...

Page 26: ...levels selection The parental lock levels are equivalent to the following ratings 1 Kid Safe Kid safe 2 G General audience recommended as acceptable for viewers of all ages 3 PG Parental Guidance sugg...

Page 27: ...e screen will show Set Password Successful 7 Press the SETUP button on the remote control to exit the menu Customising the Miscellaneous Settings 1 Press the SETUP button on the remote control to disp...

Page 28: ...slightly moistened soft cloth and finish with a dry cloth Do not use any type of solvent such as thinner benzine commercially available cleaners or antistatic spray They may damage the disc Storing Di...

Page 29: ...the remote control Make sure the unit is not in fast forward or fast reverse mode Press the OK button on the unit or the button on the remote control Make sure the AUDIO VIDEO input output connection...

Page 30: ...gion number of the unit Condensation may have formed inside the unit due to a sudden change in temperature Wait about an hour for it to clear and try again File from Media storage device does not play...

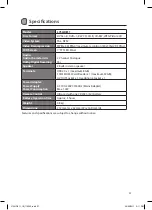
Page 31: ...er 2 Built in stereo speaker Terminals USB 2 0 x 1 maximum 8GB SD MMC MS Card Reader x 1 maximum 32GB AV OUT Socket x 1 Headphone Socket x 1 Power Adapter Power Supply Power Consumption AC 100 240V 50...

Page 32: ...he mains immediately Withdraw the mains plug and consult your dealer Safety Warnings Ventilation To prevent the risk of electric shock or fire hazard due to overheating ensure that curtains and other...

Page 33: ...ll risk severely damaging the disc and the unit Do not stack devices heat from other devices may affect the performance of the unit CAUTION RISK OF ELECTRIC SHOCK DO NOT OPEN The lightning flash with...

Page 34: ...ed by trademarks DSG Retail Ltd Maylands Avenue Hemel Hempstead Herts HP2 7TG England This symbol on the product or in the instructions means that your electrical and electronic equipment should be di...

Page 35: ...L7SLIDE11_IB_110322 indd 35 23 03 2011 2 11 PM...

Page 36: ...L7SLIDE11_IB_110322 indd 36 23 03 2011 2 11 PM...

Reviews: