background image

Portable DVD Player

Instruction Manual

L9PDVD10 

L9PDVD10_IB_110225.indd   1

2/25/11   6:30 PM

Summary of Contents for L9PDVD10

Page 1: ...Portable DVD Player Instruction Manual L9PDVD10 L9PDVD10_IB_110225 indd 1 2 25 11 6 30 PM...

Page 2: ...ting a Coaxial Audio Receiver 9 Using Earphones 9 Compatible Disc Types 10 Supported Formats 10 Region Code 10 Turning On the DVD Player 11 Basic Playback 11 Playing a Disc 11 Using the Disc Menu 11 P...

Page 3: ...on 15 TITLE 15 Using a USB Flash Drive or and SD MMC MS Card 16 General Operation 16 Customising the General Settings 17 Customising the Audio Settings 18 Customising the Video Settings 19 Customising...

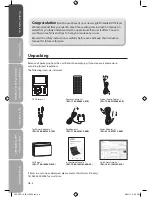
Page 4: ...g or damaged please contact Partmaster UK only Tel 0844 800 3456 for assistance Unpacking Remove all packaging from the unit Retain the packaging If you dispose it please do so according to local regu...

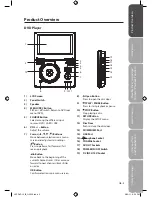
Page 5: ...fast reverse playback Button Move back to the beginning of the current chapter tracks titles or move forward to next chapters tracks titles on a disc OK Button Confirm selections on a menu screen 8 O...

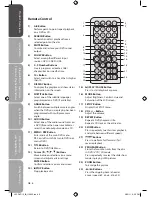
Page 6: ...available or select the audio output mode on a CD 11 MENU PBC Button Enter and exit the main DVD menu PBC on off switch Return to DVD root menu DVD 12 TITLE Button Return to DVD Title Menu 13 Cursor B...

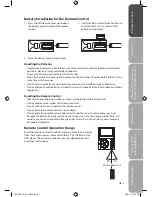
Page 7: ...types of batteries Do not dispose of used batteries as domestic waste Dispose of them in accordance with local regulations Handling the Remote Control Take care of your fingernails when you press and...

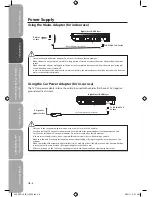
Page 8: ...er when not in use Not for use in 24V vehicles Use the provided 12V car power adapter only Use with other car power adapters could damage the unit Only use the included 12V car power adapter Do not us...

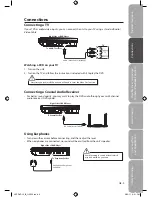
Page 9: ...he unit 2 Turn on the TV and follow the instructions included with it to play the DVD Connecting a Coaxial Audio Receiver For better sound quality you may want to play the DVD audio through your multi...

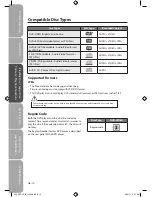
Page 10: ...les AUDIO VIDEO JPEG AUDIO CD Compact Disc Digital Audio AUDIO Supported Formats JPEG The file extensions has to be jpg and not jpeg Pictures encoding must comply with JPEG ISO format This DVD player...

Page 11: ...cket or the battery is fully charged Switch the ON OFF button to ON to turn your DVD player on 2 Open and adjust the screen angle 3 Press the button on the front panel to open the disc tray Put the di...

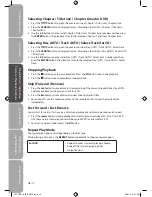
Page 12: ...the selected Disc GOTO Track GOTO Select track Stopping Playback 1 Press the button once to pause playback Press the button to continue playback 2 Press the button twice to completely stop playback Sk...

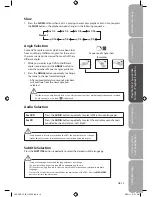
Page 13: ...c is playing to enter slow playback Each time you press the SLOW buttons the playback speed changes in the following sequence 1 2 1 16 1 8 1 4 1 4 1 8 1 16 1 2 Normal Angle Selection Some DVDs contain...

Page 14: ...ayback During playback press the DISPLAY button to display the available disc information on operation status Programmable Memory For DVD CD Press the PROGRAM button to display the PROGRAM MENU Press...

Page 15: ...e or shrink the picture 2 Press the buttons to move through the zoomed picture Adjusting the LCD Screen You can adjust the Brightness Contrast and Colour of the LCD screen 1 Press the MODE button 2 Pr...

Page 16: ...layer Right Side SD MMC MS USB COAXIAL AV OUT ON OFF DC IN 0 12V SD MMC MS USB COAXIAL AV OUT ON OFF DC IN 0 12V DVD Player Right Side SD MMC MS USB COAXIAL AV OUT ON OFF DC IN 0 12V 2 Press the SOURC...

Page 17: ...t your TV screen 4 3 LETTERBOX If you have a normal TV In this case a wide picture with black bands on the upper and lower portions of the TV screen will be displayed 16 9 Wide screen display WIDE SQU...

Page 18: ...Player LT RT Select this option if your DVD player is connected to a Dolby decoder STEREO Select this option to change channel output to stereo which delivers sound from only the two front speakers D...

Page 19: ...RPNESS Set the sharpness level of video output BRIGHTNESS Set the brightness level of video output CONTRAST Set the contrast level of video output HUE Set the hue value of the video SATURATION Set the...

Page 20: ...entering the 4 digit password you have set in PASSWORD setup before you can access the PASSWORD SETUP PAGE If you change the control level you must input password Initial password 1369 In case you for...

Page 21: ...o OFF change parental level will not activate a password check Password A 4 digit password will be required to play a prohibited disc If the disc is locked and the system prompts you to enter the pass...

Page 22: ...you cannot wipe off the dust with a soft cloth wipe the disc lightly with a slightly moistened soft cloth and finish with a dry cloth Do not use any type of solvent such as thinner benzine commerciall...

Page 23: ...Shut it off for 30 minutes to allow it to cool down The volume control is located on the side of the unit please try adjusting this No picture The region number of the disc doesn t match the region n...

Page 24: ...ignal System NTSC PAL Frequency Response 20Hz to 20 kHz 1dB Signal to Noise Ratio More than 80 dB ANALOG OUT connectors only Dynamic Range More than 85 dB DVD CD Battery Parameters Battery Specificati...

Page 25: ...pping or splashing No objects filled with liquids such as vases should be placed on the unit If you spill any liquid into the unit it can cause serious damage Switch it off at the mains immediately Wi...

Page 26: ...empty Always remove the disc when the unit is not in use Failure to do so will risk severely damaging the disc and the unit Do not stack devices heat from other devices may affect the performance of t...

Page 27: ...L9PDVD10_IB_110225 indd 27 2 25 11 6 31 PM...

Page 28: ...15 00R Main Adapter 5313 079515 04R Car Bag 1704 10600D 01R P N 1600 126H52 05R V2 DSG Retail Ltd Maylands Avenue Hemel Hempstead Herts HP2 7TG England This symbol on the product or in the instruction...

Reviews: