background image

INSTALLATION

6

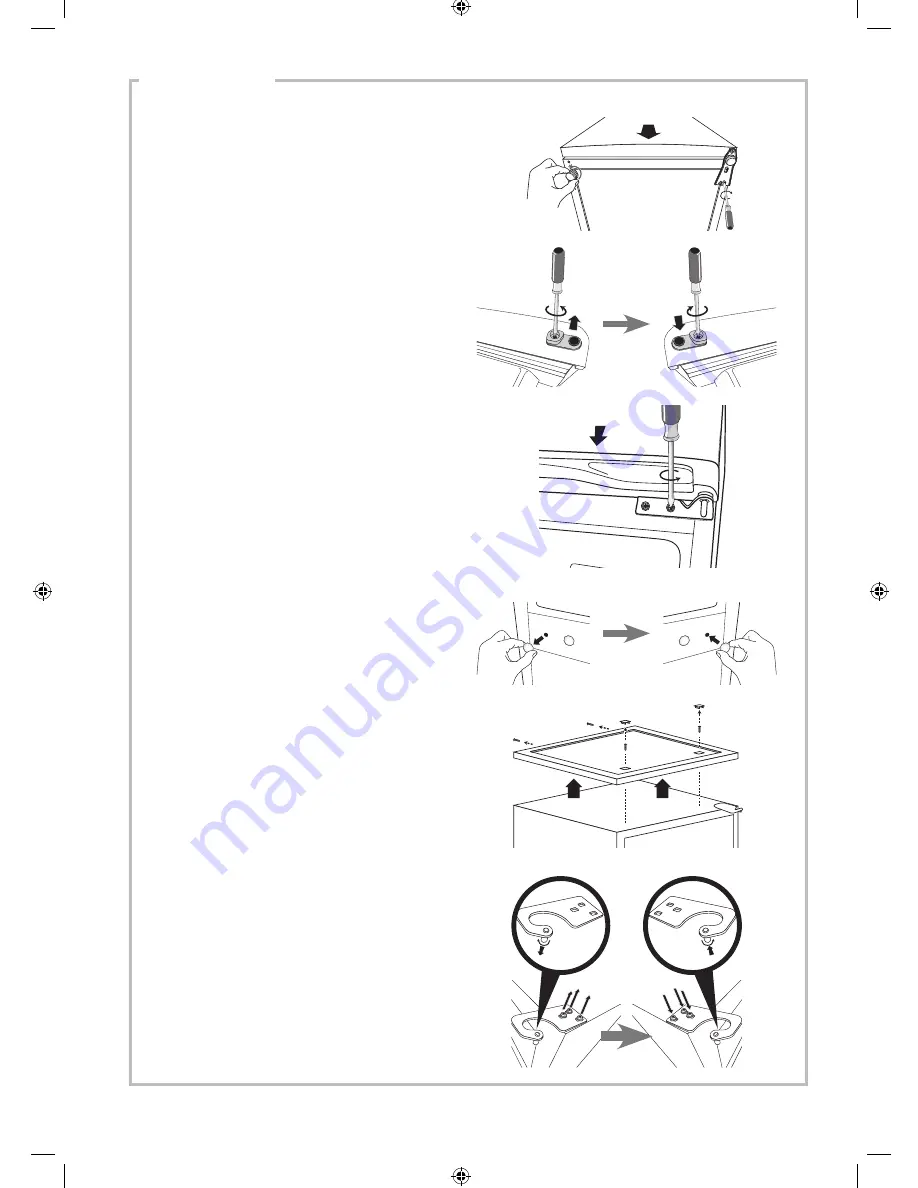
unscrew

2.  Remove the hinge bracket by removing 

the screw. Remove the adjustable feet 

from both sides. Lift the fridge door and 

move it away.

4.  Take off the middle hinge by removing 

the screws. Take off the freezer door.

5.  Remove the screw cover and place to the 

opposite side.

6.  Remove the top lid.

7.  Remove the top hinge and refit onto the 

opposite side.

3.  Remove the hinge cover on the fridge 

door by removing the screw. Refit to the 

opposite side and tighten the screw.

LUC50W11_IB_110324.indd   6

3/24/11   5:53 PM

Summary of Contents for LUC50S11

Page 1: ...Undercounter Fridge Freezer Instruction Manual LUC50S11 LUC50W11_IB_110324 indd 1 3 24 11 5 53 PM ...

Page 2: ...LUC50W11_IB_110324 indd 2 3 24 11 5 53 PM ...

Page 3: ... 11 Shopping for Chilled Foods 11 Tips for Keeping Food Perfect in the Unit 11 Shopping for Frozen Foods 11 Preparations for Freezing 12 Defrosting Frozen Food 12 Cleaning 13 Defrosting 13 Cleaning the Interior and the Exterior of the Unit 13 Cleaning Tips 13 Maintenance 14 Changing the Internal Light 14 Care When Handling Moving the Unit 14 Servicing 14 Switching Off for Long Periods of Time 14 D...

Page 4: ...erational features it offers Read all the safety instructions carefully before use and keep this instruction manual for future reference Unpacking Remove all packaging from the unit Retain the packaging If you dispose of it please do so according to local regulations The following items are included If items are missing or damaged please contact Partmaster UK only Tel 0844 800 3456 for assistance ...

Page 5: ...Swing Tools required Philips style screwdriver Flat bladed screwdriver Hexagonal spanner If you want to have the door swing reversed we recommend that you contact a qualified technician You should only try to reverse the door yourself if you believe that you are qualified to do so All parts removed must be saved to do the reinstallation of the door You should rest the unit on something solid so th...

Page 6: ... off the middle hinge by removing the screws Take off the freezer door 5 Remove the screw cover and place to the opposite side 6 Remove the top lid 7 Remove the top hinge and refit onto the opposite side 3 Remove the hinge cover on the fridge door by removing the screw Refit to the opposite side and tighten the screw LUC50W11_IB_110324 indd 6 3 24 11 5 53 PM ...

Page 7: ...nge cover on the freezer door by removing the screw Refit to the opposite side and tighten the screw Ensure the freezer door is aligned horizontally and vertically so that the seals are closed on all sides before finally tightening the hinge Ensure the fridge door is aligned horizontally and vertically so that the seals are closed on all sides Double check that the doors are aligned correctly and ...

Page 8: ...bin Clean the exterior of the unit with a damp cloth If you require more information refer to the Cleaning section Before Using Your Unit Before placing any food in your unit turn it on and wait for 24 hours to make sure it is working properly and to allow it time to fall to the correct temperature Your unit should not be overfilled Before Plugging in YOU MUST Check that you have a socket which is...

Page 9: ...uct Overview Lower Glass Shelf Salad Bin Thermostat Control Dial Glass Shelf Top Cover Levelling Feet Freezer Door Shelf Freezer Door Fridge Door Fridge Door Shelves LUC50W11_IB_110324 indd 9 3 24 11 5 53 PM ...
Page 10: ...a particularly hot or a particularly cold room or if you open the doors often 4 To ensure that the unit is cool enough to sufficiently chill and freeze your food wait 24 hours before filling it with food 5 If you are concerned that your unit is not being kept cold enough and wish to check the temperature you will need a special fridge freezer thermometer These are available from most supermarkets ...

Page 11: ...to circulate inside the compartments Ensure all parts of the unit are kept cool To prevent transfer of flavours and drying out pack or cover the food separately Fruit and vegetables do not need to be wrapped Always let pre cooked food cool down before you put in the unit This will help to maintain the internal temperature of the unit To prevent cold air escaping from the unit try to limit the numb...

Page 12: ...ridge freezer tapes labels and pens with different colours This allows you to easily organise and to effectively use the freezer Write the contents and date otherwise the frozen food might exceed the storage time and this could cause food poisoning Please refer to your food packaging for the recommended storage time You may also add the weight and cooking notes e g defrost first cook from frozen a...

Page 13: ... is complete clean your unit s interior and exterior Cleaning the Interior and the Exterior of the Unit Remove all the shelves and salad bin before cleaning To remove the salad bin first remove the lower fridge door shelf Wipe the inside of the unit with a weak solution of bicarbonate soda and then rinse with warm water using a wrung out sponge or cloth Wipe completely dry before replacing the she...

Page 14: ...pair the unit yourself Repairs carried out by inexperienced persons may cause injury or serious malfunction Contact a qualified technician Switching Off for Long Periods of Time When the unit is not in use for a long period of time disconnect it from the mains supply empty all food and clean the unit leaving the door ajar to prevent unpleasant smells Disposal Old units still have some residual val...

Page 15: ... 24L 21L 3L Defrosting Type Manual Defrost Storage Temperature 2 star section 12 C 4 star section 18 C Fridge 0 8 C average 4 C Energy Consumption 0 58kWh 24h Energy Grading A Temperature Rise 10hrs Freezing Capacity 2kg 24h Rated Voltage 230V Rated Current 0 7A Features and specifications are subject to change without prior notice LUC50W11_IB_110324 indd 15 3 24 11 5 53 PM ...

Page 16: ...hould be supervised to ensure that they do not play with the unit Do not damage the refrigerant circuit applicable only for appliances with refrigeration circuits which are accessible to the user The unit must be maneuvered by a minimum of 2 persons This unit is not intended for use by persons including children with reduced sensory or mental capabilities or lack of experience and knowledge unless...

Page 17: ... in an organised way If food is not stored in an organised way searching for an item will mean the door is open for longer Allow hot food and drinks to cool down before placing them in the unit Placing hot food in the unit will cause the compressor to run for a long time as the unit will have to work harder to lower the temperature Store food covered or packaged The evaporation or condensation of ...

Page 18: ...nt should be disposed at the end of its life separately from your household waste There are separate collection systems for recycling in the EU For more information please contact the local authority or your retailer where you purchased the product Visit Partmaster co uk today for the easiest way to buy electrical spares and accessories With over 1 million spares and accessories available we can d...

Page 19: ...LUC50W11_IB_110324 indd 19 3 24 11 5 53 PM ...

Page 20: ...LUC50W11_IB_110324 indd 20 3 24 11 5 53 PM ...

Reviews: