background image

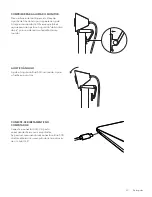
COMPRESS TO FIT MONITOR

Move the mounting arm towards the back 

of your screen so that it fits the width of 

the


monitor  Please note that you may need 

to


adjust the angle of the “foot hinge” to fit 

your monitor's shape 

ADJUST THE ANGLE

Adjust the angle of the Brio 300 by tilting 

it


forwards or backwards 

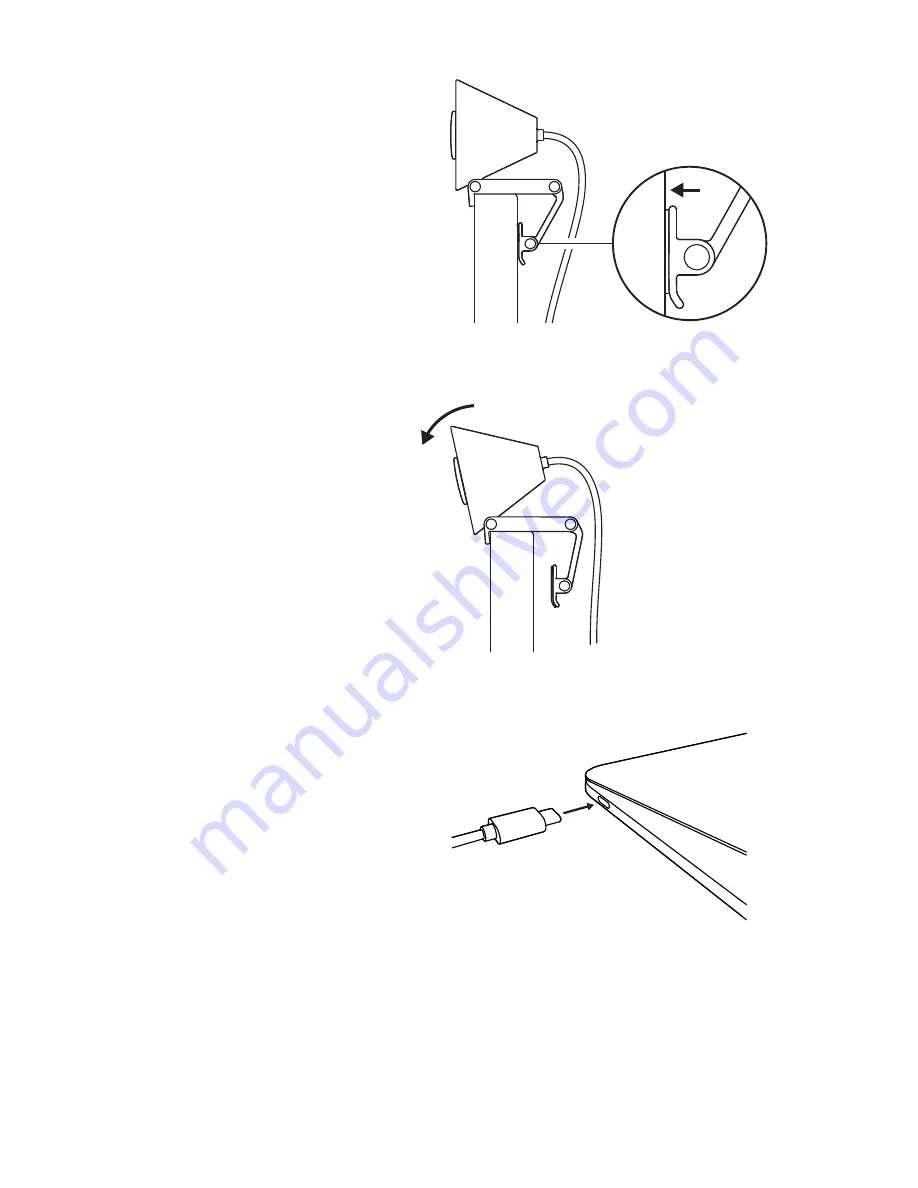
PLUG DIRECTLY INTO COMPUTER

Plug the attached 

USB-C

 connector into 

the corresponding port on your computer  

If


possible, we recommend plugging 

the


Brio


300 directly into your computer 

and


not through a USB hub 

5  English

Summary of Contents for BRIO 300

Page 1: ...BRIO 300 Setup Guide Guide d installation ...

Page 2: ...CONTENTS English 3 Français 8 Español 13 Português 18 ...

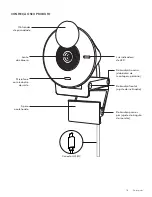
Page 3: ... PRODUCT Led indicator light Front hinge tilt adjustment Foot hinge monitor angle adjustment Rear hinge primary mounting hinge Privacy shutter Camera lens Noise reducing mic Padded foot USB C connector 3 English ...

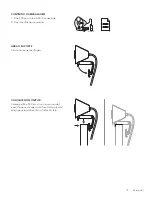
Page 4: ...with attached USB C cable 2 User documentation OPEN THE MOUNT Open the mounting arm PLACE ON MONITOR Place the Brio 300 on top of your monitor and ensure that the front tab of the mount is snug against the front of your screen 4 English ...

Page 5: ... the angle of the foot hinge to fit your monitor s shape ADJUST THE ANGLE Adjust the angle of the Brio 300 by tilting it forwards or backwards PLUG DIRECTLY INTO COMPUTER Plug the attached USB C connector into the corresponding port on your computer If possible we recommend plugging the Brio 300 directly into your computer and not through a USB hub 5 English ...

Page 6: ...bcam performance with periodic software and firmware updates It is recommended to update your webcam and take advantage of the great features of Brio 300 To do so download Logi Tune from www logitech com tune Logi Tune Webcam Height x Width x Depth 2 58 in 65 63 mm x 2 09 in 53 1 mm x 1 78 in 45 mm incl mount clip Product weight 2 63 oz 74 6 g incl mount clip cable Attached Cable length 1 5 m 5 ft...

Page 7: ... S A and or its affiliates in the U S and other countries USB C and all other trademarks are the property of their respective owners Logitech assumes no responsibility for any errors that may appear in this manual Information contained herein is subject to change without notice www logitech com support Brio300 ...

Page 8: ...neux Charnière avant réglage de l inclinaison Charnière de pied réglage de l angle de l écran Charnière arrière charnière de montage principale Volet de confidentialité Objectif Micro anti bruit Pied rembourré Connecteur USB C 8 Français ...

Page 9: ... C connecté 2 Documentation utilisateur OUVRIR LA FIXATION Ouvrez le bras de fixation PLACER SUR L ÉCRAN Placez la caméra Brio 300 sur votre écran et assurez vous que la languette avant de la fixation est contre le devant de votre écran 9 Français ...

Page 10: ... adapter à la forme de votre écran RÉGLER L ANGLE Ajustez l angle de la caméra Brio 300 en l inclinant en avant ou en arrière BRANCHER DIRECTEMENT SUR L ORDINATEUR Branchez le connecteur USB C fourni dans le port correspondant de votre ordinateur Si possible nous vous recommandons de brancher la caméra Brio 300 directement à votre ordinateur et non via un hub USB 10 Français ...

Page 11: ...es mises à jour régulières du logiciel et du micrologiciel Il est recommandé de mettre à jour votre webcam pour profiter des fonctionnalités exceptionnelles de Brio 300 En savoir plus sur Logi Tune et le télécharger sur www logitech com tune Logi Tune Webcam Hauteur x largeur x profondeur 65 63 mm 2 58 pouces x 53 1 mm 2 09 pouces x 45 mm 1 78 pouce clip de fixation inclus Poids du produit 74 6 g ...

Page 12: ...Unis et dans d autres pays USB C et toutes les autres marques sont la propriété exclusive de leurs détenteurs respectifs Logitech décline toute responsabilité en cas d erreurs susceptibles de s être glissées dans le présent manuel Les informations énoncées dans ce document peuvent faire l objet de modifications sans préavis www logitech com support Brio300 ...

Page 13: ...ED Bisagra frontal ajuste de inclinación Bisagra de pie ajuste del ángulo del monitor Bisagra trasera bisagra de montaje principal Tapa de privacidad Lente de cámara Micrófono con reducción de ruido Pie acolchado Conector USB C 13 Español ...

Page 14: ... 2 Documentación del usuario ABRE EL SOPORTE Abre el brazo del soporte COLOCA LA CÁMARA SOBRE EL MONITOR Coloca la Brio 300 sobre el monitor y asegúrate de que la pestaña frontal del soporte esté bien ajustada contra la parte frontal de la pantalla 14 Español ...

Page 15: ...gulo de la bisagra del pie según la forma del monitor AJUSTA EL ÁNGULO Ajusta el ángulo de la Brio 300 inclinándola hacia adelante o hacia atrás CONEXIÓN DIRECTA A LA COMPUTADORA Inserta el conector USB C adjunto en el puerto correspondiente de la computadora Si es posible recomendamos conectar la Brio 300 directamente a la computadora no a través de un hub USB 15 Español ...

Page 16: ... actualizaciones periódicas de software y firmware Se recomienda actualizar la cámara web para aprovechar las fantásticas funciones de la Brio 300 Para ello descarga Logi Tune desde www logitech com tune Logi Tune Cámara Web Altura x Anchura x Profundidad 65 63 mm 2 58 in x 53 1 mm 2 09 in x 45 mm 1 78 in con clip de montaje Peso del producto 74 6 g 2 63 oz con clip de montaje y cable Longitud del...

Page 17: ...en Estados Unidos y otros países USB C y todas las demás marcas comerciales pertenecen a sus respectivos propietarios Logitech no asume ninguna responsabilidad por la presencia de posibles errores en el presente manual La información aquí contenida está sujeta a posibles cambios sin previo aviso www logitech com support Brio300 ...

Page 18: ...diça frontal ajuste de inclinação Dobradiça para os pés ajuste do ângulo do monitor Dobradiça traseira dobradiça de montagem primária Obturador de privacidade Lente da câmera Microfone com redução de ruído Apoio acolchoado Conector USB C 18 Português ...

Page 19: ...o USB C conectado 2 Documentação do usuário ABRA O SUPORTE Abra o braço de montagem COLOQUE NO MONITOR Coloque o Brio 300 em cima do seu monitor e certifique se de que a aba frontal do suporte esteja posicionada contra a frente da tela 19 Português ...

Page 20: ...ustar o ângulo da dobradiça do pé para se adequar ao formato do seu monitor AJUSTE O ÂNGULO Ajuste o ângulo da Brio 300 inclinando a para a frente ou para trás CONECTE SE DIRETAMENTE NO COMPUTADOR Conecte o conector USB C à porta correspondente em seu computador Se possível recomendamos conectar o Brio 300 diretamente em seu computador e não através de um hub USB 20 Português ...

Page 21: ...mentar o desempenho da sua webcam com atualizações periódicas de software e firmware É recomendável atualizar sua webcam e aproveitar os ótimos recursos do Brio 300 Baixe Logi Tune em www logitech com tune Logi Tune Webcam Altura x largura x profundidade 65 63 mm x 53 1 mm x 45 mm incluindo clipe de montagem Peso do produto 74 6 g incluindo o clipe de instalação e o cabo Comprimento do cabo conect...

Page 22: ...as filiais nos EUA e em outros países USB C e todas as outras marcas registradas são propriedades de seus respectivos proprietários A Logitech não se responsabiliza por quaisquer erros possíveis neste manual As informações aqui contidas estão sujeitas a alterações sem prévio aviso WEB 621 002255 002 www logitech com support Brio300 ...

Reviews: