background image

Frequently Asked Questions 

  +

Cosmetic / Broken Button


Due to the portability of our mobility products, we understand they are at greater risk of cosmetic 
damage over the course of the warranty. There are situations in which this damage is 
covered:            


Letters are worn on keycaps 


Loose or fully broken keycaps 


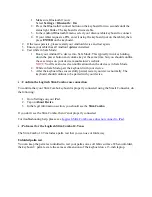
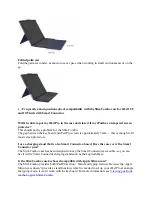
Clips that secure tablet in place no longer safely hold the tablet 


Kickstand no longer supports the tablet 

Should you find that you have any of these issues, we request that you provide a photo of the 
damage and a description of what the issue is (ex. letter keycaps A, G, and H are missing) in a 
warranty request. 
 

Best practices to avoid cosmetic damage


DO 


Keep all parts and connectors clean and free of debris at all times  


Make sure the keyboard is protected from falls as this can result in damage to the keys 


Make sure there are no objects between your device and the keyboard when closing the 
screen 


If your keyboard is detachable, re-attach the keyboard to the case and make sure it’s 
closed. This will help to protect the keys and device’s screen.  

DO NOT 


Place the keyboard into storage while not attached to the case (if your keyboard is 
removable). Storing the keyboard without the case makes it more prone to damage. 


Spill food, drinks, or any other liquids onto the keyboard.  


Pick the keys off the keyboard. They are difficult to replace and may result in the need to 
replace the entire keyboard.  


  +

Some or all keys do not work


If you are experiencing an issue with some or all of the keys not working when the 
case/keyboard is properly attached to your case, follow the instructions below for your mobile 
operating system:  


iOS


Summary of Contents for Slim Combo 12.9

Page 1: ...all times Make sure the keyboard is protected from falls as this can result in damage to the keys Make sure there are no objects between your device and the keyboard when closing the screen If your ke...

Page 2: ...nnector on the iPad and top of the keyboard is clean and free of debris 2 Verify that the iPad is in the case properly to allow the SmartConnector to align with the connector on the keyboard 3 Place t...

Page 3: ...fication when the device is in Safe Mode 2 While in Safe Mode pair the keyboard with your device 3 After the keyboard has successfully paired restart your device normally The keyboard should continue...

Page 4: ...h to fit most screen protectors I use a charging stand that is also Smart Connector based Does the case cover the Smart Connector pins The Slim Combo case has been designed to keep the Smart Connector...

Page 5: ...e the backlighting press the Backlighting Level Down key Language switch key on Logitech Slim Combo keyboards The language switch shortcut key is on the bottom left of your keyboard Viewing positions...

Page 6: ...r side 4 Fold the palm rest under the keyboard optional Viewing mode 1 Open the kickstand and adjust it to the desired angle 20 70 degrees 2 Place the holder on the desk in landscape layout as shown F...

Page 7: ...flat against the iPad No it doesn t If you don t need the keyboard you can simply detach and store it elsewhere There are still three available modes you can use with your iPad Pro Reading mode Viewi...

Page 8: ...cklighting afterwards using the backlighting shortcut keys on the top row of keys Is there an indicator light when Caps lock is enabled No Connect and pair the Logitech Slim Combo keyboard to an iPad...

Page 9: ...n your iPad is updated to the latest version 2 Disconnect the keyboard and then attempt to reconnect it to your iPad See Connect and pair the Logitech Slim Combo keyboard to an iPad for more informati...

Page 10: ...r pins on the keyboard with the three connector ports on the side of the iPad NOTE Make sure your iOS is up to date and always stays up to date this is important for Smart Connector which transfers bo...

Page 11: ...To remove your iPad remove the iPad from the holder by bending one of the two corners of the case on the side where the Smart Connector is shown in Step 3 above...

Reviews: