background image

5

PK1500


STACK CUTTER

SAFETY INSTRUCTIONS


During operation

:

Do not start cutting until the steps in the section 
”Preparations” on page 26 have been carried out. 

Never start the stack cutter if the guide bar is not in 
its top position and covered by the fixed bar guard.

Never stick hands or tools under any guards or in the 
cutting path of the guide bar.

Always stand with your face shielded by the 
protective screen. When end trimming, the chain 
can throw blocks of wood in the operator’s 
direction.

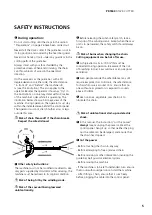
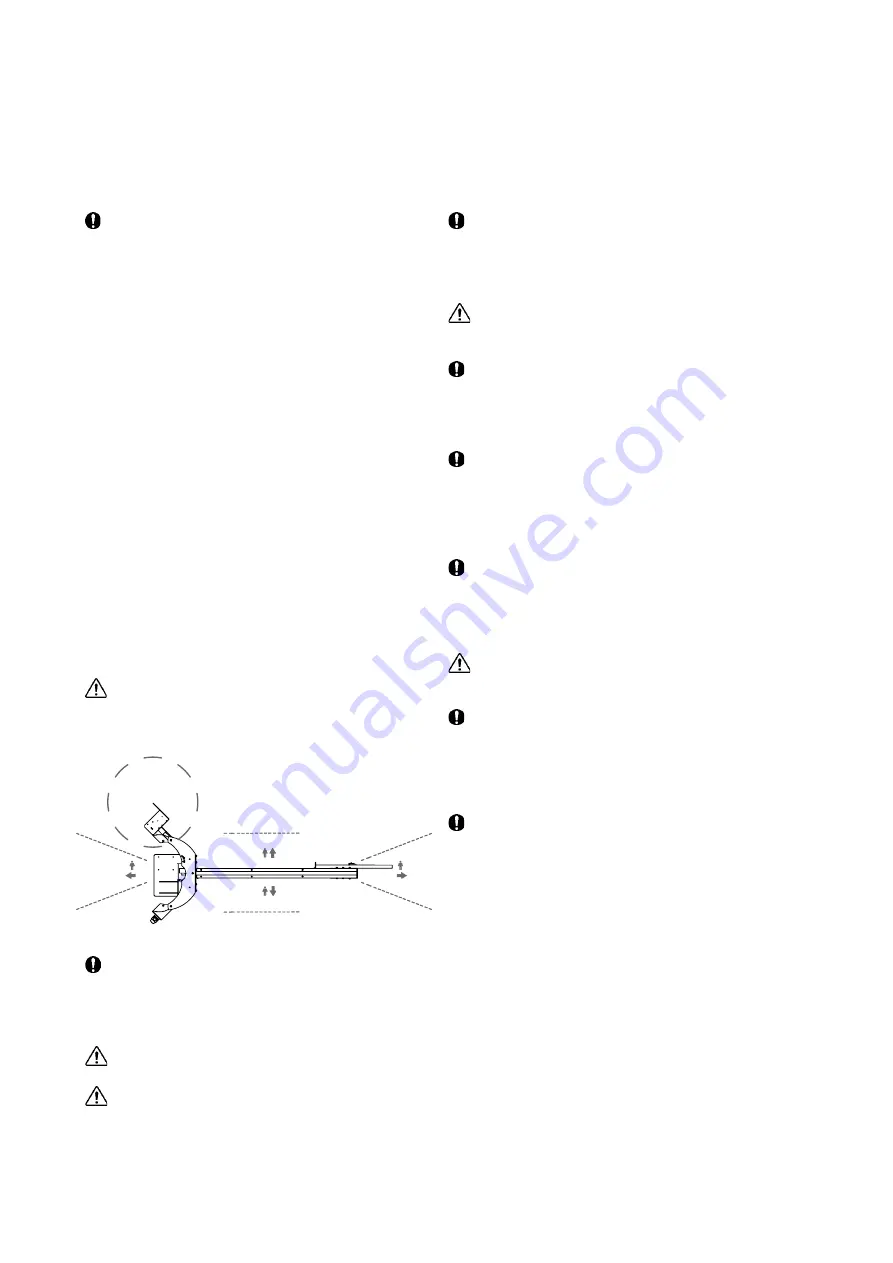
On the same axis as the guide bar, with a 20 
degree deviation to either side, the safe distance 
“in front of” and “behind” the machine is 8 
m (see the illustration). This also applies to the 
operator. Besides the operator (shown as “Op” in 
the illustration), no one may stand within 4 metres 
of the machine’s sides while it is operating. The 
illustration below shows a bird’s-eye view of the 
machine. During operation, the operator must stay 
within the indicated area behind the control panel. 
The operator must not stretch his/her arms or legs 
outside this area.


Risk of chain throw-off if the chain breaks. 

Respect the safe distance!

 Before releasing the winch safety catch, take a 

firm grip of the winding crank. Except when the saw 
unit is to be lowered, the safety catch should always 
be on.


Risk of burns when changing the chain. 

Cutting equipment can be hot after use.

 A chip extractor (min. 700 m

3

/h) must be 

connected during operation. Be aware of the risk 
of breathing in dust. Saw outdoors or ensure good 
ventilation.

 Even people outside the safe distance may still 

require ear protectors. Outdoors, the safe distance 
for harmful noise is around 15 m. Ensure that no 
one without ear protectors is exposed to sounds 
above 70 dB(A).

 Use non-toxic, vegetable, saw chain oil to 

lubricate the chain.


Risk of unintentional start-up and electric 

shock.

 In this manual, the instruction ”cut the power” 

always 

means unplug the power cable at the 

control panel, hang it up so that neither the plug 
nor the cable can be damaged, and ensure that 
the chain has stopped.

 Cut the power

- Before touching the chain in any way.

- Before attempting to free a jammed chain.

- Before servicing or other intervention involving the 
guide bar, belt guard or electrical system.

- Before moving the machine.

- If the machine is to be left unattended. Also ensure 
that no unauthorised person can start the machine.

- After fitting a chain, ensure that it runs freely 
before plugging the cable into the control panel.

 Other safety instructions:

The machine must not be modified or added to. Use 
only parts supplied by LOGOSOL. After servicing, the 
machine must be restored to its original condition.


Risk of being hit by the winding crank.

 Risk of the saw unit being lowered 

unintentionally.

4M

4M

Operator

8M

8M

Summary of Contents for 0458-395-0603

Page 1: ...BRUKSANVISNING Ref no 0458 395 0603 LOGOSOL STACK CUTTER PK 1500 EN...

Page 2: ...d that you have demonstrated your confidence in us by purchasing this product and we will do our utmost to meet your expectations Logosol has been manufacturing products since 1989 In that time we hav...

Page 3: ...ments 23 Preparations 26 Control panel 27 Stack cutting 28 End trimming 29 Setting the cut length 30 Changing cutting equipment 31 Troubleshooting cutting equipment 32 Sharpening the chain 33 Maintena...

Page 4: ...erated in the dark or where visibility is poor Make sure there are other persons within earshot who you can summon if you need help Always wear personal protective equipment Appropriate clothing is a...

Page 5: ...be on Risk of burns when changing the chain Cutting equipment can be hot after use A chip extractor min 700 m3 h must be connected during operation Be aware of the risk of breathing in dust Saw outdo...

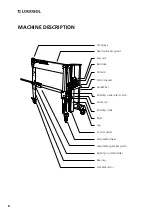
Page 6: ...wheel Winding crank Adjustable guide bar guard Control panel Guide rail Winding crank safety catch Lockable castor Handle bar Rear leg Leg Saw unit Belt drive Fixed guide bar guard Oil tank Lifting ey...

Page 7: ...en moving the machine pay particular attention to ensuring that the control panel does not hit any obstacles When the machine is being moved he winding crank safety catch must always be on The Stack C...

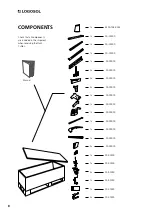
Page 8: ...000 00 00000 00 00000 00 00000 00 00000 00 00000 00 00000 00 00000 00 00000 00 00000 00 00000 00 00000 00 00000 00 00000 1x 2x 2x 1x 1x 1x 1x 1x 1x 3x 1x 1x 2x 1x 2x 1x 1x 1x 1x 2x 1x Check that all c...

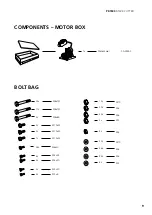
Page 9: ...Motor kmpl 00 00000 1x BOLT BAG COMPONENTS MOTOR BOX M6x20 M5x20 28x 2x M8x120 M6x120 17x 24x M10x25 M10x35 M8x35 M8x20 M5x8 M10x30 7x 2x 8x 4x 4x 3x M10 M6 M8 M5 M8 M10 M6 M8 M5 15x 45x 20x 2x 4x 32...

Page 10: ...n of the fasteners Definition of fasteners The size of a fastener is written as a diameter measurement M ISO 68 1 For bolts this is followed by a length measurement The length of the bolt is measured...

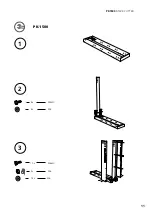
Page 11: ...11 PK1500 STACK CUTTER 1 2 M8x20 8 x 3 M6x20 10 x M6 4 x M8 8 x M6 14 x PK 1500...

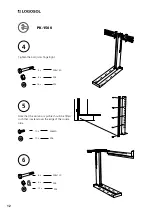
Page 12: ...20 M8x120 M8x120 10 x 8 x 6 x M8 M8 8 x 6 x Tighten the bolt joints fingertight Note that the aluminium profile should be fitted such that it extend over the edge of the square tube M8 M6 M8 16x 10 x...

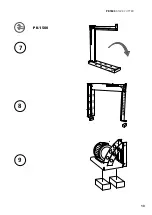
Page 13: ...13 PK1500 STACK CUTTER 7 8 9 PK 1500...

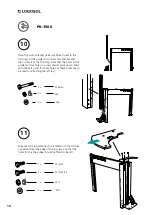
Page 14: ...ront leg Note that the holes in the guide rail four holes in a row should point down Wait with the bolt joints for these holes as these holes are to be used for attaching the left leg Note that the to...

Page 15: ...15 PK1500 STACK CUTTER 12 M10x25 4 x 13 M6x120 8 x M10 M10 M6 2 x 4 x 8 x M10 M10 M6 2 x 4 x 16 x PK 1500...

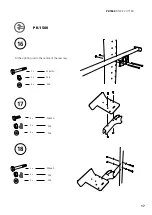
Page 16: ...16 14 M10x25 M10x30 2 x 4 x M10 M10 2 x 2 x 15 M10 M10 4 x 2 x PK 1500...

Page 17: ...17 PK1500 STACK CUTTER 16 17 M8 M8 M8 2 x 2 x 2 x Fit the sighting rod to the centre of the rear leg M8x120 2 x M8x20 2 x 18 M8x60 2 x M8 M8 M8 4 x 4 x 4 x PK 1500...

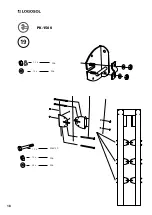
Page 18: ...18 19 M6x120 12 x M6 M6 M6 M6 12 x 12 x 24 x 12 x PK 1500...

Page 19: ...TACK CUTTER 20 21 2 x 2 x Fit the line pulleys and the line holders in the holes in the top plate then thread the lifting line as in the illustration M8 M5 M8 M5 M6 2 x 4 x 2 x 4 x 2 x M8x20 M5x8 2 x...

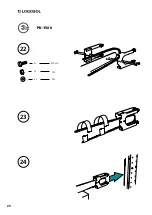
Page 20: ...20 22 23 24 M5 2x M5x20 2x M5 4x PK 1500...

Page 21: ...21 PK1500 STACK CUTTER 26 25 M10 2x M6x20 2x M6 2x Attach suitable bar nose guard M10 2x PK 1500...

Page 22: ...22 27 28 M6x20 M6x20 2 x 2 x M6 M6 2 x 4 x M6 2 x PK 1500...

Page 23: ...23 PK1500 STACK CUTTER Go through all the adjustment steps to ensure proper operation of the machine Good job...

Page 24: ...t leg Check that both legs of the frame are vertical using a spirit level Check that the inside of the frame is perpendicular If that is not the case use spacers between the moun ting plate and the fr...

Page 25: ...guide bar vertically using the adjusting bolts on the underside of the motor Tighten the chain using the tensioning bolt on the bar mount To be able to tighten the chain you have to loosen the top pla...

Page 26: ...a measuring stick that has a scale and an adjustable stop plate To prepare a stack for cutting first mark out the approximate position of all the cuts Do not forget A D C E E C B B F F to take the ke...

Page 27: ...urn the disc F that holds two of the pins Risk of electric shock Only qualified electricians are authorised to open access the electrical system The plug does not need to be opened to switch the phase...

Page 28: ...eing hit by wood debris thrown backwards in the direction of the chain Always stand with your face shielded by the protective screen Refer to the section The control panel Take a firm grip of the wind...

Page 29: ...a way that you can measure close to the centre of the stack 6 Push the sighting rod close to the stack 7 Make sure that the plastic sight pegs are close to horizontal position 8 Tighten the sighting r...

Page 30: ...ate to the desired length At the top and the bottom of both sides of the stack set the stop plate against the cut surface and mark the end of the rod Once one of the stack ends has been trimmed the cu...

Page 31: ...e it is short Chains stretch with use and are then easier to fit Remove the chip duct 1 Lay the chain around the guide bar and secure it with tape so that it does not hang below the bar 2 During fitti...

Page 32: ...e e g by a metal object in the wood The chain will still cut but will pull to one side 3 The chain has been filed incorrectly The cutters on one side have been filed down less than those on the other...

Page 33: ...e chain will rapidly overheat It is still possible to cut under these conditions but the equipment wears very quickly When filing a dull chain there is a clear risk of not reaching the chromium layer...

Page 34: ...ning has already been delayed too long Cutting with a dull chain puts great stress on the cutting equipment Consequently always file before the chain becomes dull File comfortably You can get good res...

Page 35: ...the boards from warping or bending The higher you pile the boards the better pressure there is on the lower boards Place roofing of plastic metal sheeting or masonite over the top to provide protecti...

Page 36: ...24 2 Hex bolt M6S 933 M8x20 Fzb 9007 319 1820 25 4 Round washer Brb 125A 8 4 Fzb 9291 021 0180 26 4 Hex nut M6M 934 M8 Fzb 9210 260 1100 27 2 Hex bolt M6S 931 M8x60 Fzb 28 1 Support 1025 incl fastene...

Page 37: ...37 PK1500 STACK CUTTER New Spacers between rear leg 1 and angle profile 2 for guide bars shorter than 150 mm 1 2...

Page 38: ...70 M8x15 73 4 Hex bolt M6S 931 M8x120 FZB 9007 319 1880 74 8 Round washer Brb 125A 8 4 Fzb 9291 021 0180 75 1 Hex nut M6M 934 M8 Fzb 9210 260 1100 76 1 Sighting rod Pk 03 v2 8510 001 0085 77 1 Sight p...

Page 39: ...39 PK1500 STACK CUTTER Line threading...

Page 40: ...8 319 1949 6 10 Washer Brb 6 4 9291 021 0140 7 10 Square nut M4M M6 9222 068 0900 8 4 Hex bolt M10x45 9007 320 1045 9 4 Hex nut M10 9210 260 1350 10 1 Sheave 9999 000 6448 11 1 Spacer sleeve 10 6 10 R...

Page 41: ...41 PK1500 STACK CUTTER...

Page 42: ...180 8 1 Cmpl cover plate Pk 06 8510 001 0040 9 2 Locking nut 985 M10 Fzb 9214 320 1305 10 1 Electrical connector 9999 000 6075 11 1 Check nut Skindicht SM 13 5 9009 060 0005 12 1 Enlarger Skindicht ME...

Page 43: ...06 v2 8510 001 0040 2 1 Oil pump 9999 000 6020 3 1 Transparent oil hose 9999 000 6036 4 1 Nipple 9999 000 6018 5 1 Guide bar upper washer Pk 10 v3 pos 2 8510 001 0236 6 1 Allen bolt MC6S M5x12 9045 3...

Page 44: ...15 40 700 3001 1 9999 000 6025 7 1 Ball headed thrust bolt DIN 916 M 8 x 10 9210 260 1100 8 1 Ball bearing 9999 000 6067 9 1 Retaining ring RS009 6799 Fzb 9999 000 6041 10 1 Chain sprocket 3 8 8 1207...

Page 45: ...ion SKU 1 1 Bar nose guide Pk 08 1 8510 001 0125 2 2 Threaded sleeve Pop nut M6 UFO 65 3 2 Hex bolt M6S 933 M6x35 9007 346 1380 4 6 Round washer Brb 125A 6 4 9291 021 0140 5 4 Spacer sleeve 8 6 10 888...

Page 46: ...al system Connect the machine and check that the motor is running in the right direction If this is not the case pull the plug out of the machine Switch the phases in the plug by using a large flat sc...

Page 47: ...m Stack Cutter 120 Width 1100 mm Height 1900 mm Weight 135 kg Cutting dimensions Max stack width 1100 mm Stack Cutter 120 Theoretical max width approx 1150 mm Max stack height 1350 mm Recommended heig...

Page 48: ...wing harmonized standards EN ISO 12100 2010 EN 60204 1 2006 EN 50370 1 2 Notified body 0404 RISE SMP Swedish Machinery Testing Institute AB Box 7035 750 07 Uppsala Sweden has executed EC type examinat...

Page 49: ...Fiskaregatan 2 S 871 33 H rn sand SWEDEN Phone 46 611 18285 info logosol com www logosol com...

Reviews: