background image

9

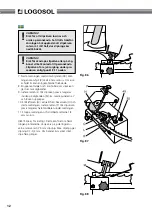
Fig. 79

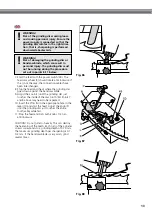
Fig. 80

Fig. 81

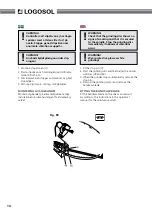
Fig. 82

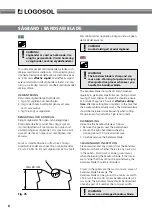
Efter skärpningen ska sågbandet skränkas enligt 
föregående instruktion.

Ju mera noggrant skärpningen utförs, desto bättre 
löper sågbandet jämnt och linjärt i stocken vid såg-
ning. 
 

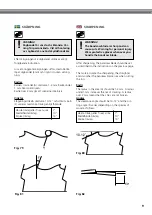
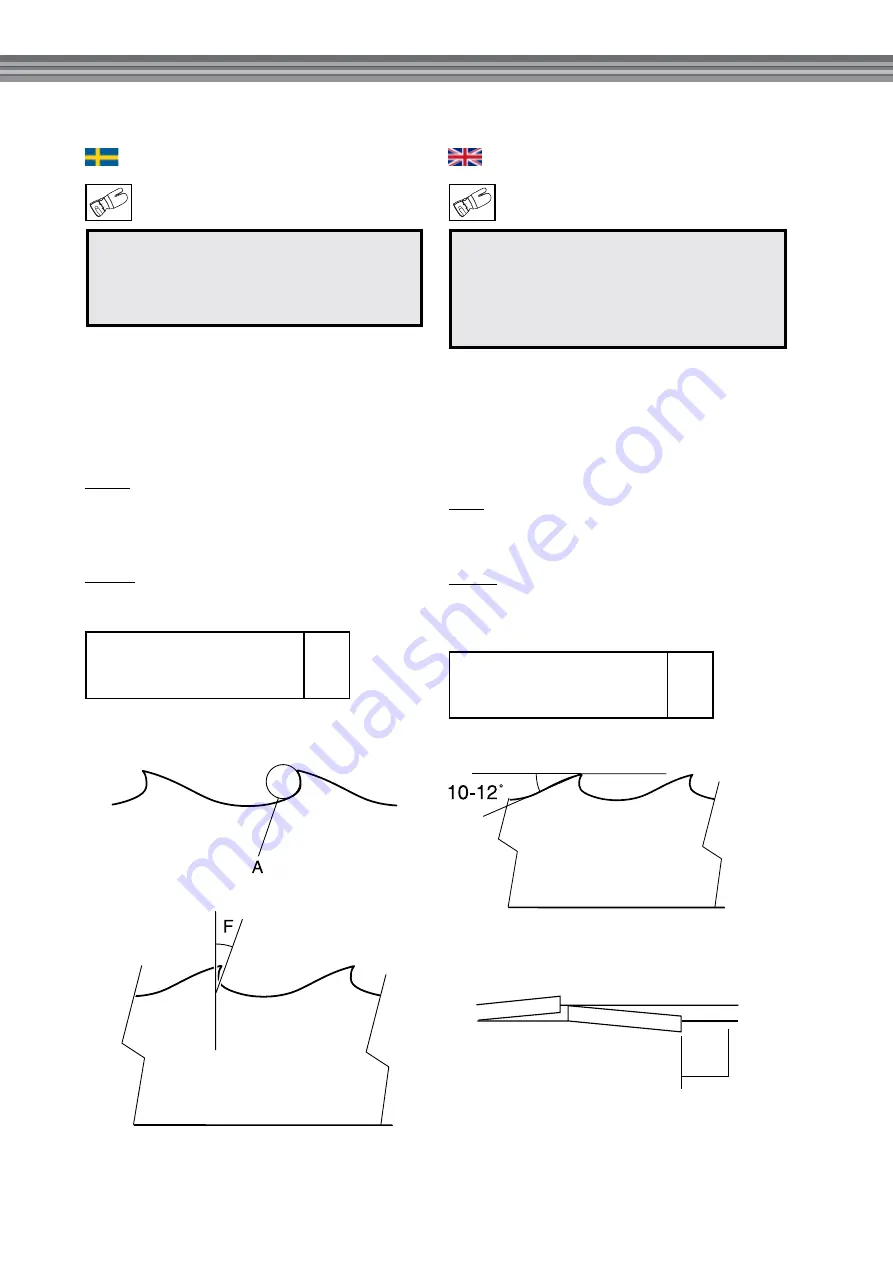
radier

Radien i området (A) skall vara 1-3 mm. Radie under 
1 mm ökar sprickrisken.
Radie över 3 mm gör att spånerna inte bryts. 
 

Vinklar

Släppningsvinkeln skall vara 10-12° och stötvin- keln 
(F) varierar med olika träslag enligt följande:

        skärpnIng

Varning!
Sågbandet är vasst och skärande. Var-
ning för personskada. Vid all hantering 
av sågbandet, använd skyddshandskar.

!

Hårda träslag eller fruset virke 
Medelhårda träslag 
Mjuka träslag

7° 
10° 
14°

After sharpening, the bandsaw blade should be set 
as described in the instructions on the previous page.

The more accurate the sharpening, the straighter 
and smoother the bandsaw blade runs when cutting 
the log. 
 

radii

The radius in the area (A) should be 1-3 mm. A radius 
under 1 mm increases the risk of cracking. A radius 
over 3 mm means that the chips are not broken. 

angles

The clearance angle should be 10-12° and the cut-
ting angle (F) varies depending on the species of 
wood as follows:

        sharpenIng

warning!
The bandsaw blade is sharp and can 
cause cuts. warning for personal injury. 
wear protective gloves whenever you 
handle the bandsaw blade.

!

Hårda träslag eller fruset virke 
Medelhårda träslag 
Mjuka träslag

7° 
10° 
14°

90°

Summary of Contents for GRINDLUX 4000

Page 1: ...ly and make sure you understand its contents before you use the machine Denna bruksanvisning innehåller viktiga säkerhetsinstruktioner This user manual contains important safety instructions Varning Felaktigt användande kan leda till allvarliga personskador eller dödsfall för operatören el ler andra warning Incorrect use can result in serious or fatal injuries to the operator or others grindlux 40...

Page 2: ...2 ...

Page 3: ... 15 Tekniska data 16 Mallar för formning av slipskiva 17 Detaljförteckning och sprängskisser 18 Table of contents Introduction 4 Key to symbols 5 Safety regulations 5 Overview 6 Description 7 Bandsaw blade 8 Setting up and sharpening 11 Changing the grinding dissc 15 Technical data 16 Templates for dressing the grinding disc 17 List of components exploded views 18 ...

Page 4: ...petshärdade sågtänder Tanddel ningen skall vara 25 mm och sågbandets bredd 32 mm This operator s manual describes in detail how the bandsaw blade grinder is used and maintained and how servicing is to be carried out It also describes the measures to be taken for maximum safety and how the safety features are designed and function as well as how they are inspected maintained and repaired if necessa...

Page 5: ...av slipapparaten Gnistor från slipskivan eller elanslutningen kan antända Sågbandet är vasst och skärande Varning för personskada Vid all hantering av sågbandet använd skyddshandskar Slipskivan får ej vara igång under inställning av slipapparaten Om slipskivan roterar åt fel håll kan den lossna och orsaka personskada Kontrollera att slipskivan ej har några sprickor samt att den sitter fast på axel...

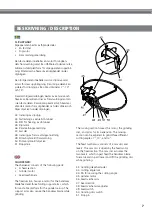
Page 6: ...atningsanordning 49 Strömbrytare till frammatning 50 Strömbrytare till slipskiva 51 Stoppinne sharpener The sharpener consists of the following parts A fixed section Grinder motor Feed mechanism The fixed section houses a motor for the bandsaw blade feed and three folding support arms which form a stable platform for the grinder set up The support arms also secure the bandsaw blade while grinding ...

Page 7: ...mal performance During normal sawing of most species of wood this should be done at intervals of approx 2 hours of effective cutting time Effective cutting time only refers to the time that the bandsaw blade actually works The bandsaw blade should be sharpened more frequently when cutting those species of wood with a high sand content Dismantling Dismantle the bandsaw blade as follows 1 Remove the...

Page 8: ...lag eller fruset virke Medelhårda träslag Mjuka träslag 7 10 14 After sharpening the bandsaw blade should be set as described in the instructions on the previous page The more accurate the sharpening the straighter and smoother the bandsaw blade runs when cutting the log Radii The radius in the area A should be 1 3 mm A radius under 1 mm increases the risk of cracking A radius over 3 mm means that...

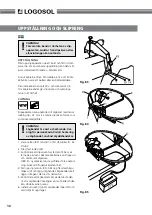
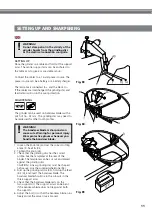
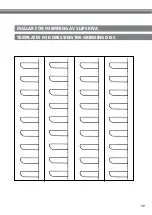
Page 9: ...lutningen kan antända Fig 83 Fig 84 Fig 85 uppställning och slipning VARNING Sågbandet är vasst och skärande Var ning för personskada Vid all hantering av sågbandet använd skyddshandskar 1 Lossa ratten 43 och ställ in rätt stötvinkel F Se FIG 83 2 Drag fast ratten 43 3 Kontrollera att slipskivan har rätt profil Se mal larna på pärmens baksida Mallarna kan klippas ur och sättas mot slipskivan OBS E...

Page 10: ...nite WARNING The bandsaw blade is sharp and can cause cuts Warning for personal injury Wear protective gloves whenever you handle the bandsaw blade 1 Loosen the knob 43 and set the correct cutting angle F See FIG 83 2 Tighten the knob 43 3 Check that the grinding disc has the correct profile See the templates at the rear of the binder The templates can be cut out and placed against the grinding di...

Page 11: ... precis tangerar hela tanddalen under matningen 11 Stoppa matningen och vrid båda rattarna 1 2 varv moturs OBS Slipa ej för kraftigt Detta kan förstöra härd ningen på tänderna Varje varv på justeringsskru varna motsvarar 0 75 mm slipdjup Max slipdjup per slipning 0 1 0 2 mm Om bandet är mycket slitet slipa flera gånger VARNING Risk för att slipskivan lossnar och orsaka personskada Se till attström...

Page 12: ...tooth valley while fed 11 Stop the feed and turn both knobs 1 2 turn anticlockwise CAUTION Do not grind to heavily This can destroy the hardening of the teeth Each turn of the adjuster screws corresponds to a grinding depth of 0 75 mm The maximum grinding depth per sharpening is 0 1 0 2 mm If the bandsaw blade is very worn grind several times WARNING Risk of the grinding disc coming loose and caus...

Page 13: ...mala vibrationer uppstår VARNING Använd skyddsglasögon under slip ningen 1 Fit the stop pin Q 2 Start the grinding disc and feed using the power switches 49 and 50 3 When the grinder stops automatically remove the stop pin 4 Fold up the grinding motor and remove the bandsaw blade fitting the bandsaw blade Fit the bandsaw blade on the one man sawmill according to the instructions in the operator s ...

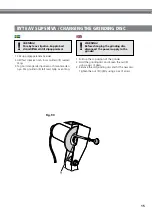
Page 14: ...h montera den nya Drag muttern R lätt med hjälp av en tång WARNING Before changing the grinding disc disconnect the power supply to the grinder 1 Fold up the top section of the grinder 2 Hold the grinding disc and loosen the nut R using a pair of pliers 3 Remove the old grinding disc and fit the new disc Tighten the nut R lightly using a pair of pliers Fig 90 Byte av slipskiva changing the grindin...

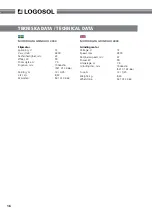
Page 15: ...ekt W 90 Strömstyrka A 7 5 Slipskiva mm 150x6x16 531 01 32 66 Säkring A 12 0 25 Vikt kg 8 24 Skärpsten 531 01 32 63 Motor data Grindlux 4000 Grinding motor Voltage V 12 Speed rpm 2800 Peripheral speed m s 22 Power W 90 Amperage A 7 5 Grinding disc mm 150x6x16 531 01 32 66 Fuse A 12 0 25 Weight kg 8 24 Whetstone 531 01 32 63 ...

Page 16: ...17 Mallar för formning av slipskiva templates for dressing the grinding disc ...

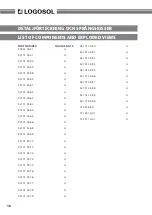
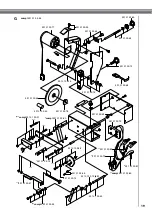
Page 17: ... G 531 01 32 69 G 531 01 32 70 G 531 01 32 73 G 531 01 32 74 G 531 01 32 74 G 531 01 32 75 G 531 01 32 76 G 531 01 32 76 G 531 01 32 77 G 531 01 32 78 G 531 01 32 79 G detaljförteckning och sprängskisser list of components and exploded views 531 01 32 80 G 531 01 32 81 G 531 01 32 82 G 531 01 32 84 H 531 01 32 85 H 531 01 32 86 H 531 01 32 87 H 531 01 32 88 H 531 01 32 89 H 531 01 94 86 G 725 23 6...

Page 18: ... 32 78 531 01 32 66 531 01 32 63 531 01 32 55 531 01 32 69 531 01 32 76 531 01 32 79 531 01 32 81 531 01 32 82 compl 531 01 32 80 compl 531 01 32 51 compl 531 01 32 60 compl 531 01 32 54 531 01 32 61 531 01 32 62 531 01 32 62 531 01 32 58 531 01 32 58 531 01 32 74 531 01 32 75 x2 531 01 32 73 531 01 32 74 G ...

Page 19: ...20 compl 531 01 32 84 531 01 32 87 x14 503 23 00 31 x16 725 23 68 51 x3 731 23 14 01 x8 732 21 14 01 x2 531 01 32 88 x4 531 01 32 89 531 01 32 85 531 01 32 86 H ...

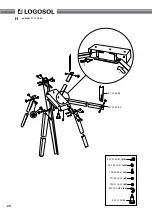
Page 20: ...ammatning 50 Strömbrytare till slipskiva 51 Stoppinne 52 Skärpsten 53 Säkringar till bandslip 54 Stativ översiktsbild overview Bandsaw Blade sharpener 42 Grinding depth adjuster 43 Cutting angle lock 44 Pin for securing the cutting angle 45 Grinder motor 46 Feed mechanism 47 Fixed section 48 Feed position adjuster 49 Feed switch 50 Grinding disc switch 51 Stop pin 52 Whetstone 53 Bandsaw blade sha...

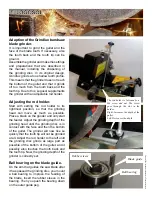
Page 21: ... the feeder Adjust the grinding depth of the grinding head until the grinding disc is in contact with the face and then the bottom of the gullet The grinder will now rise so quickly that the tooth tip will not be grinded at all Adjust the rod holder to the left until the grinding disc grinds as large part as possible of the bottom of the gullet and it possibly also touches the tooth back and the t...

Page 22: ...Logosol Sverige Fiskaregatan 2 S 871 33 Härnösand Phone 46 0 611 18285 Fax 46 0 611 18289 info logosol se www logosol se ...

Reviews: