17
about 8km/h.
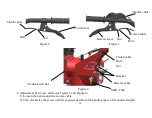
3. Shift to “reverse” position
1) Left hand releases the clutch handle to let clutch disengage.
2) Right hand puts the shift lever to “neutral” position, take care to ensure it does reach “neutral” position,
then slowly tighten your grip on the reverse shift handle.
3) Slowly tighten your grip on clutch handle to let the clutch engage, then mini tiller will run backward
(note: don’t release the reverse shift handle).
4) When you don’t need to run backward, just let your left hand release the clutch handle, and let your
right hand release reverse shift handle.
4. If you want to shift gear during running, reduce accelerator valve opening first but don’t let engine stall,
then disengage the clutch, and shift gear when the mini tiller has stopped running.
5. If you want to change running direction of the mini tiller, just push the handrails leftward or rightward.
Note: don’t grip the handle when changing running direction, or the gear might be damaged.
6. Stopping
1) Release the clutch handle to keep the clutch disengaged.
2) Put the shift lever in the neutral position, push the accelerator valve regulator lever clockwise to the
“minimum” position, then the mini tiller will stop running.
3) When you want to stop the engine, follow the relevant information in the engine’s manual (note:
normally the mini tiller can be stopped on a level ground).
vi. Connection and operation of attached parts
1. When you want to start rotary tilling, detach the wheel and put the hexagon bush of the rotary tilling
device over the two ends of the output shaft of the running mechanism. Note: rotary tilling blades are arranged
into left blade set and right blade set; installation of them shall ensure that when the mini tiller is running
forward, the edges of the blades work first. After installing the rotary tilling blades, you must install the fender
to prevent personal injury by the blades. Depth of rotary tilling can be adjusted by adjusting height of the
damping lever.

