background image

SPECIFICATIONS


 - 

25 

-

11. SPECIFICATIONS 


The power rating of the engine indicated in this document is the net power output 
tested on a production engine for the engine model and measured in accordance with   
SAE J1349 at 3,600rmp (Net Power). Mass production engines may vary change from 
this value. 
Actual power output for the engine installed in the final machine will vary depending on 
numerous factors, including operating speed of engine in application, environmental 
conditions, maintenance, and other variable. 


ITEM MODEL 

LC80ZB30-4.9C

LC50ZB60-4.9C 

Length (mm) 

570 

Width (mm) 

490 

Height (mm) 

550 

Dry Weight (kg) 

52.5 

55 

Dia. of suction port 

80 mm (3 in) 

50mm (2 in) 

Dia. of discharge 
port 

80 mm (3 in) 

50 mm (2 in) 

Max suction 
head(m) 

6 6 

Max.head (m) 

30 

60 

WATER  
PUMP 

Max. flux ( m

3

/hr) 60 

30 

Type LC178F 
Displacement(c) 349CC 
Nominal Power 
(kW/3600rpm) 

4.9 

Fuel tank capacity 

3.5L 

ENGINE 

Oil capacity 

1.1L 

Summary of Contents for LC50ZB60-4.9C

Page 1: ......

Page 2: ...esold No part of this publication may be reproduced transmitted distributed or stored without prior written permission This manual covers the operation and maintenance of water pump LC80ZB30 4 9C LC50...

Page 3: ...OMPONENT IDENTIFICATION 3 3 BEFORE OPERATION CHECK 5 4 USE OF DIESEL ENGINE 6 5 OPERATION 10 6 MAINTENANCE 15 7 CHARACTERISTIC CURVE OF DIESEL ENGIN 20 8 TROUBLESHOOTING OF DIESEL ENGINE 21 9 STORAGE...

Page 4: ...p sea water chemical solution or caustic liquid such as used oil To pervert fire hazards and to provide adequate ventilation keep the pump at least 1 meter away from building wall and other equipment...

Page 5: ...OMPONENT IDENTIFICATION 3 2 COMPONENT IDENTIFICATION DISCHARGE PORT FRAME PRIMING WATER FILLER CAP LC178F ENGINE FRAME ABSORBER BRACKET RUBBER BOTTOM PUMP DRAIN PLUG BRACKET SUPPORT PLATE SUCTION PORT...

Page 6: ...COMPONENT IDENTIFICATION 4 MUFFLER OIL DRAIN PLUG OIL FILLER CAP FUEL TANK CARBURATOR AIR CLEANER STARTER GRIP OIL DIPSTIC THROTTL E LEVER FUEL PUMP STOP FUEL SWITCH LIFTING LUG...

Page 7: ...d to provide adequate ventilation keep the pump at least 1 meter away from building wall and other equipment during operation Do not place flammable objects close to the pump Before preparing your ope...

Page 8: ...nuts bolts and screws are tightened 2 Check Oil Check the oil level after placing engine on a level place z Remove the oil filler cap and wipe it clean z Insert and remove the oil filler cap without...

Page 9: ...3 Check The Fuel Remove the fuel tank cap and check the fuel level Refill the tank if the fuel level is low Tighten the fuel tank cap after refilling Please use fuel according to environment and tempe...

Page 10: ...ENGINE 8 2 Start Engine 1 Recoil Starter Move to the engine switch to the ON position Pull the starter 2 3 times to make output shaft turning several times Move to the control lever to the START posi...

Page 11: ...til you feel resistance then pull briskly in the direction of the arrow as shown below Do not allow the starter grip to snap back against the engine Return it gentle to prevent damage the engine Pleas...

Page 12: ...ter chemical solution or caustic liquid such as used oil Place Water Pump Suction hose should not longer than necessary as pump performance is best when the pump is not far from above the water level...

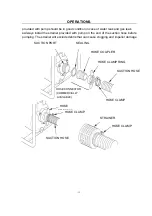
Page 13: ...rainer provided with pump on the end of the suction hose before pumping The strainer will exclude debris that can cause clogging and impeller damage STRAINER HOSE CLAMP SUCTION HOSE HOSE CLAMP RING HO...

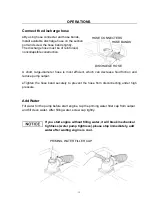
Page 14: ...riction and reduce pump output Tighten the hose band securely to prevent the hose from disconnecting under high pressure Add Water Fill water for the pump before start engine tap the priming water fil...

Page 15: ...e below conditions irregular sound or vibration of engine failing to operate smoothly abnormal exhaust gases such as constant blue white or black fumes z Don t operate the engine when ambient temperat...

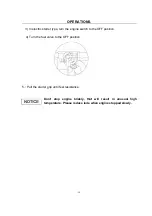
Page 16: ...n the engine switch to the OFF position 4 Turn the fuel valve to the OFF position 5 Pull the starter grip until feel resistance Don t stop engine briskly that will result in unusual high temperature P...

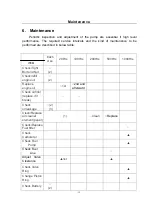
Page 17: ...ble Each Use 20Hrs 100Hrs 200Hrs 500Hrs 1000Hrs Check Tight Bolt and Nut 2 Check refill engine oil 2 Replace engine oil 1st 2nd and afterward Check oil filler replace if it break Check oil leakage 2 3...

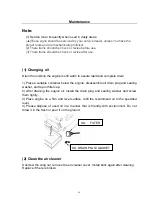
Page 18: ...a suitable container below the engine disassemble oil drain plug and sealing washer and tap oil filler cap 2 After draining the engine oil install the drain plug and sealing washer and screw them tig...

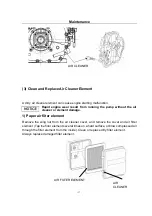
Page 19: ...cleaner or element damage 1 Paper air filter element Remove the wing nut from the air cleaner cover and remove the cover and air filter element Tap the filter element several times on a hard surface o...

Page 20: ...Waiting for more than 10min after stopping engine remove the tube clip and remove the oil pan and air filter elements Drain the stale oil from air cleaner case and wash it Dip the filter elements in...

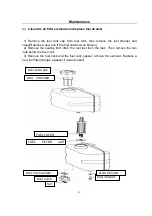
Page 21: ...f the fuel strainer was broken 2 Remove the sealing bolt drain the rest fuel from the tank Then remove the two nuts below the fuel cock 3 Remove the fuel cock and the fuel cock gasket remove the eleme...

Page 22: ...CHARACTERISTIC CURVE OF DIESEL ENGINE 20 7 CHARACTERISTIC CURVE OF DIESEL ENGINE...

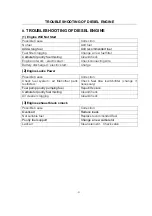
Page 23: ...re Battery discharged electric start Charge 2 Engine Lacks Power Possible Cause Correction Check fuel system air filter other parts restricted Check fuel line switch filter change if necessary Fuel pu...

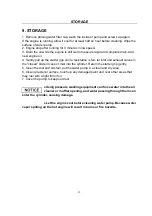
Page 24: ...let inlet and exhaust valves in the closed state in case of mist into the cylinder Return the starter grip gently 5 Clean the dist and oil stain put the water pump in a clean and dry area 6 Clean all...

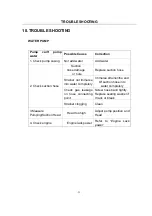
Page 25: ...rainer not immerse into water completely Immerse strainer the end Of suction hose into water completely Check gas leakage on hose connecting point Screw hose band tightly Replace sealing washer if It...

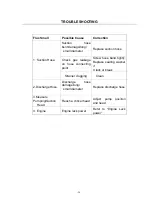
Page 26: ...ose connecting point Screw hose band tightly Replace sealing washer if It lack or break 1 Suction Hose Strainer clogging Clean 2 Discharge Hose Discharge hose damage long small diameter Replace discha...

Page 27: ...the final machine will vary depending on numerous factors including operating speed of engine in application environmental conditions maintenance and other variable ITEM MODEL LC80ZB30 4 9C LC50ZB60...

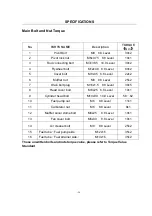
Page 28: ...l 25 2 7 Drain bolt plug M16x1 5 8 8 Level 30 5 8 Head cover bolt M6x25 8 8 Level 10 1 9 Cylinder head bolt M10x90 10 9 Level 58 62 10 Fuel pump nut M6 8 8 Level 11 1 11 Carburetor nut M6 8 8 Level 8...

Page 29: ......

Reviews: